5
Do not plug unit into the same outlet as a
refrigerator or microwave.
Avoid the use of three-prong plug adapters.
Do not cut off the grounding prong to
accommodate a two-plug outlet; that could
result in a shock hazard.
NOTE: Do not place heavy objects on top
of the cellar.
To minimize the risk of rusting, leakage, and
insulation damage, avoid placing the unit
where heavy moisture is present. Under no
circumstances apply or let water spill onto or
into the unit.
Leveling Your Wine Cellar
Your wine cellar has 4 leveling legs. After properly
placing your cellar in its final position, adjust the
legs by turning them clockwise to raise the
wine cellar or counterclockwise to lower it.
We recommend tightening the back feet to
the maximum and using the front feet to level
the cellar.
Using Your Wine Cellar
Important:
• Before connecting the wine cellar to a power
source, let it stand upright for approximately 24
hours. This will reduce the risk of any malfunc-
tion to the cooling system that might have
occurred during handling and/or transporting,
and will allow the refrigerant to flow back into the
compressor.
• When using the wine cellar for the first time,
allow at least 24 hours for the internal tempera-
ture to adjust properly. Make sure there are at
least 3 to 5 bottles in the unit.
Your cellar should now be on a flat surface that is
strong enough to support it when fully loaded.
Gently place/slide the racks into the wine cellar.
Plug the power cord into a 3-prong electrical
outlet and the unit will turn on automatically to the
default setting (50˚F).
Place bottles inside the cellar.
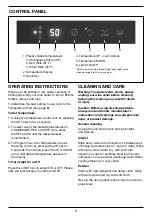
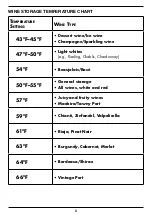
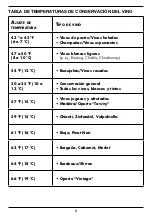
Determine the best setting to use: Refer to the
temperature guide for appropriate serving
temperatures (see page 8).
The unit’s cooling system operates most efficiently
with an ambient temperature of less than 70°F.
NOTE: Remember, if using your wine cellar for
the first time, allow at least 24 hours for
temperature to adjust properly and make sure
there are at least 3 to 5 bottles in the unit.


