Cubix HostEngine 2U User Manual Download Page 3

Cubix Corporation 

 2800 Lockheed Way 

 Carson City, NV 89706-0719 

 Page 3 

Sales 800.829.0550 


http://www.cubix.com


 [email protected] 

 host-engine-2u- x10drg-q-20150731 

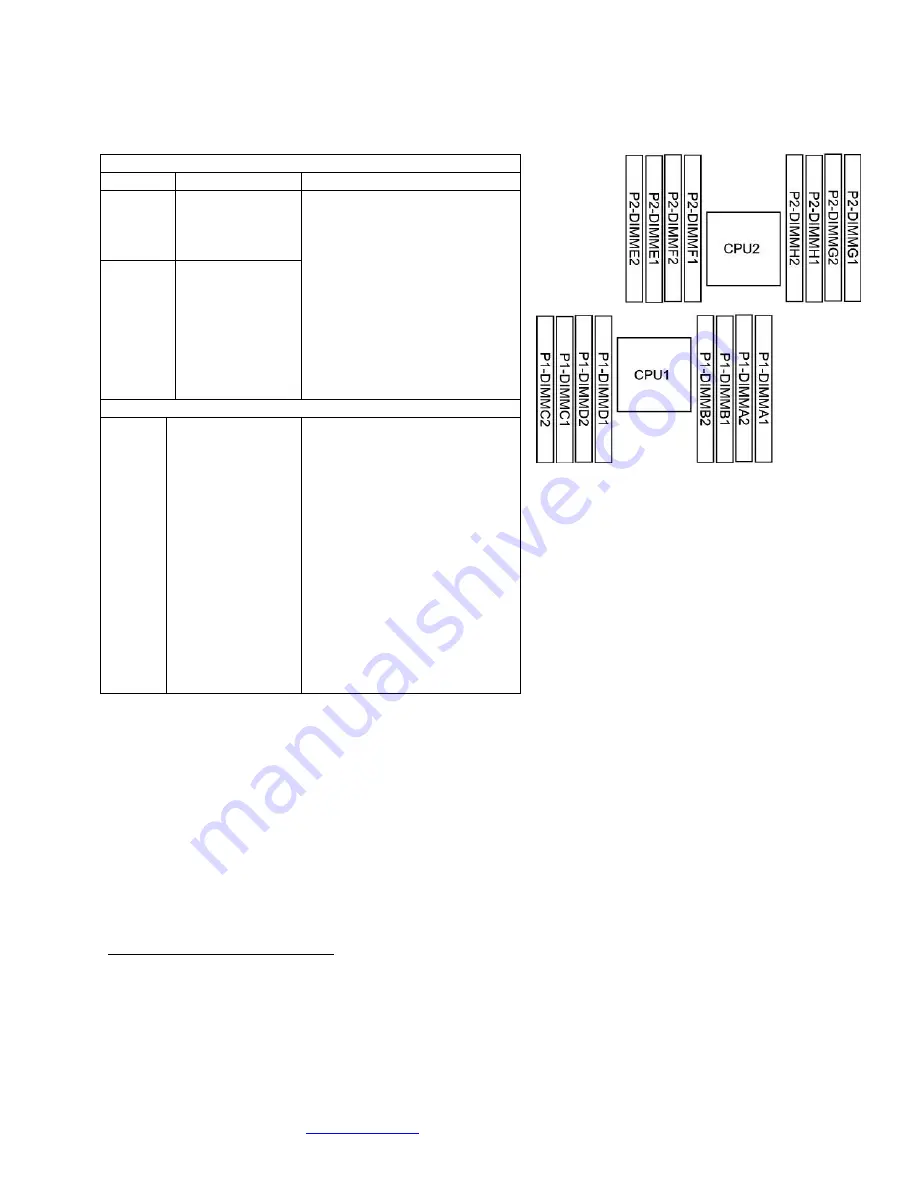
Memory Configuration


PCIe Gen 3 Slots 

When installing a HIC in HE2U, make sure you seat it in one of the PCIe Gen 3 x16 slots, which 
are numbered CPU1 Slot2, CPU1 Slot 4, CPU2 Slot 6 and CPU2 Slot 8. HE2U also supports 
one to four 2.5-inch SATA 3 solid-state drives (SSDs) to boot the operating system (OS). 
HostEngine 4U also accommodates PCIe flash / SSDs. Install PCIe flash or SSD cards in CPU1 
Slot 10 and / or CPU2 Slot 11, if available. See page 4 for details. 


Access 

HostEngine can be removed and replaced from the front once you remove power. 
Remove / Replace HostEngine 

  Power down gracefully using the OS or the front-panel on / off switch. 

  Wait for the power to shut off. 

  Disconnect power and all other cables from HostEngine. 

  Loosen the two retention screws on the HostEngine front panel. 

DIMM Configurations for CPU1 Only 

# DIMMs 

Location 

Memory Scheme 

P1-DIMMA1 
P1-DIMMB1 
P1-DIMMC1 
P1-DIMMD1 

Interleaved 

 DIMMs must be identical 

type and speed


P1-DIMMA1 
P1-DIMMB1 
P1-DIMMC1 
P1-DIMMD1 
P1-DIMMA2 
P1-DIMMB2 
P1-DIMMC2 
P1-DIMMD2 

DIMM Configurations for CPU1 and CPU2 

16 

P1-DIMMA1 
P1-DIMMB1 
P1-DIMMC1 
P1-DIMMD1 
P1-DIMMA2 
P1-DIMMB2 
P1-DIMMC2 
P1-DIMMD2 
P2-DIMME1 
P2-DIMMF1 

P2-DIMMG1 

P2-DIMMH1 
P2-DIMME2 

P2-DIMMF2 

P2-DIMMG2 

P1-DIMMH2 

Interleaved 

 DIMMs must be identical 

type and speed


Summary of Contents for HostEngine 2U

Page 1: ...ducts see the block diagram at the right By connecting HostEngine to GPU Xpander Rackmount 8 you can add eight double wide GPUs such as NVIDIA Quadro K5200 or M6000 to the HostEngine 2U computer for running Autodesk 3ds Max or Bunkspeed Shot with Mental Images iray on Microsoft Windows 7 You can also run BlackMagic Design DaVinci Resolve 9 0 for Linux or Windows on HostEngine 2U computer Connectin...

Page 2: ...net ports standard 2 x Intel RJ 45 ports Controller Dual Intel i350 network controllers Support 10BASE T 100BASE TX and 1000BASE T Ethernet port management RJ 45 port for management only Controller Aspeed 2400 BMC with dedicated IPMI Support 10BASE T 100BASE TX and 1000BASE T Serial ATA SATA 2 x SATA 3 connectors Drive Format 2 5 inch 63 5mm solid state drive SSD Transfer Rate 6 0GByte second theo...

Page 3: ...ess HostEngine can be removed and replaced from the front once you remove power Remove Replace HostEngine Power down gracefully using the OS or the front panel on off switch Wait for the power to shut off Disconnect power and all other cables from HostEngine Loosen the two retention screws on the HostEngine front panel DIMM Configurations for CPU1 Only DIMMs Location Memory Scheme 4 P1 DIMMA1 P1 D...

Page 4: ...he top once you power down HostEngine and remove the cop cover See the image below for the PCIe devices to install in each slot Power down gracefully using the OS and wait for the power to turn off Loosen the two retention screws on the HostEngine front panel Gently tug the HostEngine handles toward you Remove the screws holding the top cover and set it aside Disconnect auxiliary power cables from...

Page 5: ...nnections On the rear panel HostEngine provides four USB 2 0 ports two Gbps Ethernet ports a COM port and an IPMI 2 0 GbE port The AC power receptacle is also on the rear panel HostEngine also provides access for Cubix HICs that connect to GPU Xpander Rackmount 8 or other Xpander enclosures using external PCIe x16 cables if needed With these connections you can mount HostEngine immediately above o...

Page 6: ...t as well as screws nuts and G nuts for use in mounting HostEngine See the image at right Mount HostEngine close enough to GPU Xpander Rack Mount 8 so that the standard 2meter cables will reach Mount GPU Xpander Rack Mount 8 enclosure immediately above or immediately below HostEngine in the rack mount cabinet For this procedure use a Philips 2 screwdriver a flat blade screwdriver and a 3 8 wrench ...

Page 7: ...e rails are level you re ready to tighten the mounting screws See the image at the right 9 Tightly secure the screws holding the sliders to the front and two rear mounting brackets on each side of the cabinet 10 Extend the slide rails almost all the way out the front of the cabinet 11 Lift the HostEngine line it up carefully and slide it into place Before lifting the HostEngine into place ask for ...

Page 8: ...on City NV 89706 0719 Page 8 Sales 800 829 0550 http www cubix com sales cubix com host engine 2u x10drg q 20150731 7 Gently slide HostEngine back in place 8 Connect the AC power cord into the HostEngine rear receptacle 9 Power up HostEngine ...

Reviews: