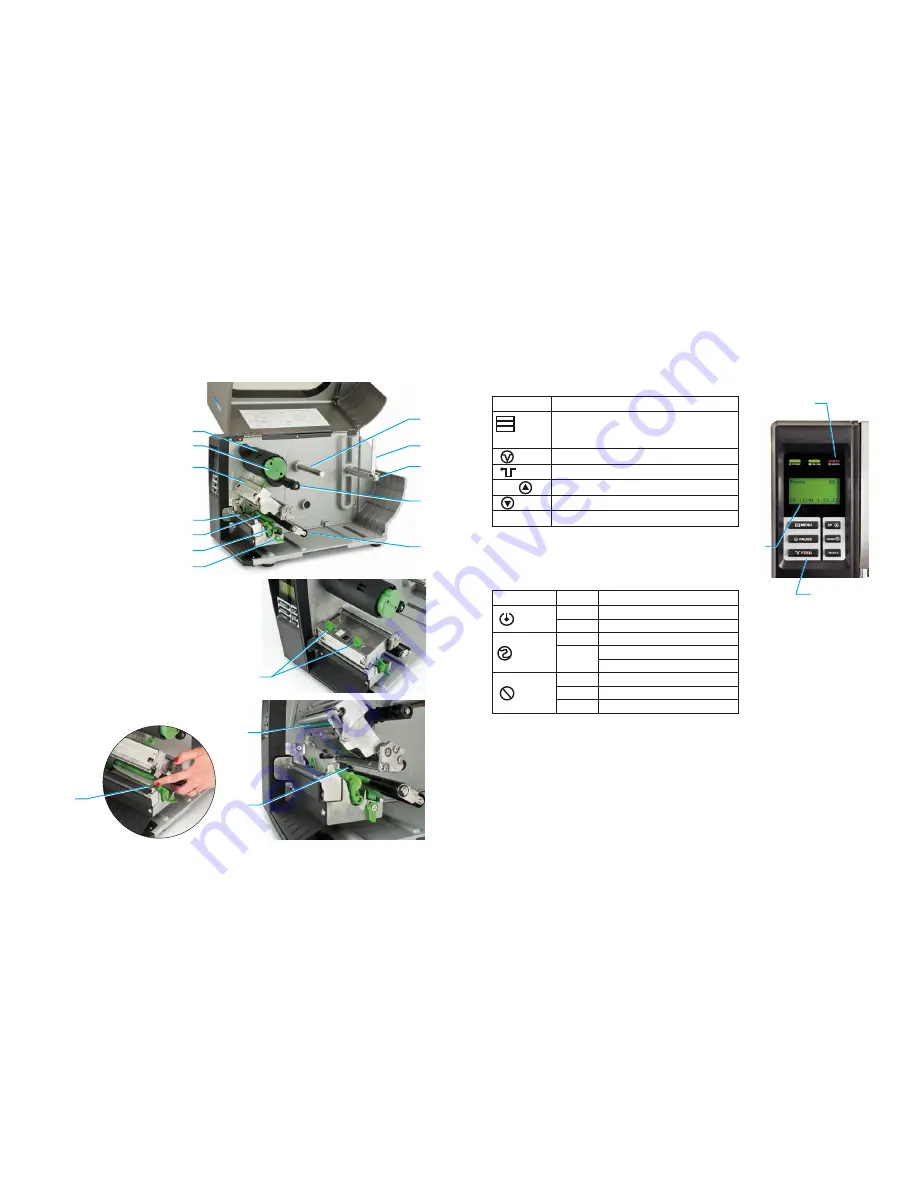
Interior View
1. Ribbon take up spindle
2. Ribbon release button
3. Ribbon guide plate
4. Platen roller
5. Media Sensor
6. Print head release lever
7. Media sensor lock
8. Media guide bar
9. Label roll guard
10. Label supply spindle
11. Ribbon supply spindle
12. Media Dampener
13. Print head pressure adjustment knobs
14. Print head
15. Ribbon sensor
16. Paper guide
Cub CB-1024i and CB-1034i
Cub CB-1024i and CB-1034i
Quick Start Installation Guide
Quick Start Installation Guide
11
12
4
5
6
7
10
3
9
2
8
1
13
15
14
16
Front Panel Display
LED Indicators
LCD
Display
Front Panel
Buttons
Setting Up The Printer
1. Place the printer on a flat, secure surface.
2. Make sure the printers power is off.
3. Plug the provided power cord into the AC power cord socket at the rear of the
printer. Plug the power cord into a properly grounded power outlet.
4.
Do not plug the printer into the PC at this time.
5. Load ribbon and labels according to the following instructions.
LED
Status
Indication
POWER
Off
The printer power is turned off
On
The printer power is turned on
ON-LINE
On
The printer is ready
Blinking
Pause
Downloading data into printer
ERROR
Off
Printer is ready
On
“Carriage Open” or “Cutter Error”
Blinking
“No Paper”, “Paper Jam” or “No Ribbon”
LED Indicators
Keys
Function
MENU
1. Enter the Menu
2. Exit from Menu or cancel a setting and return to
the previous Menu
PAUSE
Pause/ Resume the printing process
FEED
Advance on label
UP
Scroll up the menu list
DOWN
Scroll down the menu list
SELECT
Enter/ Select cursor located option
2
3


