background image

PR711FL User’s Manual 


Controls and Adjustments 

O

nce installation is complete, refer to this section for useful tips on how to use your monitor 

controls and make adjustments to match your personal preferences. The following indicators, 

controls and adjustments, including On-Screen Displays (OSD), are accessible from the front 

of your monitor:   


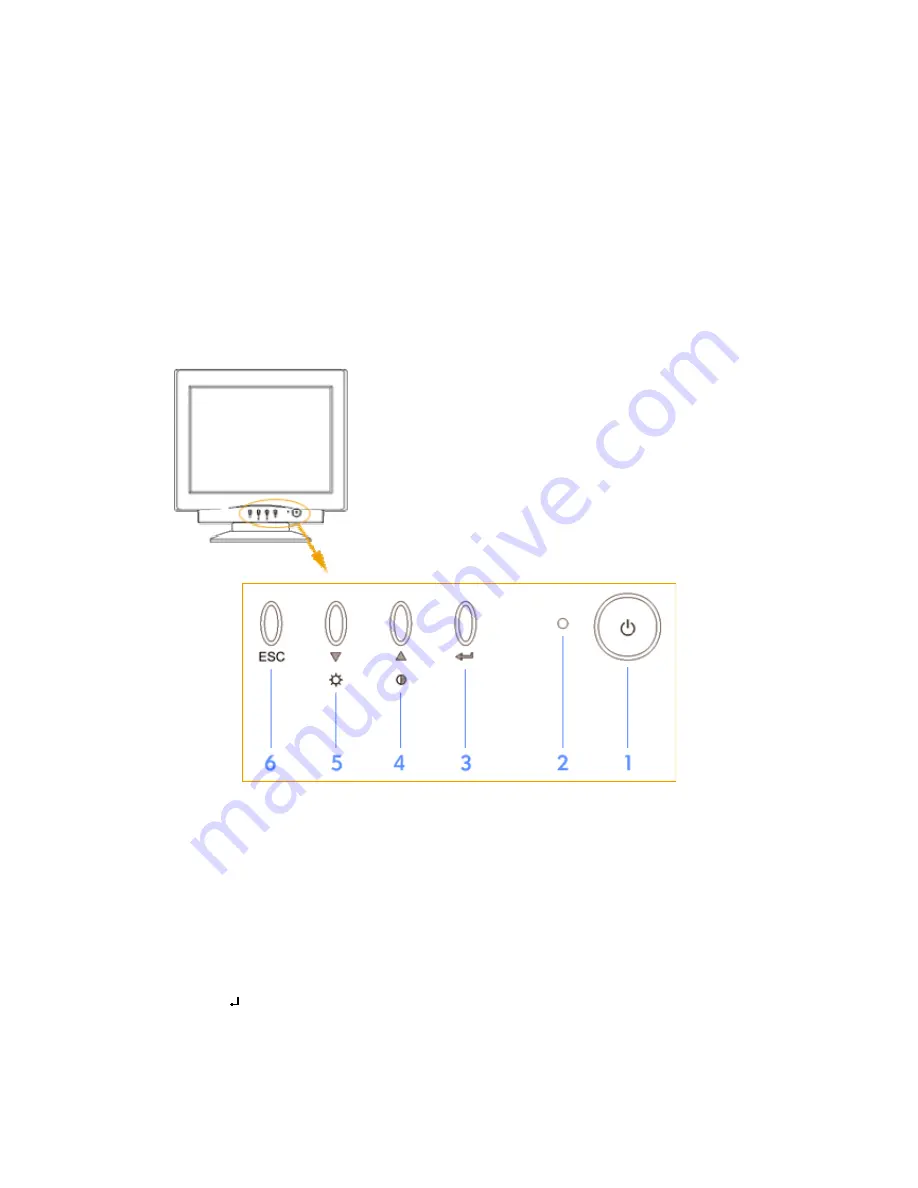
Front Panel Controls


1. Power Switch


To turn the monitor on or off.


2. Power LED Indicator


As long as the monitor is powered, this indicator is lit. In normal operation, it lights green. While 

in power saving mode, the indicator will turn to amber.


3. Enter " " button


To display the OSD manual and selected function.


Summary of Contents for Monitor PR711FL

Page 1: ...PR711FL User s Manual 1 U s e r s M a n u a l P R 7 1 1 F L ...

Page 2: ...f Contents 1 Safety Instructions 3 2 Recommendation for Optimum Performance 5 3 Introduction 6 4 Installation 7 5 Controls and Adjustments 9 6 Trouble Shooting 14 7 Energy Declaration 18 8 Specification 19 9 Reference Information 20 ...

Page 3: ...se the separation between the equipment and the receiver Connect the equipment into an outlet on a circuit different from that to which the receiver is connected Consult the dealer or an experienced radio TV technician for help Warning If a shielded type power cord is supplied with this monitor it is required in order to meet FCC emission limits and to prevent interference with nearby radio and te...

Page 4: ...re grounding type plug an important safety feature This plug will only fit into a grounding type power outlet If a grounding type power outlet is not available have one installed by a qualified electrician Do not cut off the grounding pin in order to make the plug fit into an inappropriate power outlet 7 For 230VAC operation a power cord with tandem blade plug is required Select your power cord in...

Page 5: ...itor brightness level to match the ambient room light 4 For optimum focus the contrast control should not be set to the maximum unless the input signal level is extremely low Also the brightness control should be set to a point where the overall background area just begins to disappear CAUTION Do not scrap or knock the surface of CRT with a pen a screwdriver and so on Clean the CRT surface with a ...

Page 6: ...24mm AG FD Trinitron CRT to display crisp text and vivid color graphics The full function digital control and On Screen Display OSD system provides easy adjustment of image geometry and color settings for different display modes with the precision of a fixed frequency monitor The monitor also has full ergonomic features In addition to the friendly controls and user comfort features the emission le...

Page 7: ...r color monitor package should contain the following items Color monitor with tilt swivel base with Signal cable Power cord User s Guide Driver CD System Setup 1 Turn off the system and all attached peripherals 2 Carefully turn the monitor upside down ...

Page 8: ... to the rear of the monitor and lift to remove the base Installing the Tilt Swivel Base 1 Align the base with the slots on the bottom of the monitor and insert the tilt swivel base into the slots 2 Push the tilt swivel base firmly toward the front of the monitor until the latches click into the locked position ...

Page 9: ...ing indicators controls and adjustments including On Screen Displays OSD are accessible from the front of your monitor Front Panel Controls 1 Power Switch To turn the monitor on or off 2 Power LED Indicator As long as the monitor is powered this indicator is lit In normal operation it lights green While in power saving mode the indicator will turn to amber 3 Enter button To display the OSD manual ...

Page 10: ...e with and ESC control switches Power Saving Note This monitor is equipped with an automatic power saving circuitry design that will work with any computer which meets the VESA DPMS standard It meets the ENERGY STAR low power state definition OSD On Screen Display Controls 1 Press to open the On Screen menu function Seven adjustment functions will appear on the On Screen menu Press or button to sc...

Page 11: ...equency B Picture a Press or to select Vertical and Horizontal position Vertical and Horizontal size b Press to process c Press or to preferred picture C Geometry a Press or to select Side pin Balance Keystone Parallel Rotate and Corner b Press to process c Press or to preferred picture ...

Page 12: ...ser item presses to confirm action color adjustment c Press or to select Red Green and Blue then press Enter to process d Press or increase or decrease density E Advanced a Press or to select Moire Converge or Degauss b Press to proceed c Press or to preferred picture E 1 Moire Press or to reduce Moire ...

Page 13: ...ress to proceed Caution 1 If moire reduction is overdone picture quality i e focus and vertical line stability will both be effected 2 Proper adjustment is recommended for not effecting picture performance F Recall Press to confirm window If this window appears that means it cannot be preset factory mode only ...

Page 14: ...l 14 Confirm the Recall action by pressing the or cancel the action by pressing the ESC G Language Press or to select the Language for OSD only 2 Contrast Brightness When OSD is off or will be adjust contrast or brightness ...

Page 15: ...ting tips before contacting an authorized service center Problem What to do Power Indicator LED is not lit Make sure Power control is in the ON position Check the power cable It must be plugged in completely No Picture If the Power Indicator is amber colored your computer has sent the monitor into its Power Save mode See Energy Declaration No Signal Input The video card may not be seated properly ...

Page 16: ... is connected securely to the video card or computer Picture is fuzzy or color looks blotchy Adjust Contrast and Brightness controls On all Models select the Degauss function in the OSD control menu CAUTION Allow a minimum of 20 minutes to elapse before depressing Degauss button again when not switching between modes DO NOT HOLD THE BUTTON DOWN CONTINUOUSLY Picture bounces or a wave pattern is pre...

Page 17: ...if original manufacturer s detachable signal cable is being used D Sub 15 pin only Our monitor is build in FD Trinitron CRT This CRT is sensitive to shocks and vibrations that may occur during transportation Following are some adjustment tips when below mentioned symptoms occur Symptom Tip Two horizontal lines are visible on the screen This is normal characteristic of FD Trinitron CRT These are da...

Page 18: ...ss the screen Degaussing the screen Tap lightly do not hit the side of the monitor If above mentioned remedies do not work please do the following 1 Display full white window or wallpaper background over the area where the black lines appears 2 Set Contrast and Brightness to the maximum wait for a moment until the problem is corrected You may try to tap lightly the side of the monitor ...

Page 19: ...time settings for switching to a power saving mode are adjusted from the system unit by software From the first indication of inactivity to power saving position A2 the total time must not be set to more than 70 minutes 1 VESA Power Management Proposal H sync V sync Video State Off On Blank Stand by On Off Blank Suspend Off Off Blank Off 2 Power Consumption 120 230 Vac NUTEK VESA state LED indicat...

Page 20: ...uency Horizontal 30 to 97 kHz automatically Vertical 50 to 160 Hz automatically Max Resolution 1600 x 1200 pixel non interlaced Display Colors Analog input unlimited colors Pixel Rate 202 MHz Plug Play DDC 1 DDC 2B Power Supply 100 240 VAC 50 60 Hz automatically Power Consumption 100W max Dimensions 412 W x 415 H x 430 5 D mm Weight 20 1 kgs G W 17 6kgs N W Environment Consideration Operating Temp...

Page 21: ...s section provides you with detailed information on pin assignment of the D Sub connector and the preset timing chart of the prevailing video standards Connector Pin Assignments Male Mini D 15 Connector Signal 15 Pin Mini D Sub Red Video 1 Green Video 2 Blue Video 3 Horizontal Sync 13 Vertical Sync 14 Ground 4 6 7 8 10 11 No Connection 5 9 SDA DDC 12 SCL DDC 15 ...

Page 22: ...l tiredness and eyestrain it is recommended to choose the highest refresh modes available Resolution Format Horizontal Frequency KHz Refresh Rate Hz 640x480 60Hz VGA 31 5 60 720x400 70Hz VGA 31 5 70 800x600 75Hz VESA 46 9 75 800x600 85Hz VESA 53 7 85 832x624 75Hz MAC 49 7 75 1024x768 75Hz VESA 60 75 1024x768 85Hz VESA 68 7 85 1152x864 75Hz MAC 67 5 75 1280x1024 75Hz VESA 80 75 1280x1024 85Hz VESA ...

Reviews: