Ctouch Leddura xts User Manual Download Page 11

on

Volume

on

Brightness

100

100

on

on

100

100

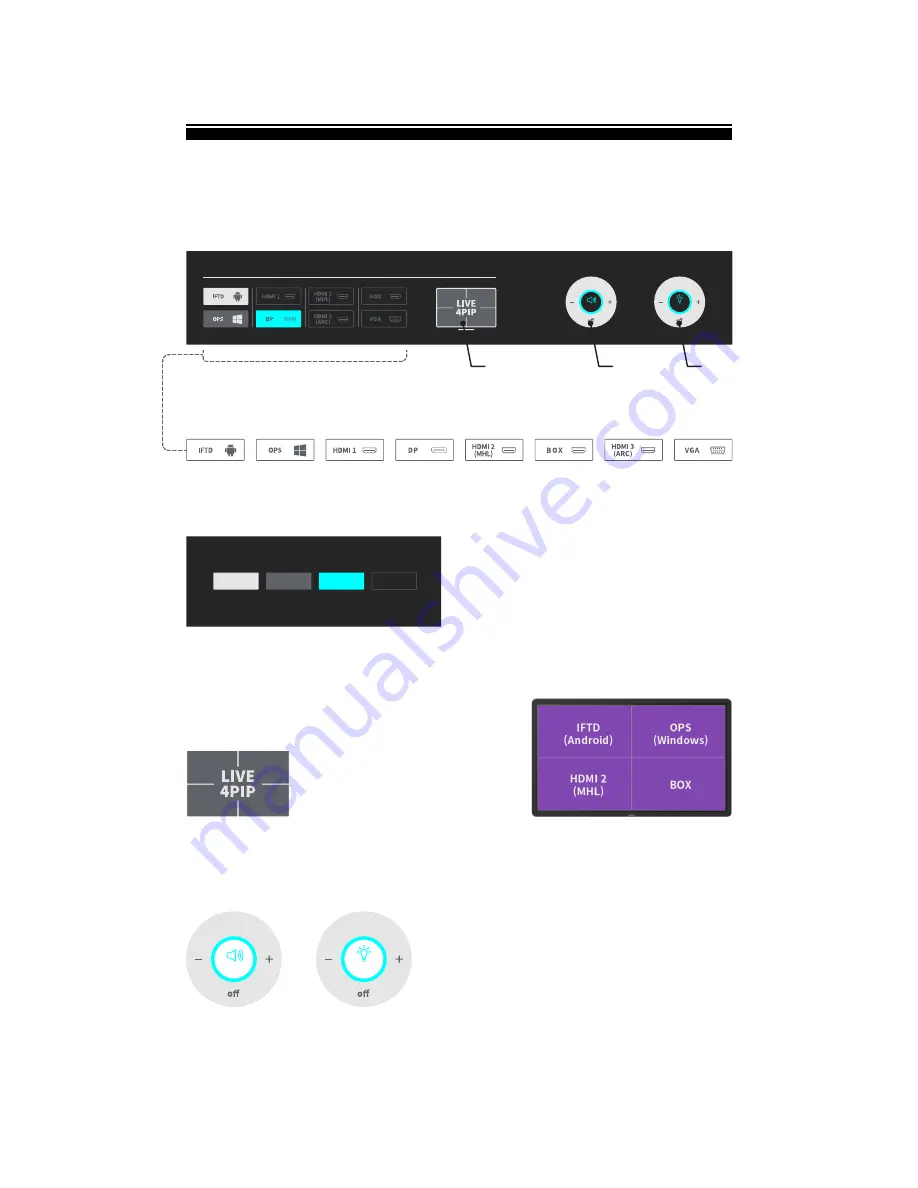
Current Input 

Source

Connected 

Input Source

Not connected

Touched

INPUT SOURCE

Status Index

* LIVE 4PIP

* Quick Input Source Change 

* Quick Input Source Change : Touch to change to the input source

* LIVE 4 PIP

   LIVE 4 PIP shows 4 input sources in one screen in real time.

   Touch one of the input sources screen to change to that input source

   Press Home Button to finish 4 PIP and go back to previous screen

* Volume / Brightness

  : Volume Control (0~100)

  : Brightness Control (0~100)

   While Back Light Unit is off, touch the screen or press Home

   button to turn the Back Light on

* Volume

Brightness

Volume

* Brightness

Touch OSD Menu

11

Summary of Contents for Leddura xts

Page 1: ...d the user s authority to operate the equipment This User s Manual includes detailed usage instructions for your product Please read this manual thoroughly Figures and illustrations in this User Manua...

Page 2: ...Do not place a water containing vessel on this apparatus as this can result in a risk of fire or electric shock Do not expose this ap paratus to rain or place it near water near a bathtub washbowl kit...

Page 3: ...ve the house for an extended period of time Accumulated dust can cause an electric shock an electric leakage or a fire by causing the power cord to generate sparks and heat or the insulation to deteri...

Page 4: ...ed Power on off Android Screen Touch OSD MENU IFTD Settings Instruction for Android Display Settings Other Settings Network Settings Touch Interface Connecting touch sensor with external device Access...

Page 5: ...Quick Manual IFTD Touch Pen package Remote Control with Batteries i Read Safety Instructions before installing the product AC Power Cable HDMI Cable Unpacking 5...

Page 6: ...Components Front view Rear View Side view Left Side view Right Touch Screen Home Button C2C Holder port Main Board Cover OPS slot USB port C2C BOX Port I O ports 6...

Page 7: ...t the audio component by optical digital audio Connect an HDMI device to this jack Connect an HDMI device to this jack Connect an HDMI device to this jack Connect a Display Port device to this jack Co...

Page 8: ...ol 1 Power 2 BLU Back Light Unit on o 3 Volume 4 Mute 5 Freeze 6 IFTD OPS DP HDMI 1 HDMI 2 HDMI 3 BOX 7 4PIP Turn on off the screen Turn on off the back light Adjust the volume Mute on off Screen Free...

Page 9: ...Getting Started Click 1 Connect AC power cable to AC inlet 2 Press Home Button or Press power button on Remote Control to turn on the IFTD 1 2 9...

Page 10: ...Apps OSD MENU Android Button Navigation Navigation Android Screen APP TIME After booting process Android screen will appear 1 After booting press Home button to open Touch OSD menu 2 Press Home Button...

Page 11: ...ut source LIVE 4 PIP LIVE 4 PIP shows 4 input sources in one screen in real time Touch one of the input sources screen to change to that input source Press Home Button to finish 4 PIP and go back to p...

Page 12: ...tions Select the timer to shut down the IFTD when there is no signal USB charging options Set the USB charging in standby mode UTP support option Set the UTP support in standby mode On Enable UTP in s...

Page 13: ...lineout options Fixed output fixed volume Variable output adjusted volume Internal Speaker setting Turn on off internal speakers ID setting Set the IFTD ID number IFTD ID number determines the IFTD w...

Page 14: ...Network Settings 1 Check the box to enable disable Wi Fi connection C2C BOX must be connected to enable Wi Fi 14 C2C BOX...

Page 15: ...LAN connect UTP support option Connect the LAN cable to the designated port in IFTD Check the box to enable disable Ethernet connection Software Update options Click on Software update to view system...

Page 16: ...Kernel version in the device Build number Click to view the Build number in the device 16 Update from external storage device Click on update from external device to enable updating from USB Update st...

Page 17: ...the Touch Panel Settings Tool The action may be different from a mouse right click in some cases Windows 8 8 1 Windows 7 8 8 1 Windows 7 Multi Touch Mode OS Mouse Mode Touch Operation Mode Touch actio...

Page 18: ...then stop Touch action Drag and drop Same action as drag and drop with a mouse Touch the screen with your finger touch pen and move without lifting When you have finished the movement lift your finge...

Page 19: ...9 Connect Touch USB cable to enable touch when external device is connected Finger actions Zoom Use in a screen that is capable of Zoom in Out Touch the screen with two fingers and move your fingers c...

Page 20: ...Accessories Optional 20 C2C BOX OPS C2C Holder C2C Pen C2C Sound Bar...

Page 21: ...Smart innovation...

Reviews: