background image


Assembly 

(

continued

)


9


8


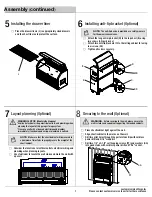
Securing to the wall (Optional)

Attach the supporting leg holder (R) to the cabinet (E)

Installing the supporting leg holder 


by using two M6x15L screws (HH).


10


Masonry.


Place chest/cabinet tight against the wall.

drill and 3/16" masonry bit.


Drill two pilot holes through the perforated strip with hammer 

through perforated holes into wall with cordless power drill and


Drill two 1/4" x 2-1/2" self-tapping screw (FF) and washer (GG) 


Align chest/cabinet to the marks on the wall.

7/16" socket.

[email protected]

Pleas


e contact customer service team fo


r furthe


r assistance

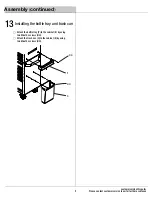
Place the peg tray (M) on the peg board. You can place on

Installing the peg tray


any position you desire.


M


12


Align the side table (S) to the M6x15L screw (HH) on each

Installing the side table 


side. Push the side table down to slot the screws into 


11


Add two additional M6x15L screw (HH) to the bottom holes 

to secure the side table. Ensure all four screws for the side


R

HH

HH

S


Attach the M6x15L screw (HH) on the upper screw hole on 
each side and do not tighten the screws.

position and then tighten the screws. Do not over tighten.

table are tightened before use. Do not over tighten.


For steel framed construction, consult a qualified structural
expert.

Summary of Contents for 100492

Page 1: ...e strive to continually create quality products designed to enhance your home Visit us online to see our full line of products available for your home improvement needs Thank you for choosing CSPS AND CABINET SET RED TEXTURED POWDER COATED Model COTC4316BC1SAU ITM ART 100492 11 00 a m 18 00 p m AEST Monday Friday customerservice csps tw IMPORTANT READ CAREFULLY CSPS the trademark is registered and...

Page 2: ...uct weight capacity including contents Do not exceed the maximum weight for each drawer See Specifications on page 4 CAUTION Only transport this product when empty Properly secure when transporting 1 Do not open more than one drawer at a time 2 Do not let children approach the tool chest cabinet 5 Lock both the lid and all drawers before moving the chest cabinet 3 To help prevent the product from ...

Page 3: ...n of the products such as surface and or weathering as this is considered normal wear and tear The manufacturer does not warrant and specifically disclaims any warranty whether express or implied of fitness for a particular purpose other than the warranty contained herein The manufacturer specifically disclaims any liability and shall not be liable for any consequential or incidental loss or damag...

Page 4: ...t is heavy and may be difficult to move after assembly BB CC DD EE Washer M8 Screw M4x10L 14 EE 10 mm 13 mm Wrench 1 45 3 kg 100 lb Maximum static weight capacity cabinet Maximum static weight capacity side table 635 0 kg 1400 lb 4 16 FF 2 FF GG GG Washer 2 Self tapping screw 1 4 x 2 1 2 Tape measure Pencil Stud Finder with voltage and metal detection sensor required 7 16 inch socket Cordless powe...

Page 5: ...chest 1 C Bracket 2 D Side handle 1 E Rolling cabinet 1 F Swivel caster with brake 2 G Drawer slide pair 18 H Regular caster 2 I Drawer 16 J Key set 2 Part Description Quantity K Lock 2 L Drawer Liner 15 M Peg tray 1 N Anti tip bracket long 1 O Anti tip bracket 2 P Bottle tray 1 Q Trash can 1 R Supporting leg holder 1 S Side table 1 P Q R S A B C D E F G H I J K L M N O ...

Page 6: ... E using four bolts CC and Tighten all bolts with a wrench Return the rolling cabinet E to its upright position CAUTION Do not over tighten the screws 3 Placing the chest Place the top chest B on top of the rolling cabinet E NOTE Two people may be required to complete this step place using the key lock on the rolling cabinet E 4 Installing the brackets Attach the brackets C to the back of the cabi...

Page 7: ...rage storage system Please consult with a licensed electrician and plumber immediately if any damaged wiring or plumbing is noticed Avoid all electrical wiring electrical outlets and plumbing when NOTE Make sure that the chest cabinet will be secured to a minimum of two studs to properly secure the weight of the chest cabinet N DD O DD E NOTE The anti tip device is provided as a safety measure for...

Page 8: ...ce csps tw Please contact customer service team for further assistance Place the peg tray M on the peg board You can place on Installing the peg tray any position you desire M 12 Align the side table S to the M6x15L screw HH on each Installing the side table side Push the side table down to slot the screws into 11 Add two additional M6x15L screw HH to the bottom holes to secure the side table Ensu...

Page 9: ...y and trash can Attach the bottle tray P to the cabinet E by using two M6x15L screws HH customerservice csps tw Please contact customer service team for further assistance Attach the trash can Q to the cabinet E by using two M6x15L screws HH P HH HH Q ...

Page 10: ... and lower the lever on the other side simultaneously so the slides can ride over the stops Pull out to remove 1 Locking and unlocking the unit IMPORTANT The drawers must be fully closed before locking unlocking the unit To lock the unit insert the key J into the lock cylinder K To unlock the unit insert the key J into the lock cylinder K 10 J and turn it 1 4 turn to the left Then remove the key a...

Page 11: ...able S to raise into position and insert it s supporting leg into the holder R Make sure it is locked to the mechanism properly 6 Lowering side table Lift the side table S and remove the supporting leg from the holder R and let down slowly when not in use 11 ...

Page 12: ...rotect the finish inside the drawers and make the drawers easier to clean Drawer liners can be cleaned with soap and water Lubricate the slides semi annually with grease or equivalent This steel product has been coated with industrial powder coating Care and Cleaning To help protect the powder coated finish do not allow harsh Use a glass cleaner Windex or equivalent product to clean and chemicals ...

Page 13: ...rawer Liner 15 M Peg tray 1 N Anti tip bracket long 1 O Anti tip bracket 2 P Bottle tray 1 Q Trash can 1 R Supporting leg holder 1 S Side table 1 P Q R S A C D F G H I J K L M N O Part Description Quantity A Gas lift 2 C Bracket 2 D Side handle 1 F Swivel caster with brake 2 G Drawer slide pair 18 H Regular caster 2 I Drawer 16 J Key set 2 ...

Page 14: ...efore returning to the store contact CSPS Customer Service 11 00 a m 18 00 p m AEST Monday Friday 10 30 a m 17 30 p m ACST Monday Friday 09 00 a m 16 00 p m AWST Mondy Friday customerservice csps tw IMPORTANT RETAIN FOR FUTURE REFERENCE ...

Reviews: