background image

I n d u s t r i a l   W o r k s t a t i o n  

AWK -3 5 0 1  


AWK-3501 Series User Manual V1.0


18

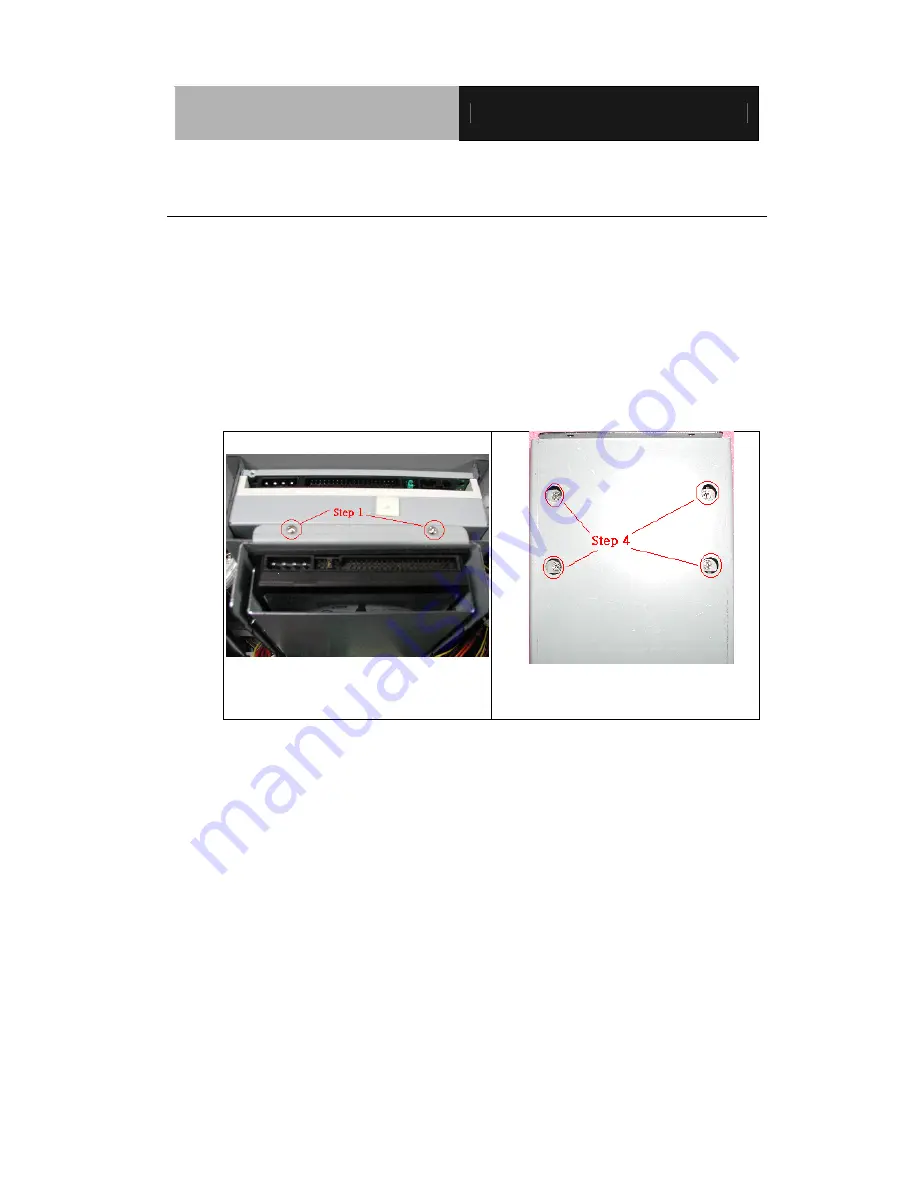
3.5” HDD Installation 

The Industrial Workstation is a PC-based industrial computer that is 
housed in aluminum alloy front panel and steel chassis. Any maintenance 

or hardware upgrades can be easily completed after removing the rear cover 

case. 

1.  Unscrew the bottom cover. 

2.  Take the disk drive module out by screws.   
3.  Slide the HDD in.   

4.  Fix 3.5” HDD with screws in the bracket. 
5.  Fix the disk drive module with screws on the CD-ROM module.   


Summary of Contents for AWK-3501

Page 1: ...Industrial Workstation AWK 3501 AWK 3501 Series User Manual V1 0 1 AWK 3501 Series 15 TFT Flat panel Industrial Workstation...

Page 2: ...on provided in this manual is intended to be accurate and reliable However the original manufacturer assumes no responsibility for its use nor for any in fringements upon the rights of third parties w...

Page 3: ...nd Pentium are registered trademarks of Intel Corporation Microsoft Windows is a registered trademark of Microsoft Corporation SMC is a trademark of Standard Microsystems Corporation RTL is a trademar...

Page 4: ...have been shipped n AWK 3501 series Industrial workstation n CD ROM Contains User s Manual Drivers and Utilities n Accessories Screws bag Mounting brackets VGA Cable Power cord n With Touch Screen Op...

Page 5: ...ing it fall could cause damage 7 The openings on the enclosure are for air convection Protect the equipment from overheating DO NOT COVER THE OPENINGS 8 Make sure the voltage of the power source is co...

Page 6: ...ccording to the users manual e The equipment has been dropped and damaged f The equipment has obvious signs of breakage 15 DO NOT LEAVE THIS EQUIPMENT IN AN UNCONTROLLED ENVIRONMENT WHERE THE STORAGE...

Page 7: ...cations 11 Dimensions 15 Hardware Installation 16 2 5 HDD Installation 17 3 5 HDD Installation 18 VGA Cable Installation 19 USB Touch pad cable to CPU card Installation 20 Touchscreen cable to CPU car...

Page 8: ...Industrial Workstation AWK 3501 AWK 3501 Series User Manual V1 0 8 General Information Chapter 1...

Page 9: ...sed systems that could be configured with different levels of full size CPU cards with a 15 XGA 1024 x 768 color TFT high brightness long lifetime LCD displays AWK 3501 are equipped with Analog VGA in...

Page 10: ...on for display adjustment l Heavy duty steel chassis and aluminum alloy front panel l Water proof front panel with IP 65 certification l 10 slots ISA PCI bus passive backplane l Anti vibration disk dr...

Page 11: ...p to 3 06 GHz FSB 400 533 MHz Memory n SBC 780 Supports up to 1 GB SDRAM DIMM x 2 n SBC 860 Supports up to 2 GB DDR SDRAM DIMM x 2 Disk Drive Housing n Removable 2 5 anti vibration HDD option 3 5 anti...

Page 12: ...chip limitations the system does not support Window NT for touch pad Front accessible control panel You can easily access the workstations controls from the front sturdy protective panel Controls incl...

Page 13: ...V Frequency 47 63 Hz 24V DC 300W 24V DC DC optional Input Range 19 32VDC Maximum input current 20A at 24VDC input l Dimension W x H x D 675 x 465 x 455mm 22 6 x 18 3 x 17 9 l Carton dimension W x H x...

Page 14: ...condensing l Vibration 1 0G 5 500Hz Random operation l Shock 10G peak acceleration 11 msec duration operation l EMC CE FCC Class A l Waterproof Dustproof Front Panel IP65 Certification Touchscreen opt...

Page 15: ...Industrial Workstation AWK 3501 AWK 3501 Series User Manual V1 0 15 Dimensions...

Page 16: ...Industrial Workstation AWK 3501 AWK 3501 Series User Manual V1 0 16 Hardware Installation Chapter 2...

Page 17: ...puter that is housed in aluminum alloy front panel and steel chassis Any maintenance or hardware upgrades can be easily completed after removing the rear cover case 1 Open front panel door 2 Unscrew t...

Page 18: ...that is housed in aluminum alloy front panel and steel chassis Any maintenance or hardware upgrades can be easily completed after removing the rear cover case 1 Unscrew the bottom cover 2 Take the dis...

Page 19: ...Industrial Workstation AWK 3501 AWK 3501 Series User Manual V1 0 19 VGA Cable Installation Make sure that the VGA cable is securely connected before turning on the power switch...

Page 20: ...3501HTT A bare bone you need to install touch pad cable to USB pin header on CPU card USB Touch pad Pin Assignment PIN FUNCTION PIN FUNCTION 1 Vcc 5v RED 2 Ground BLACK 3 Data WHITE 4 Ground BLACK 5...

Page 21: ...PU card Installation If you only order AWK 3501HTT A bare bone you need to install touchscreen cable to RS 232 pin header on CPU card RS 232 Touchscreen Pin Assignment Pin defined Standard RS 232 Sign...

Page 22: ...Industrial Workstation AWK 3501 AWK 3501 Series User Manual V1 0 22 BIOS Jumper Setting Chapter 3...

Page 23: ...Pentium 4 Level In regard to Jumper setting and BIOS for each CPU card please refer to User manual of SBC 780 or SBC 860 Manual CPU card SBC 780 or SBC 860 SBC 860 LAN connector CN 15 is LAN 1 CN 17 i...

Page 24: ...Industrial Workstation AWK 3501 AWK 3501 Series User Manual V1 0 24 Drivers Installation Chapter 4...

Page 25: ...rst If you utilize Windows NT series OS you are strongly recommended to download the latest version Windows NT Service Pack from Microsoft website and install it before installing any driver As for th...

Page 26: ...C 780 or SBC 860 Manual CPU card SBC 780 or SBC 860 Touch Pad Drivers Installation Please follow the instructions when you start to install touch pad drivers 1 Insert the AWK 3501 CD ROM into the CD R...

Page 27: ...Industrial Workstation AWK 3501 AWK 3501 Series User Manual V1 0 27 On Screen Display Control Chapter 5...

Page 28: ...value will be adjusted correctly and saved automatically Notice The AWK 3501 series were designed to provide the best quality in 70MHz VGA frequency range We recommend keeping the screen refresh rate...

Page 29: ...e Moving DOWN Button To move the locating cursor backward in the OSD Menu press the button To decrease the value while adjusting a parameter press button Power Switch Press the Power Switch to turn on...

Page 30: ...There are twelve options in the OSD Menu Press the Menu button to choose the items you would like to adjust Main Menu Auto Adjust Monitor OSD Control BIOS Version Graphic Graph Text Exit Auto Adjust...

Page 31: ...Industrial Panel PCs AWK 3501 AWK 3501 Series User Manual V1 0 31 Graphic Contrast Brightness R Color G Color B Color Exit Graph Text Sharpness Exit Exit...

Page 32: ...re is image pixel noise appears adjust the Phase setting value under Monitor menu Pull and adjust the value bar to find out what is the best clarity range for your LCD display 3 If the image is not ce...

Page 33: ...it is possible that the VGA card timing of the system may be outside the LCD monitor s synchronous range You may need a qualified technician for help 3 Problem The LCD monitor does not work properly u...

Reviews: