background image

Crystal Vision

Active Control Panel

20

     26/01/06

To continue with control panel operation or configuration, press the CAL key once. A
second press of the CAL key will return to Statesman control.

The control panel will display the name of the card that first responds to the polling
request together with its location number.

The location number consists of the frame number plus the card position in the frame.

Navigating the display

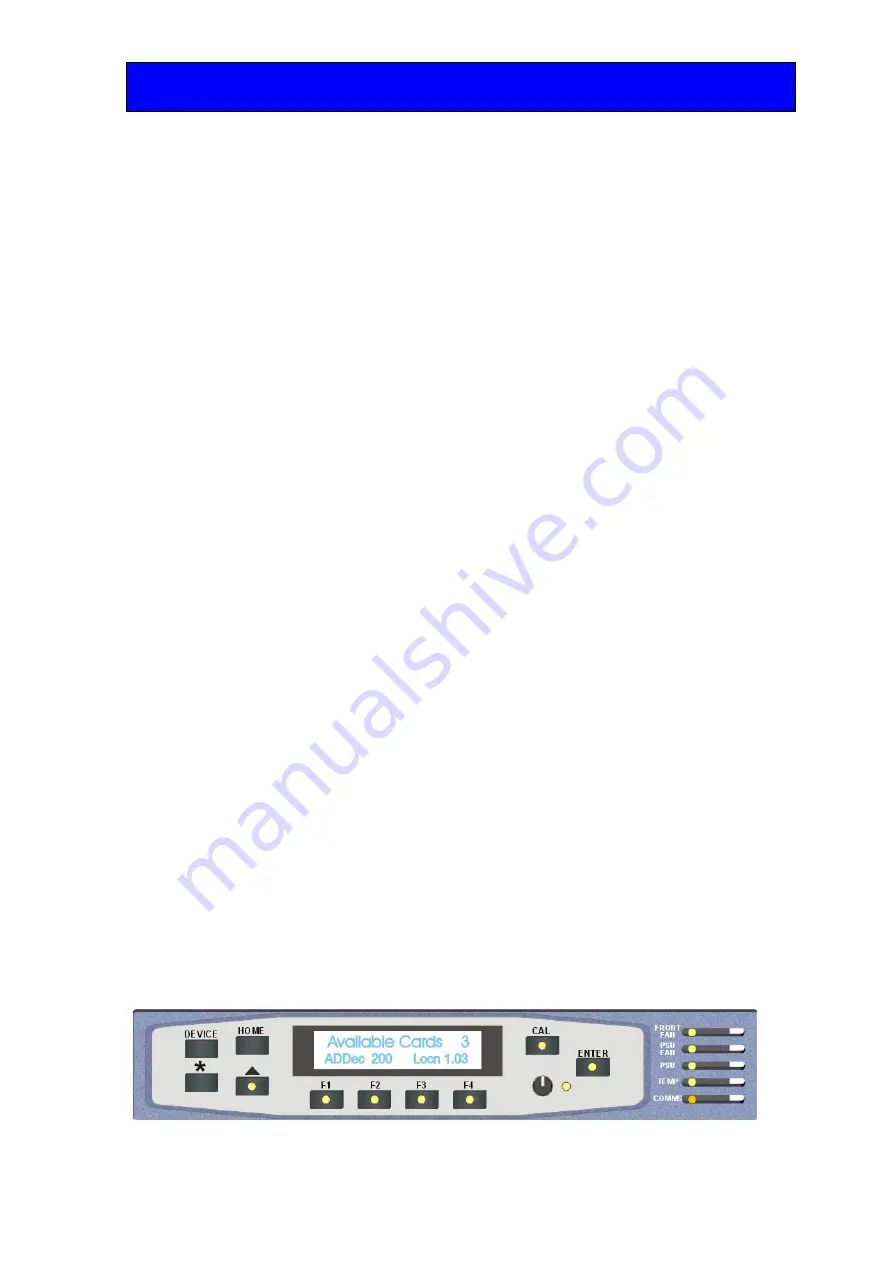
The functions assigned to control panel keys are:


DEVICE – enters Device menu to select a card or show cards available / enters Panel setup when
held down during power up / shows frame status when pressed from Statesman mode


CAL – enters or leaves Statesman mode / enters panel diagnostics mode when held down during
power up / updates the display


Asterisk – enters board rename menu from the Device menu


F1 to F4 – soft keys, function assigned within each menu


HOME – moves the display to the home menu


ENTER – accept current selection


Upward arrow – used to move up the menu structure / enter lock panel menu from the Device
menu


Rotary control – shaft encoder used to select options or variable data

Menu numbering scheme

This manual uses a simple menu numbering convention based on the sequence of keys
required to reach each menu from the top level home menu. For example, menu 1.1.2 is
reached from the home menu by pressing F1, then F2. Menu 1.2.3 is reached by pressing
F2 and then F3. Further option can be reached by using the shaft to scroll up or down.

Note:

Please refer to the Crystal Vision Control Panel manual for details of the Panel Setup,
Lock Panel and Diagnostic menus.

Selecting ADDEC-200

To select a particular card in a frame, press the DEVICE key to go to the Device menu.
The top line of the display will show ‘Available Cards X’, where X is the number of cards
that have responded so far to the polling request.

The available cards menu

Summary of Contents for ADDEC-200

Page 1: ...n Technology Park Station Road East Whittlesford Cambridge CB22 4WL England E mail sales crystalvision tv Website www crystalvision tv Tel 44 0 1223 497049 Fax 44 0 1223 497059 ADDEC 200 Analogue to S...

Page 2: ...ith RM01 6 Rear module connections with RM23 7 Rear module connections with RM24 7 Rear module connections with RM25 8 Rear module connections with RM27 9 Module configuration 10 V SDI OUT port config...

Page 3: ...delay or offset 18 4 Using the active front panel 19 4 1 Module selected 19 The ADDEC 200 menu structure 21 Home Menu 22 Video Menu 23 Miscellaneous Menu 24 5 Statesman 25 5 1 Installing Statesman 25...

Page 4: ...frame rates plus any delays by taking its timing from the external analogue reference and will automatically synchronise sources between 0 and 2 fields An audio follow pulse is also produced which al...

Page 5: ...e analogue external reference and will automatically synchronise sources with or without embedded audio between zero and two fields Synchronisation Mode is ideal for external sources that are not time...

Page 6: ...PC control system will allow Frame Field 1 or Field 2 to be selected This is useful if there is movement between both fields as a frame freeze may show movement judder Field freeze will remove judder...

Page 7: ...ight modules and a single power supply The DTBAV and Indigo desk top boxes both have a built in power supply and will house up to two single height modules Note For details of fitting rear connectors...

Page 8: ...posite sync B B input loop through SDI OUT Serial digital output V IN SDI OUT Component V Input SDI OUT link selectable Y PAL NTSC IN Component Y YC Y PAL NTSC Input U C SDI OUT Component U YC C Input...

Page 9: ...With this rear module cards can be inserted in the top two and bottom slot RM25 rear module connector Description RM25 18 ADDEC 200 modules per Indigo 4 frame 9 per FR2AV or Indigo 2 frame Slots 1 2 4...

Page 10: ...or Indigo 1 frame 1 per Indigo DT Every other slot can be used Channel A I O assignment TP TTL level positive going Audio follow pulse SDI OUT Serial Digital Output V IN SDI OUT Component V SDI OUT l...

Page 11: ...onfigured by setting the position of links PL3 PL6 to be found approximately in the middle right hand edge of the module When a Component U or C input is required set jumper link PL3 PL6 to their uppe...

Page 12: ...connection at present 3 d Recall preset bit 8 No user connection at present 4 e Audio follow pulse Pulse width equal to audio delay 5 f loss of input ref frozen No user connection at present As suppli...

Page 13: ...10 6 11 6 3 8 7 9 7 18 7 26 7 19 8 20 8 4 7 7 16 7 17 7 25 7 10 8 11 8 5 5 5 6 5 15 5 24 5 1 6 2 6 6 4 5 14 5 13 5 23 5 3 6 4 6 7 5 7 6 7 15 7 24 7 1 8 2 8 8 4 7 14 7 13 7 23 7 3 8 4 8 9 3 5 12 5 22...

Page 14: ...high density D Type male plugs and frame ground is pin 6 in each case and 5V 500mA is pin 15 on Remote 2 Note The 5V output is protected by self resetting thermal fuses which limit the total output c...

Page 15: ...GPI lines a to f of each card connect to the rear remote connector as follows Slot no a pin b pin c pin d pin e pin f pin 1 8 1 9 1 18 1 26 1 19 2 20 2 2 7 1 16 1 17 1 25 1 10 2 11 2 Table shows pin n...

Page 16: ...t format DOWN YUV Both UP or DOWN Composite 3 Not assigned Normally UP No customer functions 4 YUV Betacam format UP normal DOWN Betacam format 5 Pedestal UP pedestal setup is suppressed DOWN pedestal...

Page 17: ...tes if picture freeze is selected PSU Green Good power supply PSU rails Bottom LED Ref Green External reference present Input Green Video input present 3 4 Card edge configuration Input Video format S...

Page 18: ...ure may be blanked or passed unaltered DIL switch 6 sets whether the VBI signal is passed or blanked DIL 6 Function UP vbi Sets analogue video picture VBI content to be blanked DOWN bln Sets analogue...

Page 19: ...onal Adjusting the video delay or offset Adjustment is made by rotating the card edge Delay shaft control The range of this control is from 0 minimum delay through the board and 2 fields The delay is...

Page 20: ...ng the panel for the first time At power up the two line 20 character screen will display Crystal Vision followed by the firmware version number for the control panel All eight control panel keys LEDs...

Page 21: ...F4 soft keys function assigned within each menu HOME moves the display to the home menu ENTER accept current selection Upward arrow used to move up the menu structure enter lock panel menu from the De...

Page 22: ...d edge controls or through automatic response to the input video signal the text displayed on the active front panel will not be updated immediately If necessary press CAL to update the display The AD...

Page 23: ...s Home Menu Video and Misc are the two sub menus accessible from the home menu Pressing F1 Video leads to all the video gain levels and configurations Misc contains the default and preset menus The Ho...

Page 24: ...U and V adjustment by the shaft control Adjusts 80 120 in 1 step Allows phase NTSC Hue correction in the analogue input video 90 deg in 1deg steps Rotate shaft to adjust value Delay in whole lines 0 6...

Page 25: ...card settings to their default values including the erasing of all stored presets The following table shows the default values for each parameter affected Parameter Default value Gains and levels 0 or...

Page 26: ...is an Indigo frame the firmware must be V1 04 or above An optional RS422 to RS232 converter if the PC has no RS422 ports Installing Statesman Refer to the readme and or help file on the CD before pro...

Page 27: ...ollowing colour and size coding is used A module is shown present by full colour and absent by greyed colour A module is shown open by large icon size and closed by small icon A module is the source o...

Page 28: ...h or without embedded audio between zero and two fields In Delay Mode timing is derived only from the analogue input Adjusting the video delay The video delay may be adjusted from zero to two fields f...

Page 29: ...required Input format selection Composite YC or YUV input formats can be selected The input can also be configured to accept Component Betacam level signals Video status The Video Status panel allows...

Page 30: ...ted location contains previously saved setting information it will be over written by the new setting data To recall previously store setting information again tick the selected location and click Rec...

Page 31: ...clears the current setting to 100 Black Level The black level can be adjusted between 25mV Cal button clears the current setting to its zero off set Phase Hue The Burst to subcarrier phase or Hue NTSC...

Page 32: ...le values to their default value Note Any configuration stored as presets will also be erased This control can be used to restore a board from a previously unknown state before integration into a new...

Page 33: ...nitoring Status LEDs Board edge LEDs provide status reporting and may be useful when fault finding ADDEC 200 front view showing controls and LEDs The following table summarises the card edge LED funct...

Page 34: ...not been exceeded Ensure the external reference input is stable The video output is not synchronous with other station sources If the input analogue video is not synchronous with station sources ensu...

Page 35: ...SDI input in Delay Mode only Timing Video timing Synchronisation Mode The timing of the output with respect to Ref in may be adjusted by any number of lines up to a whole video frame Horizontal timin...

Page 36: ...led with active control panel for up 2 modules Indigo 4S 4U frame with passive front panel fitted with Statesman CPU for up to 24 modules Indigo 2S 2U frame with passive front panel fitted with States...

Reviews: