Crystal Video Swift800 Pro User Manual Download Page 11

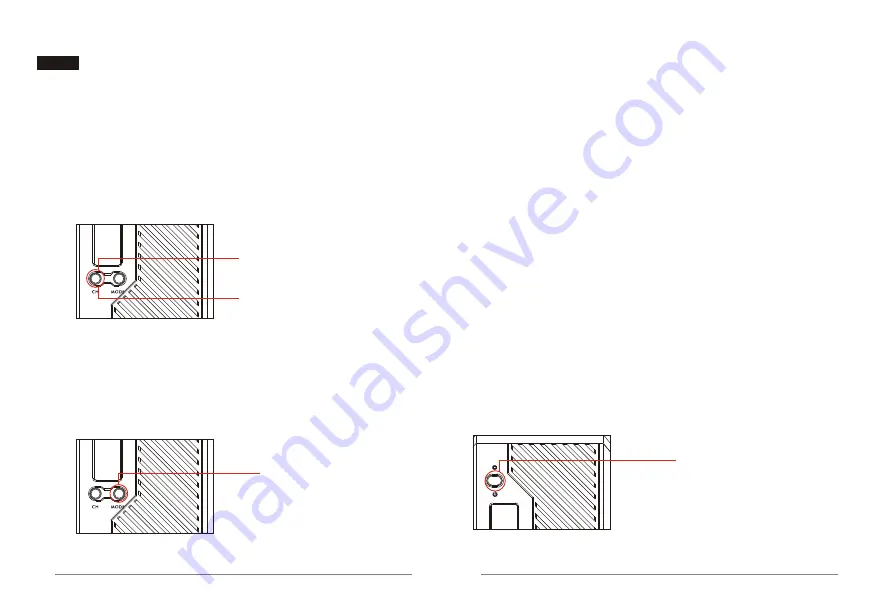
Press this button to switch channels.

Long pressing for 3 seconds to enters WPS (WPS requires that both the transmitter 
and receiver are operating) 

Long press the CH button for 3 seconds

Long press 10 seconds to recover to factory settings (restoring the factory settings 
requires that both the transmitter and receiver are operating) 

Long press the CH button for 10 seconds

Switch the fan on and off by short pressing the button

Long pressing for 3 seconds can switch between working modes 
(Point-to-point/RTSP pull streaming)

Mode Switching

Long pressing the Mode button 
for 3 seconds can switch between 
working modes.

15

16

Button Function Instructions

CH Button

Mode Button

Power Button

Long pressing for 3 seconds turns this product on and off, and displays 
‘SSID’ by short pressing 

Long press this button to 
switch on or off the  product

In point-to-point mode, the video sources can be transmitted via HDMI or SDI port, 
and the receiver transmits the video to the monitor, switch console, and other devices 
via HDMI or SDI port.

Point-to-Point mode:

In RTSP streaming mode, transmitter receives the video signal from video source and 
transmits the video signal to mobile devices (up to four smartphones or iPads)

RTSP streaming mode:

3

Long press the transmitter and receiver Mode button for 3 seconds for mode switching, 

    when switching from point-to-point mode to RTSP streaming mode, "RTSP" will be 
    displayed on the OLED display; when switching from RTSP streaming mode to point-to-
    point mode, "RTSP" will disappear on the OLED display.

1

Switching operation must be applied on both the transmitter and receiver.

2

Factory mode is point-to-point mode

Summary of Contents for Swift800 Pro

Page 1: ...SER MANUAL Swift800 Pro SHENZHEN CRYSTAL VIDEO TECHNOLOGY CO LTD E mail Sales cv hd com E mail Marketing cv hd com Post code 518102 Tel 86 755 27750518 6652 Fax 86 755 29188427 www cv hd com ADD F12 F518 Idea Land Baoyuan Road Baoan Central Area Shenzhen China SDI HDMI Wireless Video ...

Page 2: ...Optimal range between transmitter and receiver is between 1 meter and 30 meters with in line of sight indoor ...

Page 3: ...tion 07 09 12 Product Specifications 18 Button Function Instructions 15 19 OLED Screen 13 Transmitter Interface Introduction 01 02 Product Installation Operation Instructions 17 Troubleshooting 21 Reminders User Operation Instructions CONTENTS Connectivity diagram Packing List Powering on and booting up How to Use the App ...

Page 4: ...ailed introduction to this product s specifications and instructions operation instructions reminders and troubleshooting Before using this product please carefully read this manual If you have any questions or difficulties while using this product please promptly contact us or our distributor Product Introduction This product is a wireless video transmission kit which operates in 5G band that del...

Page 5: ... as 70ms Beamforming Combine 2x2 MIMO and Beamforming technology that increases wireless beams directionality and makes them have a higher signal to noise ratio increase the transmission distance and anti interference capabilities Point to Point Mode and RTSP Streaming Mode Support two kinds of working modes point to point and RSTP streaming The point to point mode supports HDMI SDI signal input o...

Page 6: ...lot Explanation A C D E G H I L SMA jacks for connectors OLED Screen CH Button MODE Button DC In Type C USB Port SDI Loop Out J SDI In B F K B C D E F G H I J K L Low Battery Indicator 05 06 LOOP OUT Product Interface Introduction Transmitter 7103 Interface Instructions Serial Number ...

Page 7: ...erface Introduction SWIFT 800 PRO USB A D E G H I L J C B F K A HDMI Out Power Button Explanation OLED Screen CH Button MODE Button DC In SDI Out SDI Out B C D E F G H I J K L Low Battery Indicator Serial Number SMA jacks for connectors Type C USB Port NP F Battery Slot ...

Page 8: ...duct Installation Operation Instructions 10 90 SWIFT 800 PRO 1 Please install the antennas on the receiver and transmitter via the antenna port There should be a 90 angle between each antenna the optimal installation method as shown in the picture 2 Install NP F batteries in both the transmitter and the receiver Battery ...

Page 9: ... and receiver with three ways as follows a Install the NP F battery in the NP F battery holder on the back of the transmitter b Use the attached DC power adapter c Use a V mount battery USB D to DC power cable is needed in this case d Use a power bank 5V 2A with Type C cable 2 Booting up the transmitter and receiver requires about 30 seconds Wireless connection between transmitter and receiver wil...

Page 10: ...non rotating fan blades Network Signal When the network is not connected displays X When the network successfully connects displays the signal strength Video Signal When the signal is not recognized displays NOVIDEO when the signal is recognized displays the video format Working Mode Point to point mode blank display RTSP mode displays RTSP Working Frequency Displays the current working frequency ...

Page 11: ...rns this product on and off and displays SSID by short pressing Long press this button to switch on or off the product In point to point mode the video sources can be transmitted via HDMI or SDI port and the receiver transmits the video to the monitor switch console and other devices via HDMI or SDI port Point to Point mode In RTSP streaming mode transmitter receives the video signal from video so...

Page 12: ...the SSID s last six digits Input password 12345678 to connect 3 Switch the product to RTSP working mode 5 After successfully connecting an image displays on the screen and the menu can be used to choose the corresponding function load Product Specifications Frequency 1080p60 59 94 1080p50 1080p30 29 97 1080p25 1080p24 23 98 1080psf24 23 98 SDI In 1080i60 59 94 1080i50 720p60 59 94 720p50 480P 576P...

Page 13: ...requency Setting When using one of these products it is recommended to set its working frequency to between CH5 and CH9 In environments covered by WiFi and other networks the spectrum should be at a low occupancy rate and the frequency will be very stable Note When in RSTP mode it is recommended to set the frequency at CH1 to CH4 or CH10 to CH11 or the phone will be unable to find the SSID Cable C...

Page 14: ...distance and transmission environment It is possible to try reducing the distance or increasing the device s height c Confirm whether multiple products are being used simultaneously When using multiple products please separate their working frequencies by 1 or more frequencies For example one of them can be set at CH5 and another can be set at CH7 while transmitters must be 2 meters away from each...

Reviews: