UM-CV-751-R
0'
-F17-Q113V1 www.
UDFNPRXQWVDO
es.com
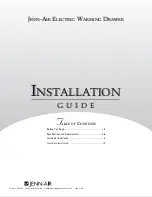
Sub screen
Main screen
P.9
Mode
Display the Sub screen next to the Main screen.
OSD Menu
→
MISC
→
PIP Mode
→
PBP
Size
LCD Monitor
Main / Sub screen
1920 x 1200
955 x 716
1920 x 1080
955 x 716
1440 x 900
715 x 536
1366 x 768
678 x 508
1280 x 1024
635 x 476
< 2.3.2 > Picture By Picture ( PBP )
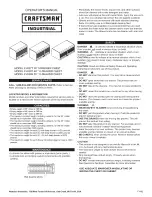
< 2.3.3 > PIP / PBP Source
To select an input signal for PIP / PBP Sub screen.
OSD Menu
→
MISC
→
PIP Source
→
VGA / S-Video / Composite / DVI / HDMI / SDI / YPbPr / TV
Sub
Main
VGA
S-Video
Composite
DVI-D
HDMI
SDI
YPbPr
TV
VGA
x
o
o
o
o
o
o
o
S-Video
o
x
x
o
o
o
o
x
Composite
o
x
x
o
o
o
o
x
DVI
o
o
o
x
x
o
o
o
HDMI
o
o
o
x
x
o
o
o
SDI
o
o
o
o
o
x
x
o
YPbPr
o
o
o
o
o
x
x
o
TV
o
x
x
o
o
o
o
x
The PIP / PBP is operable in the following table :