background image

UM-CV-751-F17-Q218V1 www.

UDFNPRXQWVDO

es.com

Compliance

EMC

FCC & CE certifi ed

Safety

CE / LVD certifi ed

Environment

RoHS2 & REACH compliant


Power 

Power Supply

Range

Auto-sensing 100 to 240VAC, 
50 / 60Hz

Power Consumption for 
Single Console

Screen ON

Max. 25W

Power saving mode

Max. 4W

Power button OFF

Max. 1W

Power Consumption 
with KVM integration

Screen ON

Max. 55W

Power saving mode

Max. 34W

                                                                                                            *For details, please refer to our KVM rear kit user manuals

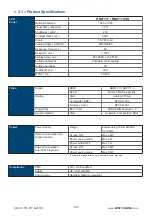
< 2.1 > Product Specifi cations  

LCD 
Panel

RM-

F117 / 

RM-

F17

USD

Native Resolution

1920 x 1080

Panel Size ( diagonal )

17.3

"

Brightness ( cd/m² )

400

Contrast Ratio ( typ. )

600:1

Colors

16.7 M, 8-bit

Viewing Angle ( L/R/U/D )

80/80/60/80

Response Time ( ms )

40

Dot pitch ( mm )

0.1989

Display Area ( mm )

381.888H x 214.812V 

Surface treatment

Anti-glare, Hard-coating

Surface hardness

3H

Backlight Type

LED

MTBF ( hrs )

50,000

P.10

Video 

Digital 

HDMI

HDMI 1.3 / HDCP 1.3

DVI-D

DVI-D, TMDS single link

Analog

VGA

Analog 0.7Vp-p

Composite ( BNC )

NTSC & PAL

S-Video ( 4-pin )

NTSC & PAL

Plug & Play

DVI / VGA

VESA EDID structure 1.3

Synchronization

VGA

Separate, Composite & SOG

Summary of Contents for RM-F117

Page 1: ...ountsales com 751 RM F17USD 1920 x 1080 native resolution User Manual 1U 17 FHD LCD Console Drawer dedicated KVM switch and rackmount screen technology 1920 x 1080 native resolution RM F117 Flexible m...

Page 2: ...ce personnel should open the chassis Opening it yourself could damage the equipment and invalidate its warranty If any part of the equipment becomes damaged or stops functioning have it checked by qua...

Page 3: ...ORB 2 1 2 post rack mounting brackets Part 3 P 18 P 20 21 P 22 23 P 24 P 25 Part 2 Specifications OSD 2 1 Product Specifications 2 2 Keyboard Mouse Specifications 2 3 On screen Display Operation OSD...

Page 4: ...s not made to clean monitors and monitor screens can scratch the LCD display or strip off the finish Do not spray any kind of liquid directly onto the screen or case of your monitor Spraying liquids d...

Page 5: ...tructure Diagram 4 1 2 5 6 7 3 11 9 10 8 11 10 9 8 7 6 5 4 3 1 LCD interchangeable module kit Membrane switch KVM option Installation Slides LCD membrane Micro switch for screen auto power off Audio s...

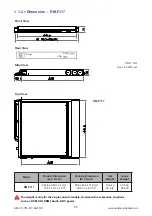
Page 6: ...dels It varies with accessories options such as KVM SDI HDMI Audio DC power UNIT mm 1mm 0 03937 inch Model Product Dimension W x D x H Packing Dimension W x D x H Net Weight Gross Weight RM F117 441 6...

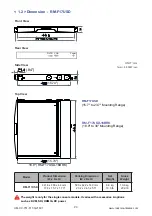
Page 7: ...mm 1mm 0 03937 inch Model Product Dimension W x D x H Packing Dimension W x D x H Net Weight Gross Weight RM F17USD 441 6 x 400 x 44 mm 17 4 x 15 7 x 1 73 590 x 622 x 140 mm 23 2 x 24 5 x 5 5 8 6 kg 1...

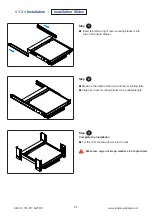
Page 8: ...rawer into the rack Complete the installation Step 3 Insert the left and right rear mounting brackets into the LCD console drawer Step 1 Step 2 Measure the depth of the front and rear mounting rails A...

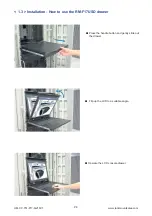
Page 9: ...M CV 751 F17 Q218V1 www rackmountsales com P 5 Hold the handle and slide out the drawer Operate the LCD console drawer Flip up the LCD to a suitable angle 1 3 Installation How to use the RM F117 drawe...

Page 10: ...F17 Q218V1 www rackmountsales com 1 3 Installation How to use the RM F17USD drawer Press the handle button and gently slide out the drawer Flip up the LCD to a suitable angle Operate the LCD console d...

Page 11: ...UM CV 751 F17 Q218V1 www rackmountsales com Intentionally Left Blank P 7...

Page 12: ...console drawer we suggest turning o the power to all devices Apply power to connected devices again only after the LCD console drawer is receiving power The company is not responsible for damage cause...

Page 13: ...y cause irreversible damage to the servers KVM and LCD console drawer Before attempting to connect anything to the LCD console drawer we suggest turning o the power to all devices Apply power to conne...

Page 14: ...t user manuals 2 1 Product Specifications LCD Panel RM F117 RM F17USD Native Resolution 1920 x 1080 Panel Size diagonal 17 3 Brightness cd m 400 Contrast Ratio typ 600 1 Colors 16 7 M 8 bit Viewing An...

Page 15: ...z 720p 720 x 480 x 50 60Hz 576p 480p Audio Signal 2ch Linear PCM Physical Specification RM F117 RM 17USD Product W x D x H 441 6 x 460 x 44 mm 441 6 x 400 x 44 mm 17 4 x 18 1 x 1 73 inch 17 4 x 15 7 x...

Page 16: ...pport Windows Linux Unix Mac OS 2 2 Standard Keyboard Mouse Specifications tb keyboard integrated with trackball tb Supporting layouts America United States EMEA United Kingdom Germany France Spain No...

Page 17: ...ed with touchpad Me P 13 How to Use MAC Keyboard Keyboard Features F1 Decrease display brightness F9 Fast forward F2 Increase display brightness F10 Mute sound F3 Mission control Only works with OS X...

Page 18: ...ode Key pad behaves as a normal key pad mode Num Caps Scro ll Comp ose Num Caps Scro ll Comp ose Incorporates SUN keys including Stop Cut Paste Compose Copy and Help 104 key notepad keyboard with full...

Page 19: ...UM CV 751 F17 Q218V1 www rackmountsales com Intentionally Left Blank P 15...

Page 20: ...he LED touch buttons will automatically turn off after 10 minutes of idle status except the Power Light up all membrane buttons please press any button for 1 2 seconds except the Power 1 2 2 3 On scre...

Page 21: ...eo signal to eliminate waviness and distortion Clock Adjust the clock value Phase Adjust the phase value H Position Align the screen image left or right V Position Align the screen image up or down 2...

Page 22: ...ynchronized Asynchronized Video Compatible Video Format 3G SDI 1080p 1080p 1080i 720p 60 50Hz 4 2 2 30 25 24Hz 4 4 4 60 50Hz 4 4 4 60 50Hz 4 4 4 HD SDI 1080p 1080i 720p 30 25 24Hz 4 2 2 60 50Hz 4 2 2...
Page 23: ...UM CV 751 F17 Q218V1 www rackmountsales com Intentionally Left Blank P 19...

Page 24: ...n out Audio HDCP 1 3 HDMI 1 3 1 In some circumstances if the user connects the LCD to PC via HDMI port for video and audio signals the LCD may display incorrectly on a full screen If so please adjust...

Page 25: ...HDCP 1 3 HDMI 1 3 1 In some circumstances if the user connects the LCD to PC via HDMI port for video and audio signals the LCD may display incorrectly on a full screen If so please adjust the display...

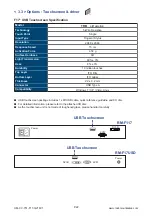
Page 26: ...op Layer ITO Film Bottom Layer ITO Glass Thickness 2 2 0 2 mm Connector USB Type A Compatibility Windows 7 XP Vista Linux 3 3 Options Touchscreen driver USB touchscreen package includes 1 x 6ft USB ca...

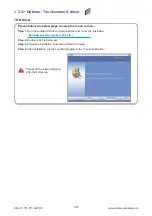
Page 27: ...com tw drivers_Win html Step 2 Double click the Setup exe Step 3 Follow the installation instruction to finish the setup Step 4 After installation run the TouchKit program the 4 point calibration Plea...

Page 28: ...oad 4950 mA 2450 mA 1220 mA 749 mA 600 mA Output rating Output voltage 12 Volt 12 Volt 12 Volt 12 Volt 12 Volt Output current 4 16A 4 16A 4 16A 6 25A 12 5A Efficiency 84 85 85 91 86 P 24 RM F117 1 If...

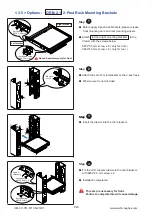
Page 29: ...release front mounting ears and rear mounting wheels Attach left and right mounting brackets to the drawer with the screws below 6 32 3 5 mm screw x 8 only for front 6 32 4 5 mm screw x 6 only for re...

Page 30: ...ompany reserves the right to modify product specifications without prior notice and assumes no responsibility for any error which may appear in this publication All brand names logo and registered tra...

Reviews: