background image


THE AV INTERFACE: 

1.


Remove the factory radio from the dashboard. 

2.


Remove the factory connectors from behind the factory radio. 

3.


Mate the T-Harness connections to the factory connectors. (Make sure all connectors are 
properly seated into the interface and into the radio.) 

4.


On the CAN Module, set DIP switch number 4 to ON to enable AV Input.  

5.


Switch to the new AV input by pressing the BACK button on the radio or the middle button on the 
steering wheel control behind the left side of the steering wheel. (See page 3) (If the radio does 
not have a BACK button use the GREEN wire option to toggle the AV source by connecting it to 
+12V. We recommend using a toggle switch to use this feature.) 


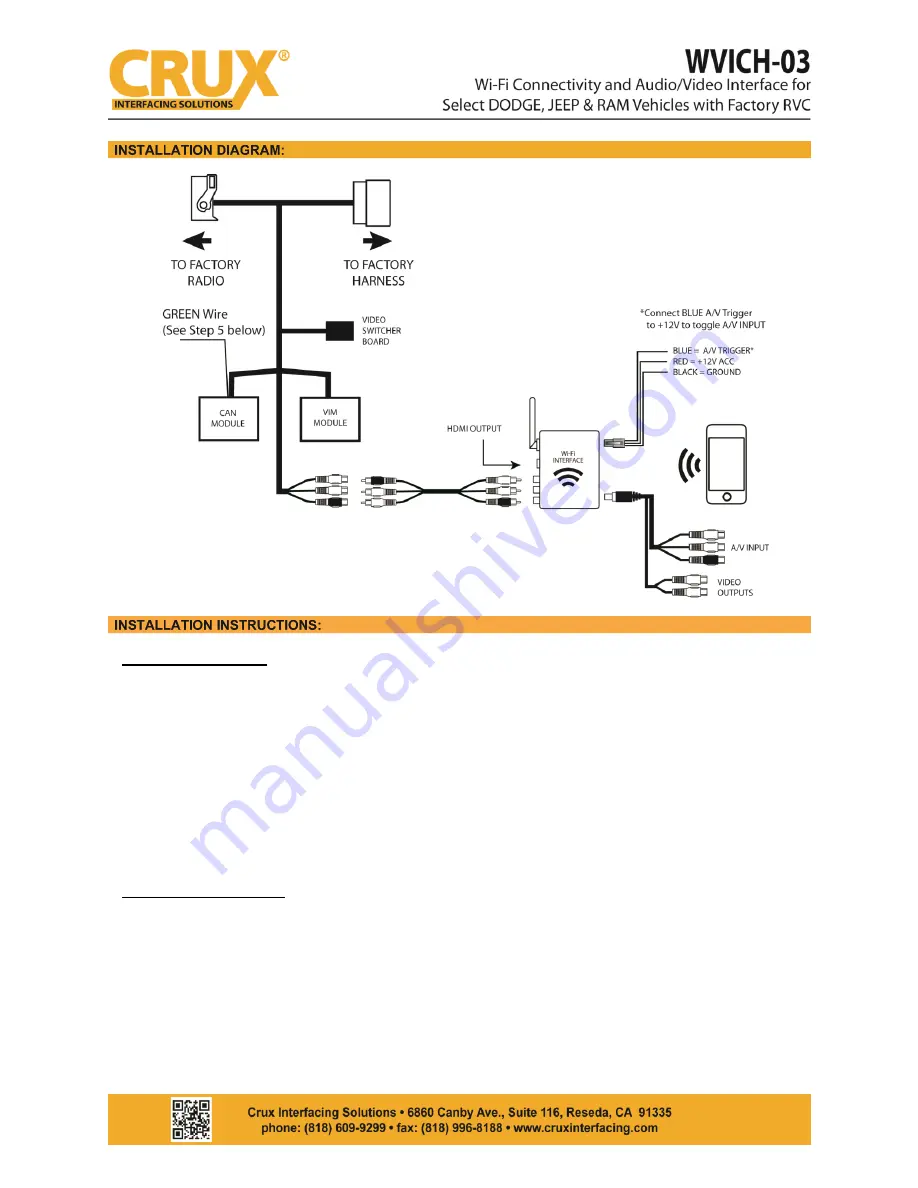
THE Wi-Fi INTERFACE: 

5. Connect the 4-Pin power connector and extension A/V cable to the Wi-Fi Interface. 
6. Screw on the antenna to the interface. 
7. Connect the RED power lead to +12V ACC and the BLACK wire to Ground. 
8. The BLUE wire is used to trigger the AV input feature. The AV INPUT can be connected to an AV 

source with composite output. A toggle switch (not included), wired between the BLUE wire and 
+12V can be used to switch ON or OFF the AV INPUT feature. The AV INPUT can also be used for a 
rear-view camera option. Connect the BLUE wire to the reverse light +12V lead to toggle this 
feature. 

2 / 4 

Rev.081817 

Summary of Contents for WVICH-03

Page 1: ...st Smartphones to the OEM Screen Provides an A V input for devices with composite audio video output Offers 2 video outputs for multiple screen applications Plug and Play Installation Compatible with iOS and Android devices Compatible with 8 4 and 5 Uconnect Radios For vehicles without factory rear view camera see Part WVICH 03B WVICH 03 CAN MODULE WVICH 03 A V Interface Harness WVI X WiFi Interfa...

Page 2: ...ACK button use the GREEN wire option to toggle the AV source by connecting it to 12V We recommend using a toggle switch to use this feature THE Wi Fi INTERFACE 5 Connect the 4 Pin power connector and extension A V cable to the Wi Fi Interface 6 Screw on the antenna to the interface 7 Connect the RED power lead to 12V ACC and the BLACK wire to Ground 8 The BLUE wire is used to trigger the AV input ...

Page 3: ...to the AV source On some vehicles there is a SWC control switch behind the left side if the steering wheel Press the middle button to switch to the A V source NOTE If there is no video signal flowing through the AV input there will be a BLUE screen present To exit simply press the BACK or SWC button again With the Interface ON and READY On the iOS 7 and up Open settings Select Wi Fi Under Choose N...

Page 4: ...on uses a direct Wi Fi connection to transfer the Audio and Video from your device You will still be able to browse the internet or stream audio video using your data plan If your smartphone has the Screen Time Out enabled and your display goes to sleep mode you will no longer see the image on the screen Deactivate this feature for continuous viewing 8 4 Uconnect Radio 1 Piece Radio 5 Uconnect Rad...

Reviews: