RTX220 QR - Manual
• For the RAX841-XJ, use the included set of keys to turn the
key lock 90 degrees clockwise to power on each hard drive.
• For the RAX845-XJ, push in the power buttons on each frame
until the LED lights up to power on each hard drive.
Your RAX is now ready to use! If the hard drives are already
formatted, the RAX can be used right away. If the hard drives are
brand new, or the formats are not compatible with your computer,
the drives will need to be formatted before being used. See sec-
tion 3, “Usage with Mac and Windows Operating Systems” for
information on formatting.
2.4 Tips for Rack Mounting RAX 8-Bay-XJ
Elevated Operating Ambient Temperature:
Install the equipment
in an environment compatible with the maximum ambient tempera-
ture of 40° C
Ventilation:
Do not block or inhibit the air flow to the unit.
Mechanical Loading:
Use care to ensure the RAX is mounted in a
level position to prevent damage.
Circuit Overloading:
Do not overload the circuits. Refer to the name
plate ratings on the equipment.
Reliable Grounding:
Maintain grounding of rack-mounted equip-
ment by using indirect connections to the branch circuit (i.e. UPS
battery backups, power strips).
3. Usage with Mac and Windows Operating Systems
3.1 Usage with Mac OS X
3.1.1 Compatibility
RAX uses 3.5-inch SATA (Serial-ATA) hard drives only. RAX does
not require drivers for operation under Mac OS X. However, if you
install a host card specifically to work with this product, that card
may require drivers. See your card’s User Manual for drivers and
instructions.
3.1.2 Formatting a Drive
If you purchased your RAX pre-populated with hard drives, this
step should not be necessary unless you wish to change the format
or erase the drive. To format, use Mac OS X’s Disk Utility (found in
the applications folder).
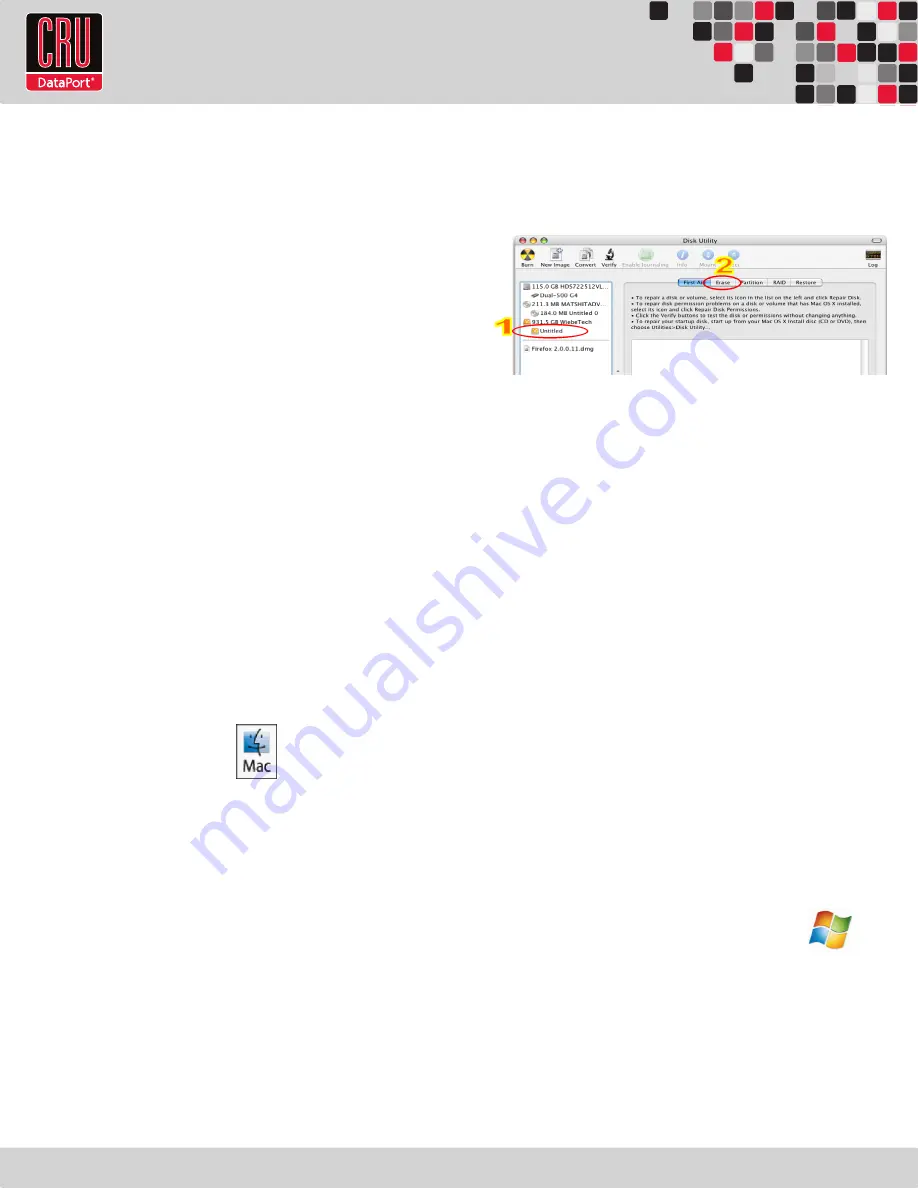
a. Click on the drive in the window to the left (see following image).
b. Click the Erase tab in the window to the right (see following
image).
c. Select the format type. Most users prefer Mac OS Extended
with Journaling (HFS+), which is required for compatibility
with Time Machine (OS 10.5 or newer). If you need to use your
RAX with both Mac and Windows computers, select MS-DOS
File System instead.
d. Enter a name for the new volume and then click “Erase” to
start the process.
3.1.3 Mounting and Unmounting Volumes
If the hard drives installed in RAX are already formatted, an icon
representing the drive’s volume will appear (mount) on the desktop.
You can begin using the volume right away. If the drive is unfor-
matted, a message will appear on the desktop saying that the disk
is unreadable. You can use OS X’s Disk Utility to easily format the
drive (see section above).
Unmount the volume before powering down the unit by dragging
the volume’s icon to the trash bin, or by selecting the volume
then pressing Command-E. Disconnecting the unit without first
unmounting the volume can result in data loss.
3.1.4 Creating a Boot Drive
To activate this feature, you must first install OS X on the hard
drive in your carrier. The easiest way to do this is to clone an
existing system drive using a utility such as Carbon Copy Cloner or
Super Duper. Next, go to System Preferences --> Startup Disk. A
window will list the available bootable volumes. Select the volume
from which you wish to boot. Another method is to hold down the
Option key during boot up. A screen should appear that allows you
to select the volume you wish to use. This is useful if you wish to
boot from your RAX hard drive only some of the time.
3.2 Usage with Windows Operating Systems
3.2.1 Compatibility
RAX-XJ uses 3.5-inch SATA (Serial-ATA) hard drives only. RAX
does not require drivers for operation under Windows XP, Vista,
or 7. However, if you install a host card specifically to work with
this product, that card may require drivers. See your card’s User
Manual for drivers and instructions.
Page 3


