


RTX220 QR - Manual
d. Hold the hard drive inside the carrier and turn the drive carrier
assembly over. Secure the hard drive to the bottom of the car-
rier by using the mounting screws provided.
e. Replace the cover and secure it with the screws you removed in
Step B into the sides of the carrier.
f. Reinsert the carrier into the frame and push the handle in until it
clicks to secure it.
2.2 Rack Mounting Warnings
•
Elevated Operating Ambient:
If installed in a closed or multi-
unit rack assembly, the operating ambient temperature of the
rack environment may be greater than room ambient.
•
Reduced Air Flow:
Installation of the equipment in a rack
should be such that the amount of air flow required for safe
operation of the equipment is not compromised.
•
Mechanical Loading:
Mounting of the equipment in the rack
should be such that a hazardous condition is not achieved due to
uneven mechanical loading.
•
Circuit Overloading:
Consideration should be given to the
connection of the equipment to the supply circuit and the effect
that overloading the circuits might have on over current protec-
tion and supply wiring. Appropriate consideration of equipment
nameplate ratings should be used when addressing this concern.
•
Reliable Earthing:
Reliable earthing of rack-mounted equip-
ment should be maintained. Particular attention should be given
to supply connections other than direct connections to the
branch circuit (e.g. use of power strips).
3. Operating RAX215DC-XJ
Connect the SFF-8088 data cable to the RAX and your host computer. Plug
in the power cord. Turn on the power. Insert the carriers into the frame
and the “Auto Start” feature will power up the drives automatically.
Your RAX is now ready to use! If the hard drives are already formatted,
the RAX can be used right away. If the hard drives are brand new, or the
formats are not compatible with your computer, the drives will need to
be formatted before being used. See the following section, “Usage with
Mac and Windows Operating Systems.”
NOTE:
A flashing red LED on the bay indicates bay fan failure.
Call CRU technical support for assistance.
4. Usage with Mac and Windows Operating Systems
4.1 Usage with Mac OS X
4.1.1 Compatibility
RAX uses 3.5-inch SATA (Serial-ATA) hard drives only. RAX does
not require drivers for operation under Mac OS X. However, if you
install a host card specifically to work with this product, that card
may require drivers. See your card’s User Manual for drivers and
instructions.
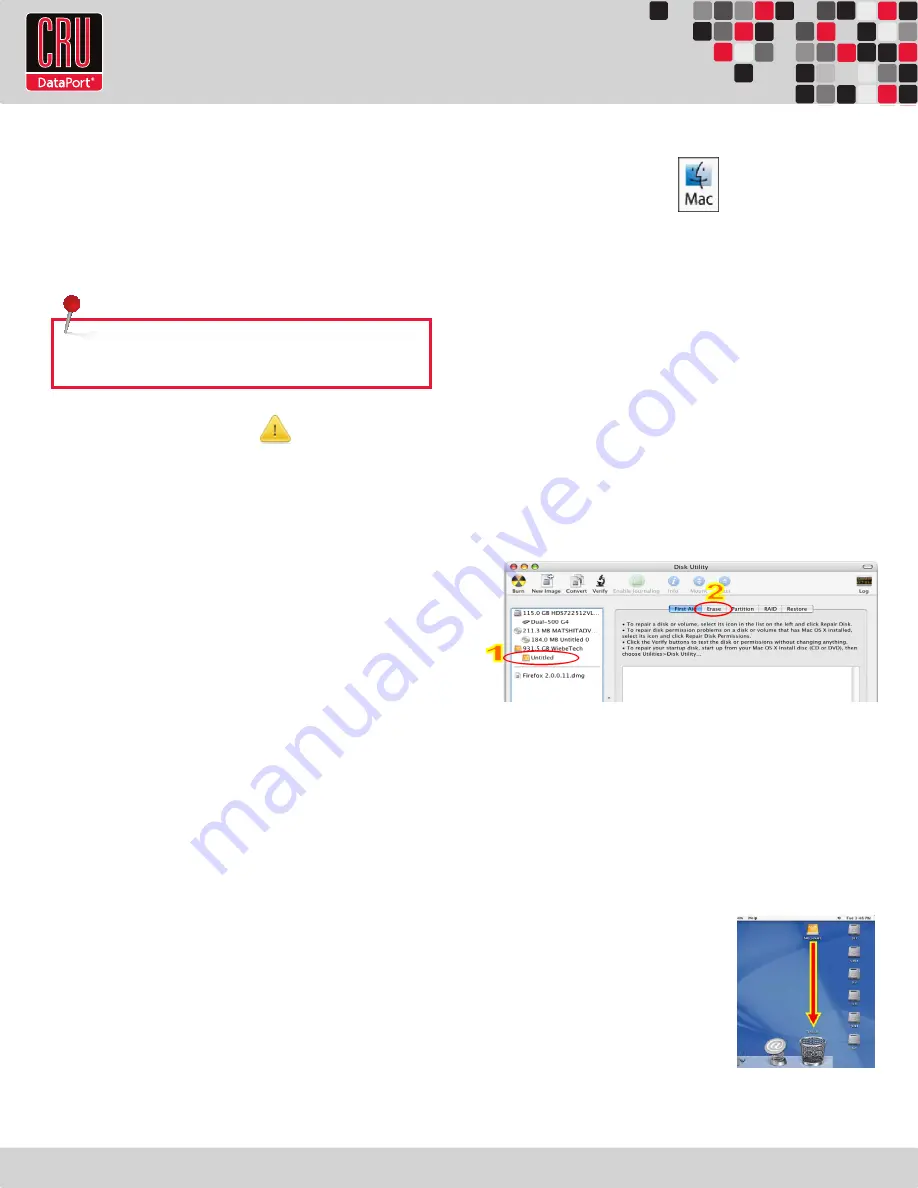
4.1.2 Formatting a Drive
If you purchased your RAX pre-populated with hard drives, this
step should not be necessary unless you wish to change the format
or erase the drive. To format, use Mac OS X’s Disk Utility (found in
the applications folder).
a. Click on the drive in the window to the left (see picture below).
b. Click the Erase tab in the window to the right (see picture
below).
c. Select the format type. Most users prefer Mac OS Extended
with Journaling (HFS+), which is required for compatibility
with Time Machine (OS 10.5 or newer). If you need to use your
RAX with both Mac and Windows computers, select MS-DOS
File System instead.
d. Enter a name for the new volume and then click “Erase” to
start the process.
4.1.3 Mounting and Unmounting Volumes
If the hard drives installed in RAX are
already formatted, an icon representing
the drive’s volume will appear (mount)
on the desktop. You can begin using
the volume right away. If the drive is
unformatted, a message will appear
on the desktop saying that the disk is
unreadable. You can use OS X’s Disk
Utility to easily format the drive (see
section above).
Page 2


