background image

2

Protecting Your Digital Assets

TM

CRU Data Express DX175 User Manual

1 gEnEraL inFormaTion

1.1 paCKagE ConTEnTS

The following list contains the items that are included in the 
complete confi guration for this device. Please contact CRU if 
any items are missing or damaged: 

accessories

Quantity

Installation screws for receiving frame

4

Installation screws for 2.5” drive mounting

4

Installation screws for 3.5” drive mounting

4

Data Express key

3

Quick Start Guide

1

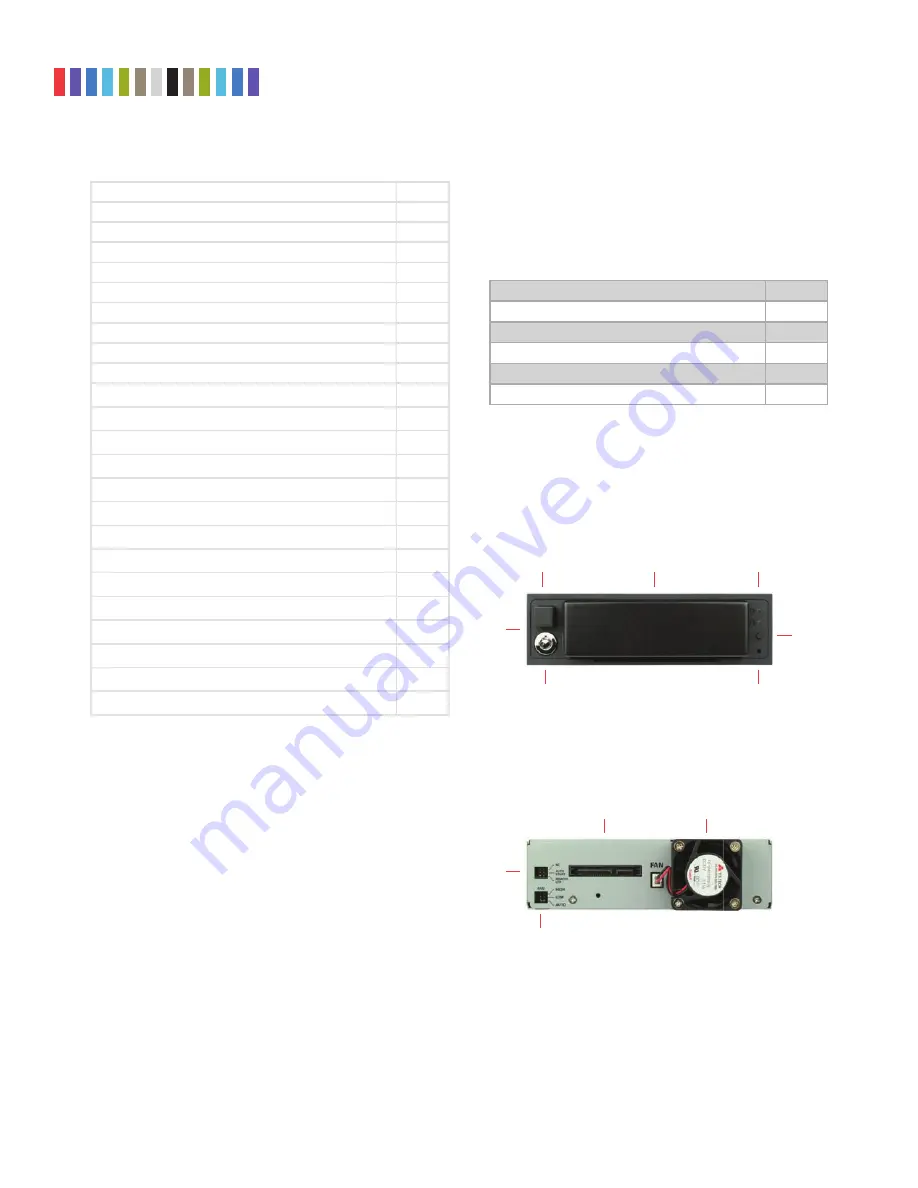
1.2 iDEnTiFYing parTS

Take a moment to familiarize yourself with the parts of the 
product. This will help you to better understand the following 
instructions.

TaBLE oF ConTEnTS

1 General Information

2

1.1 Package Contents

2

1.2 Identifying Parts

2

1.3 LED Behavior

3

1.4 Warnings and Notices

3

2 DX175 Installation

3

2.1 Frame Installation

3

2.2 Drive Installation

3

2.3 Operating Your DX175

4

2.4 Eject a Carrier

4

3 Other Confi guration Options

4

3.1 Error Reporting Disable Switch

4

3.2 Drive Activity LED Polling

4

3.3 Drive Auto Spinup

4

3.4 Fan Speed

5

4 Usage with Windows and Mac Operating Systems

5

4.1 Usage with Windows Operating Systems

5

4.1.1 Format a Drive

5

4.1.2 Mount and Unmount Volumes

7

4.2 Usage with Mac Operating Systems

8

4.2.1 Format a Drive

8

4.2.2 Mount and Unmount Volumes

8

4.3.2 Create a Boot Drive

9

5 Technical Specifi cations

10

Eject Button

FronT

Carrier

Status Lights

Frame

Power

Button

Keylock

Error Reporting

Disable Switch

BaCK

SATA Power &

Data Connectors

Cooling Fan

Drive

Auto

Spinup

Confi g

Fan Speed

Confi g

Summary of Contents for Data Express DX175

Page 1: ... smaller computers Toolless entry into the drive carrier Temperature Control Cooling Sensor auto adjusts fan speed depending on need Push button carrier ejection mechanism Keylock secures the carrier from accidental ejection Rated for up to 50 000 carrier insertions DataExpress Branding ...

Page 2: ...mation 2 1 1 Package Contents 2 1 2 Identifying Parts 2 1 3 LED Behavior 3 1 4 Warnings and Notices 3 2 DX175 Installation 3 2 1 Frame Installation 3 2 2 Drive Installation 3 2 3 Operating Your DX175 4 2 4 Eject a Carrier 4 3 Other Configuration Options 4 3 1 Error Reporting Disable Switch 4 3 2 Drive Activity LED Polling 4 3 3 Drive Auto Spinup 4 3 4 Fan Speed 5 4 Usage with Windows and Mac Opera...

Page 3: ...ource This includes any place where the product will be subject to direct sunlight Do NOT allow water to make contact with the carrier or receiving frame Before starting any type of hardware installation please ensure that all power switches have been turned off and all power cords have been disconnected to prevent personal injury and damage to the hardware To avoid overheating the DX175 should be...

Page 4: ... used Formatting a drive will erase all data on the drive so be sure to back up your data before beginning this operation 2 4 Ejecting A Carrier a Turn off the computer or properly dismount the drive from the system To dismount the drive ensure there are no file transfers in progress and the white Drive Activity LED is off before turning the DX175 off b If the carrier is locked into the frame inse...

Page 5: ...e Disk Management utility by following the steps below for your specific Windows operating system Windows 10 a Right click on the Start Button and then select Disk Management b The drive should appear in the list of Disks in the lower pane You may need to scroll down to see it If the drive is already formatted you can identify it easily by its volume name If the drive is not initialized or is bran...

Page 6: ...partition type Select gpT and press oK c To format the volume right click the Drive properties Box highlighted in red in Figure 1 and select new Simple volume d Unless you wish to customize the settings in these dialog prompts click next on the Select Partition Specify Volume Partition Size and Assign Drive Letter or Path dialog prompts leaving the default settings e You will now see a window that...

Page 7: ... 1 2 Mount and Unmount Volumes Mount a Volume If the drive inside of the DX175 is already formatted you can begin using the volume right away When the DX175 is properly connected and turned on a window may open to allow you access to the volume If no window appears find the volume by opening a File Explorer window Windows 10 8 and Server 2012 R2 by clicking on This PC in the navigation pane of a F...

Page 8: ...e Select apFS if it is an available option Otherwise select oS x Extended journaled If you need to use your DX175 with both macOS and Windows computers select ExFaT instead e For the scheme select guiD partition map f Click Erase to start the process g Once the format is complete click Done 4 2 2 mount and unmount volumes If the drive installed in the DX175 is already formatted an icon representin...

Page 9: ...hird party app like MacDaddy Install Disk Creator Next go to System Preferences Startup Disk A window will list the available bootable volumes Select the volume from which you wish to boot Another method is to hold down the Option key during boot up A screen should appear that allows you to select the volume you wish to use This is useful if you are sporadically booting from the DX175 ...

Page 10: ... product to be free of significant defects in material and workmanship for a period of five years from the original date of purchase CRU s warranty is nontransferable and is limited to the original purchaser Limitation of Liability The warranties set forth in this agreement replace all other warranties CRU expressly disclaims all other warranties including but not limited to the implied war rantie...

Reviews: