background image

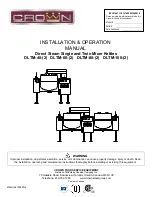
INSTALLATION AND OPERATION MANUAL, DIRECT STEAM SINGLE & TWIN MIXER

KETTLE, MODELS DLTM-40 TO DLTM-100 AND DLTM-40-2 TO DLTM-100-2

3.0  INTRODUCTION

DESCRIPTION

All Crown direct connected steam jacketed kettles pertaining to this manual are direct steam
operated pressure vessels of a double-wall stainless steel construction forming a steam
chamber (jacket) enveloping the lower two thirds of the kettle bowl surface.  All kettles are
tilting, floor mounted in fixed positions on legs with adjustable flanged feet.  All kettles are
equipped with a safety relief valve and a steam control valve.

CAPACITIES

All models are suffixed with either -40, -60, -80 or -100 to indicate the capacity of that kettle in
US gallons.  Thus a DLTM-40 is a two thirds jacketed direct steam kettle mounted on legs with
a capacity of 40 gallons (US).

FUNCTIONING MODE

Crown direct connected steam jacketed kettles consist of a stainless steel bowl and a stainless
steel jacket which envelopes two thirds of the lower surface of the bowl thus forming a sealed
pressure vessel (chamber) into which steam is introduced by means of a manual control valve. 

The kettle bowl is the container for the food product which ideally should be of a liquid or semi-
liquid consistency to achieve complete contact with the bowl surface and thus fully absorb the
heat transmitted through that surface.  

The temperatures required for the cooking process to function adequately must be greater than
the boiling point of the liquid food product.  Further, the greater the steam pressure used, the
higher the temperature and consequently the quicker the cooking process.  For example, steam
pressurized at 30 psi attains a temperature of 274 degrees Fahrenheit (135 Celsius).

In the initial stages of the cooking process when the steam comes in contact with the cold kettle
bowl surface it condenses and forms considerable amounts of water.  A thermostatic steam
trap should be plumbed to the exit end of the kettle jacket.  This trap is a mechanical device
that closes on high temperatures and opens when the temperature drops thus allowing the
water formed from condensate to exhaust but retain steam under pressure.  

Part No. 10040R4

6

2018-12-05

Summary of Contents for DLTM-100

Page 1: ...enance instructions thoroughly before installing or servicing this equipment IMPORTANT FOR FUTURE REFERENCE Please complete this information and retain this manual for the life of the equipment Model ___________________________ Serial ___________________________ Date Purchased ____________________ CROWN FOOD SERVICE EQUIPMENT Division of Middleby Canada Company Inc 70 Oakdale Road Downsview Toront...

Page 2: ... to alert you to potential personal injury hazards Obey all safety messages that follow this symbol to avoid possible injury or death WARNING Improper installation operation adjustment alteration service or maintenance can cause property damage injury or death Read the installation operating and maintenance instructions thoroughly before installing operating or servicing this equipment Intended fo...

Page 3: ...LE OF CONTENTS DESCRIPTION PAGE 1 0 Important Notes for Installation and Operation 2 2 0 Service Connections 4 3 0 Introduction 6 4 0 Installation Instructions 7 5 0 Operating Instructions 8 6 0 Cleaning Instructions 10 7 0 Maintenance 13 8 0 Troubleshooting 17 Appendix A Material Safety Data Sheet 21 Part No 10040R4 3 2018 12 05 ...

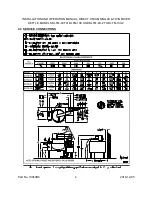
Page 4: ...INSTALLATION AND OPERATION MANUAL DIRECT STEAM SINGLE TWIN MIXER KETTLE MODELS DLTM 40 TO DLTM 100 AND DLTM 40 2 TO DLTM 100 2 2 0 SERVICE CONNECTIONS Part No 10040R4 4 2018 12 05 ...

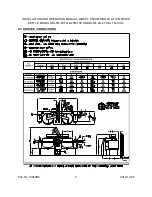
Page 5: ...INSTALLATION AND OPERATION MANUAL DIRECT STEAM SINGLE TWIN MIXER KETTLE MODELS DLTM 40 TO DLTM 100 AND DLTM 40 2 TO DLTM 100 2 2 0 SERVICE CONNECTIONS Part No 10040R4 5 2018 12 05 ...

Page 6: ...e of the bowl thus forming a sealed pressure vessel chamber into which steam is introduced by means of a manual control valve The kettle bowl is the container for the food product which ideally should be of a liquid or semi liquid consistency to achieve complete contact with the bowl surface and thus fully absorb the heat transmitted through that surface The temperatures required for the cooking p...

Page 7: ...am line 3 4 pipe size to the steam inlet Make sure there is a steam control valve strainer convenient to the unit If incoming steam pressure is greater than kettle maximum operating pressure then a pressure reducing valve must be installed in the line If large amounts of water accumulate in the steam line it will be necessary to install one or more ball float traps in the line to eliminate the wat...

Page 8: ...wer switch located on the left side of the control panel Place switch in the ON position Ensure that mixer speed control is set to the stop position Set the mixer switch located beside the main power switch to ON position Note that the agitators should not be turning The speed control has four basic settings which are stop slow medium and fast Set the speed control to the slow position and observe...

Page 9: ...shaft of large agitator push up and turn to disengage lock pin Pull straight down on agitator Remove the small agitator in the same manner Soak and wash agitators in warm soapy water Never use abrasive cleansers or scouring pads on the stainless steel surfaces as this will damage the finish of the stainless steel If it is necessary to remove the scraper blades from the large agitator for cleaning ...

Page 10: ...e rinse inside of kettle thoroughly and drain to remove any food particles 3 Using a nylon brush clean kettle with a mild detergent and warm water rinse Never use steel wool or scouring powder as it will scratch stainless steel 4 Tilt kettle fully or open the tangent draw off valve if one is provided to allow soap and water solution to drain Rinse with clean water 5 Wipe the exterior of kettle wit...

Page 11: ...ore thorough and frequent cleaning or the life of the equipment could be adversely affected STAINLESS STEEL To remove normal dirt grease or product residue from stainless steel use ordinary soap and water with or without detergent applied with a sponge or cloth Dry thoroughly with a clean cloth Never use vinegar or any other corrosive cleaner To remove grease and food splatters or condensed vapour...

Page 12: ...oking in the kettle CONTROL PANEL The textured control panel should be cleaned with warm water and mild soap Never use an abrasive cloth or steel wool Never use cleaning solvents with a hydrocarbon base BUTTERFLY VALVE WARNING If you are cleaning a valve that is assembled to a kettle be sure the kettle is completely empty of any product DISASSEMBLY AND MAINTENANCE In the event that repairs or repl...

Page 13: ...r test should also be performed at the end of any non service period CAUTION Hot high pressure fluid may be discharged from body drain and vent during try lever test Care must be taken to avoid any bodily contact CAUTION High sound levels may be experienced during try lever test Wear proper safety equipment and exercise extreme care Test at or near half of the operating pressure by holding the tes...

Page 14: ...ts the hydraulic system from properly cooling The hydraulic system has been adjusted and tested at the factory and no adjustment should be needed If the unit fails to operate properly all service work must be performed by a qualified service agent A thermostat controlled cooling system has been installed in the hydraulic system to maintain cool oil temperatures while in operation The oil is cooled...

Page 15: ...o on MIXER to on and set mixer speed to STOP 2 Turn trim relief stem item B completely in 3 Increase the pump pressure by turning A inwards until gauge D reads 1700 psi The pressure must be 300 psi higher than the pump setting 4 Adjust trim relief B outwards until pressure indicated on gauge D begins to drop 5 Lock the trim relief B 6 Decrease the pump pressure by turning A outwards until gauge D ...

Page 16: ...exceed 54 rpm Decreasing the flow to less than 10 rpm may over centre the swash plate and will damage the pump 3 Use jam nut to lock adjusting screw when complete SETTING THE BRIDGE ACTUATOR 1 On the operator panel switch POWER to on MIXER to on and set mixer speed to STOP 2 The pressure reducing valve and associated gauge are located at the back of the hydraulic unit Adjust it to 800 psi 3 The sp...

Page 17: ...te to exhaust but retain steam under pressure The temperatures required for the cooking process to function adequately must be greater than the boiling point of the liquid food product The greater the steam pressure used the higher the temperature and the quicker the cooking process For example steam pressurized at 30 psi reaches a temperature of 274 degrees Fahrenheit 135 degrees Celsius Since ai...

Page 18: ...lete their stroke and burn out Make certain the electrical signal is interlocked so that this condition cannot exist 3 Incorrect voltage or frequency will prevent operation or burn out coil 4 Foreign matter in valve 5 Oil too hot PUMP 1 Excessive noise caused by vacuum leak in suction line 2 Misalignment of drive mechanism will cause high noise level in operation 3 Relief set too high 4 Return lin...

Page 19: ...hrough inlet of pump 5 System pressure exceeds pump rating BROKEN INTERNAL PARTS 1 Lack of oil 2 Excessive torquing of housing bolts 3 Solid matter being drawn in from reservoir DIRTY OIL 1 Components not cleaned properly after servicing 2 Air breather left off 3 Filter dirty or ruptured FOAMING OIL 1 Return line not below oil level 2 Oil contaminated 3 Suction leak to pump MOISTURE IN OIL 1 Water...

Page 20: ...SHOOTING Continued OVERHEATING OF SYSTEM 1 Continuous operation at relief setting a Stalling under load b Viscosity of oil too high 2 Excessive slippage or internal leakage a Fluid too low 3 System relief valve set too high 4 Power unit ambient too high 5 Insufficient volume of cold water supply to oil cooler Part No 10040R4 20 2018 12 05 ...

Page 21: ...INSTALLATION AND OPERATION MANUAL DIRECT STEAM SINGLE TWIN MIXER KETTLE MODELS DLTM 40 TO DLTM 100 AND DLTM 40 2 TO DLTM 100 2 Part No 10040R4 21 2018 12 05 ...

Page 22: ...INSTALLATION AND OPERATION MANUAL DIRECT STEAM SINGLE TWIN MIXER KETTLE MODELS DLTM 40 TO DLTM 100 AND DLTM 40 2 TO DLTM 100 2 Part No 10040R4 22 2018 12 05 ...

Page 23: ...INSTALLATION AND OPERATION MANUAL DIRECT STEAM SINGLE TWIN MIXER KETTLE MODELS DLTM 40 TO DLTM 100 AND DLTM 40 2 TO DLTM 100 2 Part No 10040R4 23 2018 12 05 ...

Page 24: ...INSTALLATION AND OPERATION MANUAL DIRECT STEAM SINGLE TWIN MIXER KETTLE MODELS DLTM 40 TO DLTM 100 AND DLTM 40 2 TO DLTM 100 2 Part No 10040R4 24 2018 12 05 ...

Page 25: ...INSTALLATION AND OPERATION MANUAL DIRECT STEAM SINGLE TWIN MIXER KETTLE MODELS DLTM 40 TO DLTM 100 AND DLTM 40 2 TO DLTM 100 2 Part No 10040R4 25 2018 12 05 ...

Page 26: ...INSTALLATION AND OPERATION MANUAL DIRECT STEAM SINGLE TWIN MIXER KETTLE MODELS DLTM 40 TO DLTM 100 AND DLTM 40 2 TO DLTM 100 2 Part No 10040R4 26 2018 12 05 ...

Page 27: ...INSTALLATION AND OPERATION MANUAL DIRECT STEAM SINGLE TWIN MIXER KETTLE MODELS DLTM 40 TO DLTM 100 AND DLTM 40 2 TO DLTM 100 2 Part No 10040R4 27 2018 12 05 ...

Page 28: ...INSTALLATION AND OPERATION MANUAL DIRECT STEAM SINGLE TWIN MIXER KETTLE MODELS DLTM 40 TO DLTM 100 AND DLTM 40 2 TO DLTM 100 2 Part No 10040R4 28 2018 12 05 ...

Reviews: