– 46 –
T R A D I T I O N A L S E R I E S C O T T A G E R O O F F R E E S T A N D I N G M O D E L • G R E E N H O U S E I N S T R U C T I O N S
Appendix F –
Polycarbonate Panels
& Cap Installation
GENERAL INFORMATION ABOUT HANDLING POLYCARBONATE
All polycarbonate sheets are covered with a thin sheet of plastic on both sides to prevent the sheets
from becoming dirty and scratching during handling. One side is a clear plastic while the other side
is blue or some other colour, depending on the manufacturer. This latter side should be installed so
that it faces out.
(VERY IMPORTANT: The sheet is marked to indicate which side should face out.)
Before you begin installing, lay out the sheets lengthwise so that it is easier to take the one you
want to install. Do the same with the capping.
Remove all the paper on the foam strip on the greenhouse before you begin installing the panels.
If the weather is warm and sunny, the foam strips will be sticky. Take a trigger spray bottle and fill it
with soap and water. Just before you install the panels, spray the foam lightly so that the panels can
be moved around.
Do not store polycarbonate bundles outside in the sun. Instead, store them
in a cool dark place, such as a garage, until you are ready to use them.
To clean polycarbonate panels, use soap and water only – do NOT use any chemicals – they will
damage the panels.
ROOF POLYCARBONATE PANEL INSTALLATION
NOTE: When you install the roof panels, start on the far side of the roof vent opening.
Work towards the vent opening. When installing the last pieces in the roof you can reach
it through the vent opening and do not have to move your ladder outside.
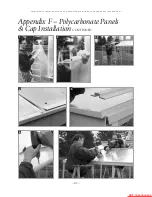
Start with the roof panels. Peel off the plastic.
(See Picture 1, page 47) Remember to mark the
corner so that you know which side is out (The blue plastic indicates the outside; the clear plastic
indicates the inside).
Put an aluminum “ ” on the bottom of the sheet
(Picture 2, page 47).
Then slide the panel into the top
track
(Picture 3, page 47)
and the
bottom of the panels with the “
” into the gutter. The long leg of
the “ ” faces outside
(Picture 4).
(The gutter should have NO foam
on the ledge where the lip of the “ ”
rests)
If the Poly Bars do not line
up with the panel, move the greenhouse ridge toward the front or back until the bars line up.
This “squares up” the roof section.
Spray the foam with water if it is sticky.
The shorter pieces
should be placed under the vents. Finish the one side of the roof.
Take the cap, hold it against the panel and position it in the center of the Poly Bar
(Pictures 5,
6 & 7, page 47).
Use #8 x 1/2" screws and screw it on the Poly Bars
(You could use a portable
drill with screwbit to do this job, just don’t make it too tight).
Continue to the next panel and
follow the same procedure.
NOTE: At this time, seal the INSIDE (with silicone)
of the
“ ”
before installing the panel on the roof.
Silicone
outside
inside
Silicone AFTER the
panels are installed.
Summary of Contents for Traditional Series
Page 1: ...ACF Greenhouses...


