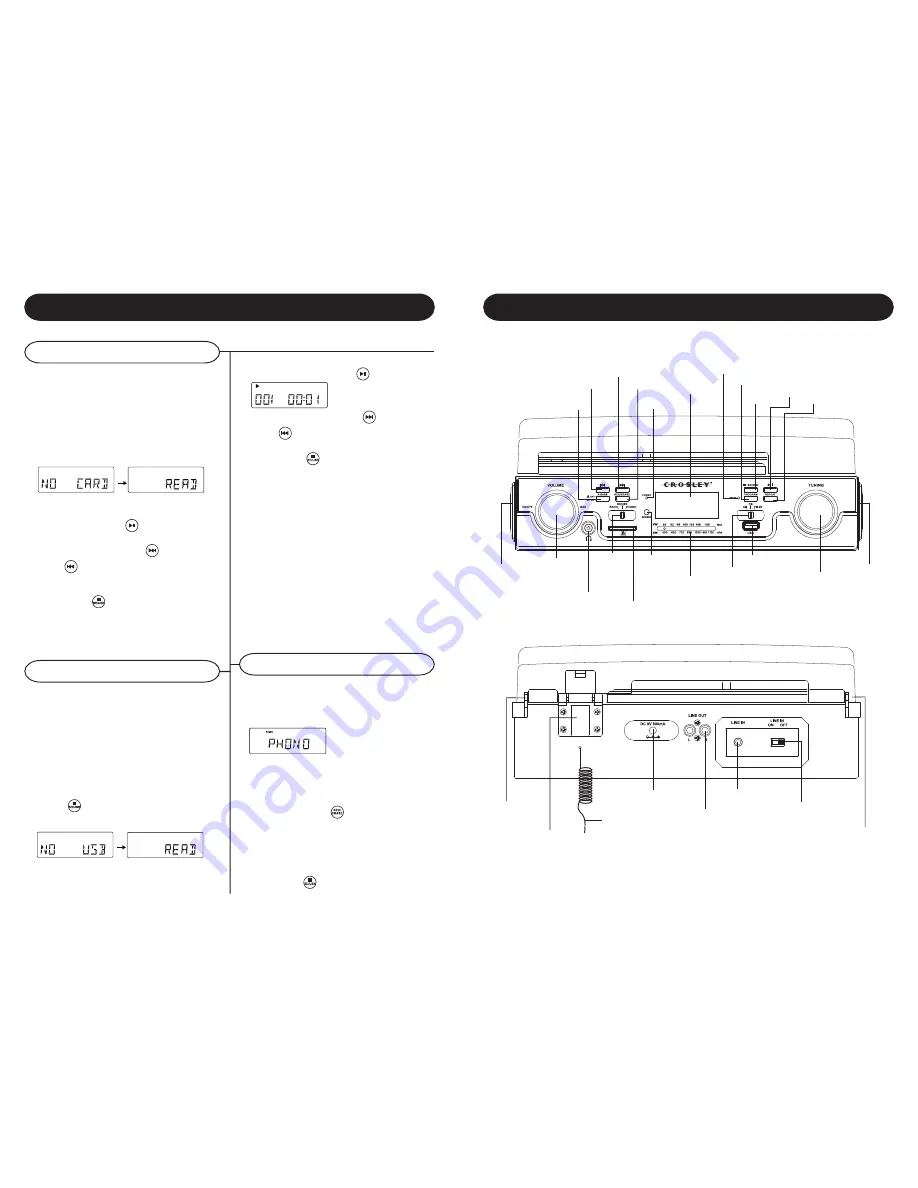
1 Slide the FUNCTION Switch to SD/USB mode.
2 Switch the unit ON by turning the VOLUME
ON/OFF KNOB to the on Position.
3 Turn the VOLUME control in mid-range position.
4 Plug-in USB mass storage device. READ is
displayed as the system scans the contents of
USB device.
5 Before starting playback, press and hold
STOP
/
for approximately 2 seconds to
switch between SD/USB. Release the button when
USB is shown on the display.
6 Track no. 1 of the first folder will be displayed
after the contents of the SD Card have been
USB
MP3
USB
USB
SPEAKER
VOLUME
ON/OFF
KNOB
EARPHONE JACK
RADIO\
SD/USB\
PHONO
SWITCH
SD CARD
DIAL SCALE
AM\FM\
FM.ST
SWITCH
USB PORT
TUNING KNOB
SPEAKER
X-BASS
ON/OFF
BACKWARD SKIP
FORWARD SKIP
REC/ERASE
POWER
INDICATOR
SENSOR
LCD DISPLAY
FM.ST INDICATOR
PROGRAM
STOP/
SD/USB
PLAY/
PAUSE
REPEAT
1 Slide THE FUNCTION Switch to SD/USB mode.
2 Switch the unit ON by turning the VOLUME
ON/OFF KNOB to the on Position.
3 Turn the VOLUME control in mid-range position.
4 Insert SD-Card into the card slot. READ is
displayed as the system scans the contents of
SD card.
5 Track no. 1 of the first folder will be displayed
after the contents of the SD Card have been read.
Press
PLAY/PAUSE /
to start playback.
6 Press the
FORWARD SKIP/
/ BACKWARD
SKIP /
once or repeatedly until the desired
track number appears in display.
7 Press
STOP
/
to stop playback.
Note: If your music is separated into multiple folders
on your SD Card, this unit will only show the actual
MP3 files and will NOT show the different folders in
which the files are stored.
7 Press the
FORWARD SKIP
/
/ BACKWARD
SKIP
/
once or repeatedly until the desired
track number appears in display.
8 Press
STOP
/
to stop playback.
Note: If your music is separated into multiple folders
on your USB Flash Drives this unit will only show
the actual MP3 files and will NOT show the different
folders in which the files are stored.
Notes:
1. USB connector does not support connection with
USB extension.
2. This unit is not designed for communication with
computer directly.
3. All USB Flash Drives and SD Cards may not be
compatible with this unit.
IMPORTANT:
Do not disconnect the USB device SD card during
USB/SD mode, as this may damage the external
device or its files. Please power off first or press
another Mode before safely disconnecting the USB
device /SD card.
This unit allows you to convert your records into MP3
format onto either USB Flash Drive or an SD Card.To
convert your records, follow the steps below.
1 Slide the FUNCTION button to PHONO mode.
2 Start playback of the record at the point you want
to start recording. (See Turntable Operation on
Page 7 for more information on playing your
record).
3 Press
REC/ERASE /
to start recording.
4. REC will show on the display and TO will be
shown briefly.
5 The media that you are recording to (either USB
or SD), will begin flashing on the display once
recording begins.
6 Press
STOP
/
to stop recording.
5
8
CARD
CARD
read. Press
PLAY/PAUSE
/
to start playback.
Control Locators
AC ADAPTOR
JACK
EXTERNAL
FM ANTENNA
LINE OUT
JACK
LINE IN JACK
LINE IN SWITCH
LOCK HINGE
LID PIVOT POINT
LID PIVOT POINT
Basic Operation
SD-Card Operation
USB Operation
Phono to USB/SD
Summary of Contents for 354234
Page 1: ......


