background image

23

steering head bearing

The steering head bearing is preset at the time of delivery. In the event the 
handlebar has too much play after some time or become too stiff, have the 
steering head bearing adjusted by a speciality retailer or a bicycle shop.

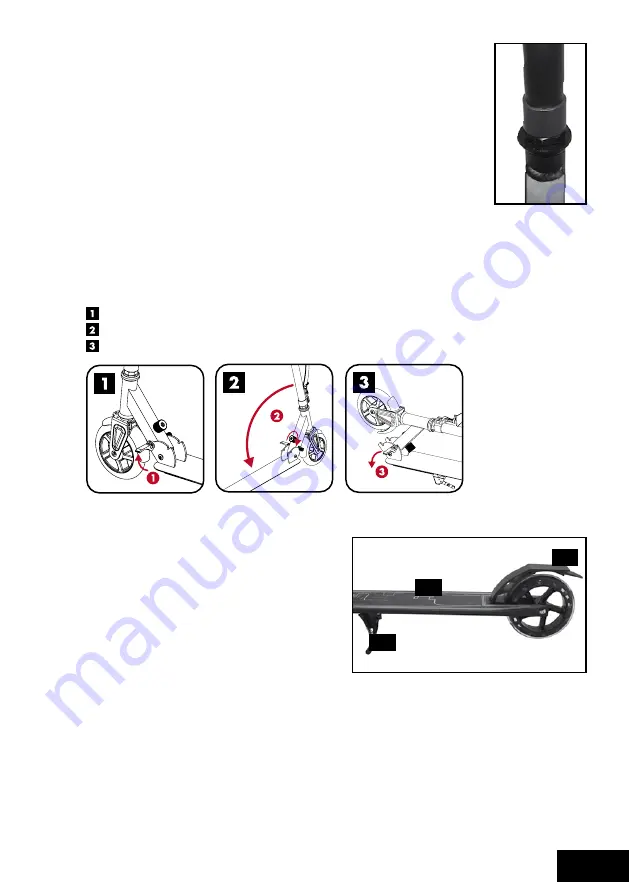
to put the product back into its transport condition

1. Release the quick locking mechanism on the steering column, press the locking button, push  
  the steering column all the way down, then clamp the quick locking mechanism into place.
2. Press the locking buttons on the handlebars, pull the handlebars out of the T-pipe and attach  
  them to the holders.
3.    Activate lower quick release.
 

  Turn knob clockwise, press steering post toward the deck until it locks.


  Fasten lower quick release.

use

riding, braking, parking

• Place one leg on the deck (13) and regularly 
  push off with the other leg for momentum.
• Step on the brake plate to brake (14).
• Unfold the kickstand (15) to park. 
  The product may only be parked on a 
  smooth surface.

(13)

(14)

(15)

Summary of Contents for AS-1461

Page 1: ...1 Patinete de aluminio Monopattino in alluminio Trotinete em alum nio Aluminium Scooter Alu Scooter Delta Sport Nr AS 1461 Instrucciones de uso Istruzioni d uso EN 14619 2004...

Page 2: ...as t cnicas 3 Especificaciones de uso 3 Advertencias de seguridad 3 4 Montaje 4 5 Volver a plegar el patinete para el transporte 5 Uso 5 Mantenimiento 6 Cuidados y almacenamiento 7 Observaciones sobre...

Page 3: ...ese por lo tanto de las disposiciones legales vigentes al respecto antes de utilizarlo por primera vez Advertencias de seguridad ATENCI N Peligro de asfixia para ni os No deje nunca jugar a los ni os...

Page 4: ...ara poder utilizarlo siga los siguientes pasos Desplegar 1 Suelte el cierre r pido inferior 1 2 Gire el bot n 2 en el sentido de las agujas del reloj y desplace la columna del manillar 3 hacia adelant...

Page 5: ...ecci n completamente hasta abajo y fije a continuaci n el cierre r pido 2 Pulse los botones de bloqueo de las empu aduras de manillar saque las empu aduras del tubo en forma de T y f jelas a sus sopor...

Page 6: ...s de cabeza hexagonal con llaves de vaso hexagonal del tama o 5 Saque los tornillos de cabeza hexagonal y retire la rueda Instale la nueva rueda y f jela con los tornillos de cabeza hexagonal Despu s...

Page 7: ...or favor conserve el ticket de compra La garant a s lo es v lida para fallos en el material y fallos de fabricaci n y no en caso de uso incorrecto o inadecuado del producto Esta garant a no limita los...

Page 8: ...tecnici 9 Uso previsto 9 Avvertenze per la sicurezza 9 10 Montage 10 11 Ripiegare l articolo nella posizione di trasporto 11 Utilizzo 11 Manutenzione 12 Cura deposito 13 Indicazioni per lo smaltimento...

Page 9: ...strada Prima dell uso informarsi sulle disposizioni di legge Avvertenze per la sicurezza ATTENZIONE Pericolo di soffocamento per i bambini Non lasciare mai che i bambini giochino da soli con il mater...

Page 10: ...come indicato di seguito Apertura 1 Sbloccare la chiusura rapida inferiore 1 2 Ruotate il pulsante 2 in senso orario e chiudete la colonna di guida 3 in avanti finch non scatta un CLIC 3 Bloccare il m...

Page 11: ...pulsante di arresto spingere l asta del manubrio fino in fondo quindi fissare la chiusura rapida 2 Premere il pulsante di arresto delle impugnature estrarre le impugnature dal tubo a T e fissarli sui...

Page 12: ...la ruota Rimontare la nuova ruota e fissarla con le viti assiali Dopo la sostituzione Astenersi dall uso se dopo la sostituzione la ruota striscia di lato Dopo i primi minuti di marcia assicurarsi che...

Page 13: ...e dalla data di acquisto Si prega di conservare lo scontrino La garanzia vale solo per i difetti del materiale e di fabbricazione e decade in caso di impiego improp rio o inadeguato I suoi diritti leg...

Page 14: ...ados t cnicos 15 Utiliza o prevista 15 Instru es de seguran a 15 16 Montagem 16 17 Colocar o artigo no estado de transporte 17 Utiliza o 17 Manuten o 18 Cuidados armazenamento 19 Observa o relativa el...

Page 15: ...podendo por esse motivo circular nela Informe se antes da utiliza o sobre a legisla o aplic vel Instru es de seguran a AVISO Perigo de asfixia para crian as N o deixa crian as brincar com o material d...

Page 16: ...o colocar em estado de utiliza o proceda do seguinte modo Abrir 1 Solte o fecho r pido inferior 1 2 Rode o bot o 2 no sentido dos ponteiros do rel gio e dobre a coluna do guiador 3 para a frente at q...

Page 17: ...una do guiador totalmente para baixo de seguida fixar o fecho r pido 2 Pressionar os bot es de reten o dos punhos puxar para fora do tubo em T e fixar nos suportes 3 Soltar o fecho r pido inferior Rod...

Page 18: ...roda Monte a nova roda e fixe a com os parafusos do eixo Depois da substitui o N o utilize o equipamento no caso da roda raspar lateralmente ap s a sub stitui o Assegure se que todos os parafusos con...

Page 19: ...guardado o seu tal o de compra A garantia cobre apenas defeitos de material e de fabrico e anulada em caso de uso abusivo ou inadequado Os seus direitos legais em especial os direitos fundamentais do...

Page 20: ...ts 21 Technical Data 21 Intended Use 21 Safety Information 21 22 Assembly 22 23 To put the product back into its transport condition 23 Use 23 Maintenance 24 Care Storage 25 Disposal Information 25 3...

Page 21: ...jumps This product does not comply with traffic regulations and may not be used in traffic Find out about the legal provisions prior to use Safety Information WARNING Risk of suffocation for children...

Page 22: ...to ride proceed as follows Unfold 1 Release the lower quick locking mechanism 1 2 Turn the knob 2 clockwise and press the steering post 3 forward until it locks into place 3 Secure the folding mechani...

Page 23: ...button push the steering column all the way down then clamp the quick locking mechanism into place 2 Press the locking buttons on the handlebars pull the handlebars out of the T pipe and attach them t...

Page 24: ...d remove the wheel Mount the new wheel and secure it with the axle screws After replacing Do not use if the wheel slides sideways after replacing Make sure that all screws are still secure and have no...

Page 25: ...ceipt The warranty only covers material and production errors and will not cover improper or inappropriate handling Your legal rights in particular statutory rights are not restricted with this warran...

Page 26: ...27 Technische Daten 27 Bestimmungsgem e Verwendung 27 Sicherheitshinweise 27 28 Montage 28 29 Artikel in den Transportzustand versetzen 29 Verwendung 29 Wartung 30 Pflege und Lagerung 31 Hinweise zur...

Page 27: ...der Verwendung ber die gesetzlichen Bestimmungen Sicherheitshinweise WARNUNG Erstickungsgefahr f r Kinder Lassen Sie Kinder nicht unbeaufsichtigt mit dem Verpackungsmaterial oder dem Artikel spielen...

Page 28: ...n 1 L sen Sie den unteren Schnellverschluss 1 2 Drehen Sie den Knopf 2 im Uhrzeigersinn und klappen Sie die Lenks ule 3 nach vorn bis diese einrastet KLICK 3 Sichern Sie den Klappmechanismus durch Fes...

Page 29: ...schieben anschlie end Schnellverschluss feststellen 2 Arretierkn pfe der Griffe dr cken Griffe aus dem T Rohr ziehen und an den Halterungen befestigen 3 Unteren Schnellverschluss l sen Knopf im Uhrzei...

Page 30: ...auen Sie die neue Rolle wieder ein und befestigen Sie sie mit den Achsschrauben Nach dem Austausch Wenn die Rolle nach dem Austausch seitlich schleift nicht verwenden Vergewissern Sie sich dass alle S...

Page 31: ...Garantie gilt nur f r Material und Fabrikationsfehler und entf llt bei missbr uchlicher oder unsachgem er Behandlung Ihre gesetzlichen Rechte insbesondere die Gew hrleistungsrechte werden durch diese...

Page 32: ...32 Version 02 2012 Delta Sport Handelskontor GmbH Wragekamp 6 D 22397 Hamburg...

Reviews: