Crimson VWP4600 Manual Download Page 6

6

5

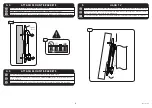
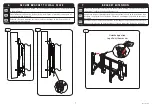
Hook top of bracket over the top of wall mount then lower down and tilt toward wall.  

Parte superior del gancho de soporte sobre la parte superior del soporte de pared a continu-

ación, más abajo y la inclinación hacia la pared.

Accrocher le haut du support sur le support mural, puis plus bas et l’inclinaison vers le mur. 

HANG  TV                                                                                                                                                

5

VWP4600-0002

4-4

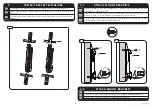
If screws bottom out use washers (not included) to eliminate slack.

Si los tornillos tocó fondo a continuación, utilizar arandelas (no incluidos) para elimi-

nar la holgura.

Si les vis touché le fond, puis utiliser des rondelles (non inclus) afin d’éliminer mou.

ATTACH MOUNT BRACKETS

4-4

!

4-3

Spacer

R or S

Use spacers (R / S) between TV and mount if needed.

Utilice espaciadores (R / S) entre la televisión y montar si es necesario.

Utiliser des entretoises (R / S) entre le téléviseur et le support métallique si nécessaire.

ATTACH MOUNT BRACKETS

4-3

Summary of Contents for VWP4600

Page 1: ...hese directions or have doubts about the safety of the installation contact Crimson AV Customer Service or call a qualified contractor Crimson AV is not liable for damage or injury caused by incorrect...

Page 2: ...bit Hammer if necessary Madera poco 6mm 7 32 poco mamposter a 11 mm 7 16 Toma llave de 13 mm Llave 5mm Hammer si es necesario Bois peu 6mm 7 32 peu ma onnerie 11mm 7 16 13mm Cl douille Cl allen 5mm M...

Page 3: ...hole on marks Utilice un 6mm 7 32 para perforar la madera poco 65mm 2 5 agujeros Utilisez un 6mm 7 32 bits de per age pour percer des trous 65mm 2 5 WOOD STUD INSTALLATION 1a 4 Use wall plate C to mar...

Page 4: ...deux trous Utilisez un marteau pour enfoncer dans le cas ch ant 1b 3 MASONRY BLOCK CONCRETE INSTALLATION B Level wall plate then mark 6 hole locations Nivele la placa de pared a continuaci n marque la...

Page 5: ...ls main seulement 4 1 ATTACH MOUNT BRACKETS 4 2 Multi washer V Screws F M 4 1 Screws N P DO NOT USE Multi washer H For portrait mode add extensions to bracket with screw H Repeat steps 3 8 Para el mod...

Page 6: ...600 0002 4 4 If screws bottom out use washers not included to eliminate slack Si los tornillos toc fondo a continuaci n utilizar arandelas no incluidos para elimi nar la holgura Si les vis touch le fo...

Page 7: ...est en position d verrouill e puis appuyez sur le bouton de d verrouillage et retirez le support de l extension souhait e 7 BRACKET EXTENSION Unlocked position to pull out the monitor 6 1 6 2 Remove k...

Page 8: ...our diminuer 9 ROLL HEIGHT ADJUSTMENT 9 VWP4600 0002 8 Using a 5mm allen key turn plumb adjustment screw Turn screw clockwise to adjust the screen towards the wall and counterclockwise to adjust away...

Page 9: ...les o emergentes Dentro de stos se in cluyen todo tipo de gastos que pudieran surgir de las reparaciones de productos Crimson AV LLC que no se hayan realizado en Crimson AV LLC Las especificaciones es...

Page 10: ...tips www crimsonav com support crimsonav com Full motion Articulating Wall Mount VW4600 TM Monitor size diagonal Horizontal distance between wall plates Determine horizontal distance between wall plat...

Page 11: ...ll motion Articulating Wall Mount VW4600 TM Determine vertical dis tance between wall plates 1 Measure the height of the monitor X 2 Measure and mark distance X between drill locations in order to pro...

Page 12: ...k installation tips www crimsonav com support crimsonav com Full motion Articulating Wall Mount VW4600 TM Hang monitors starting at the bottom center location and build up 3 1 4 3 2 6 5 79 8 9 7 VWP46...

Reviews: