background image

CNX Telephone Audio Interface Card 

Crestron 

CNXTA


As of the date of manufacture, this unit has been tested and found to comply with 
specifications for CE marking. 


NOTE:  

This device complies with part 15 of the FCC rules. Operation is subject to 

the following two conditions: (1) this device may not cause harmful interference, and 
(2) this device must accept any interference received, including interference that may 
cause undesired operation.  

Setup 

Installation 

Items required to install the CNXTA are already attached to the unit. The only tools 
required are a Phillips tip screwdriver and a grounding strap. Follow the installation 
procedure after this paragraph. 

CAUTION:  

The CNXTA contains electrostatic sensitive devices (ESDs), observe 

precautions for handling ESDs to avoid damaging the card.  

1.  Disconnect power from the control system. 

2.  Using the Phillips tip screwdriver, remove the blank faceplate from the 

card slot of the control system where the CNXTA will be installed. 

3.  Align the CNXTA with the card guides and slide the card into position.  

4.  Firmly press both ends of the CNXTA faceplate to seat the card into the 

control system connector.  

5.  Tighten the thumb screws finger-tight to secure the CNXTA to the 

control system.  

6.  Reapply power to the control system.  

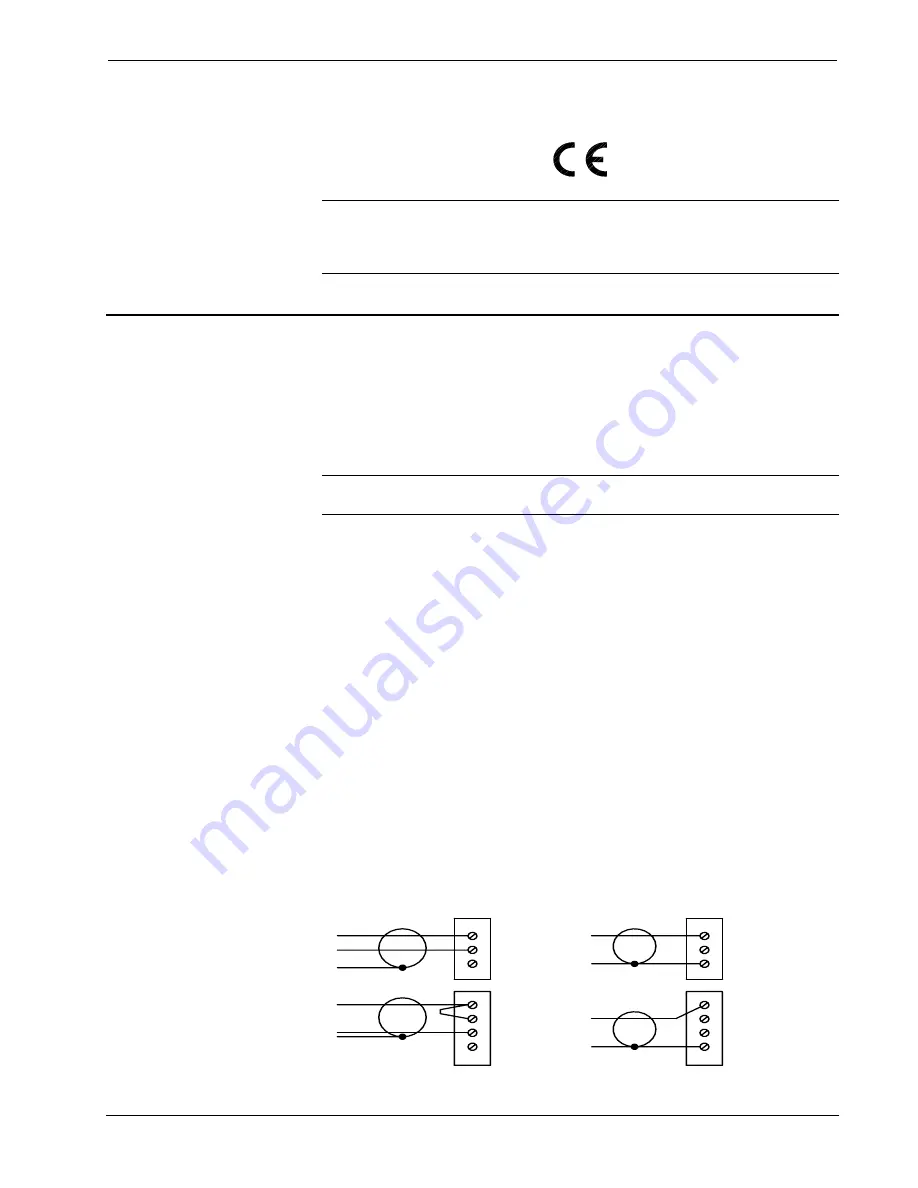
Audio Wiring Specifications 

Input impedance and balance of the audio wiring are determined by external 
connections. When preparing external audio input and audio output wiring to the 
CNXTA, refer to the following diagram:  

Balanced and Unbalanced External Connections 

BALANCED 600 OHMS INPUT

BALANCED OUTPUT

UNBALANCED 10K INPUT

UNBALANCED OUTPUT

AUDIO

OUT

-

G

+

-

G

AUDIO

IN

x

+

AUDIO

OUT

-

G

+

-

G

AUDIO

IN

x

+


4  

  CNX Telephone Audio Interface Card: CNXTA 

Operations & Installation Guide - DOC. 8144A 

Summary of Contents for CNXTA

Page 1: ...Crestron CNXTA CNX Telephone Audio Interface Card Operations Installation Guide ...

Page 2: ......

Page 3: ...onvert a WAV File 8 To Create WAV Messages from Individual Files 9 Set WAV File or Message Properties Save and Exit 11 Configure CNXTA 14 CNXTA File List 15 Export File List Button 16 Import File List Button 16 Send New Files to CNXTA Button 16 Programming with SIMPL Windows 16 CNXTA Basic Touchpanel 17 CNXTA Symbol 18 CNXTA Basic Program 20 Problem Solving 23 Troubleshooting 23 Further Inquiries ...

Page 4: ......

Page 5: ...estron s website www crestron com A Cresnet system with the CNXTA may be programmed to respond to incoming telephone tones or sequence of tones For example pressing 1 or 12 from a telephone after connecting to the system may be used to activate an air conditioning system and the CNXTA would respond with Command accepted air conditioning is on The system may also be programmed to dial out and play ...

Page 6: ...elephone line A compatible 3 position female connector is provided Audio Output Port AUDIO OUT OUT OUT GND AUDIO IN This port is a 4 position male connector and is used to receive line level audio into the CNXTA This audio may then be recorded by the CNXTA and or patched directly to the telephone line A compatible 4 position female connector is provided Audio Input Port AUDIO IN IN INX IN GND PHON...

Page 7: ...s are required to register in order to obtain access to the FTP site 2 The Stand Alone Viewport is NOT required if the Viewport included with VisionTools Pro e v2 05 or SIMPL Windows v1 31 not available at time of publication or later is used If required the Stand Alone Viewport must be installed into a SEPARATE DIRECTORY other than the SIMPL directory The latest version can be obtained from the D...

Page 8: ...damaging the card 1 Disconnect power from the control system 2 Using the Phillips tip screwdriver remove the blank faceplate from the card slot of the control system where the CNXTA will be installed 3 Align the CNXTA with the card guides and slide the card into position 4 Firmly press both ends of the CNXTA faceplate to seat the card into the control system connector 5 Tighten the thumb screws fi...

Page 9: ...lick on the Index tab and type in Sound Recorder For Windows 95 NT double click the installing entry For Windows 95 98 NT follow the directions provided to add the Sound Recorder program The Sound Recorder is part of the Multimedia component This section contains descriptions of the Crestron pre recorded files and procedures on how to use Sound Recorder to record edit and convert WAV file messages...

Page 10: ...quipm en ZIP EQ UIPM ENT Files Numbers WAV Files Zero Nine Eighteen Ninety Sixth Fifteenth One Ten Nineteen Hundred Seventh Sixteenth Two Eleven Twenty Thousand Eighth Seventeenth Three Twelve Thirty M illion Ninth Eighteenth Four Thirteen Forty First Tenth Nineteenth Five Fourteen Fifty Second Eleventh Six Fifteen Sixty Third Twelfth Seven Sixteen Seventy Fourth Thirteenth Eight Seventeen Eighty ...

Page 11: ...cation the following procedure uses the PC mouse and pull down Menu Bar To record a WAV file message perform the following procedure 1 At the Windows taskbar select Start Programs Accessories For Windows 95 NT select Multimedia for Windows 98 select Entertainment Select Sound Recorder and the Sound Recorder opens as shown below Open Sound Recorder 2 Select File New as shown below Create New File t...

Page 12: ...the commands of the application the following procedure uses the PC mouse and pull down Menu Bar To convert a WAV file perform the following procedure 1 At the Windows taskbar select Start Programs Accessories For Windows 95 NT select Multimedia for Windows 98 select Entertainment Select Sound Recorder and the Sound Recorder opens as shown below Open Sound Recorder 2 Select File Open browse to the...

Page 13: ...s consecutively for longer messages NOTE Although there are alternative methods for selecting the commands of the application the following procedure uses the PC mouse and pull down Menu Bar To create CNXTA messages from individual WAV files perform the following procedure 1 At the Windows taskbar select Start Programs Accessories For Windows 95 NT select Multimedia for Windows 98 select Entertain...

Page 14: ...first WAV file to be inserted and open the file Open First WAV File 5 As shown below move the file position slider or click or to where to insert another file NOTE The figure below shows the insertion point near the middle of the file The most common insertion points are at the end or beginning of the file File Insertion Point 10 CNX Telephone Audio Interface Card CNXTA Operations Installation Gui...

Page 15: ...another message follow that procedure to step 9 Set WAV File or Message Properties Save and Exit NOTE The following procedure assumes that Sound Recorder is open NOTE Although there are alternative methods for selecting the commands of the application the following procedure uses the PC mouse and pull down Menu Bar To set the WAV file or message properties save the file and exit Sound Recorder per...

Page 16: ...field has PCM selected If not select it as shown below Select File Format 4 Make sure that the Attributes field has 8 000 Hz 16 Bit Mono selected If not select it as shown below Select File Attributes NOTE After the format and attributes have been selected the conversion format may be saved as a convenient name such as CNXTA Format 12 CNX Telephone Audio Interface Card CNXTA Operations Installatio...

Page 17: ...on Set the File Properties 6 To complete the file properties conversion click OK Complete File Properties Conversion 7 Select File Save or Save As to rename the file to save the file with the CNXTA acceptable format Save File Operations Installation Guide DOC 8144A CNX Telephone Audio Interface Card CNXTA 13 ...

Page 18: ... box select the slot where the CNXTA is located and the Viewport will attempt to locate a CNXTA at that slot If it is unable to determine which card is in the selected slot or if the card in the selected slot is not a CNXTA the Viewport will not allow you to continue If the control system cannot be connected to configure the CNXTA offline by selecting Offline from the Select Card Slot dialog box T...

Page 19: ...ies in the File column correspond to a location that a file is stored Two icons as shown in the legend box represent whether a particular file is stored on the PC or loaded into the CNXTA If the configuration dialog is not in offline mode the file list will show the files that have been loaded into the CNXTA on initialization Selected File Options Dialog Box The selected file options dialog box op...

Page 20: ...e the configuration utility is closed and re entered these files will no longer be available for exporting because the utility has no location reference Import File List Button When importing a file a custom file selection dialog box is opened This dialog box displays details about the currently selected XTA file Specifically the file count and the file position range This dialog box also allows t...

Page 21: ...n touchpanel screen designs NOTE VT Pro e is required for the CNXTA Basic Touchpanel The latest version of VT Pro e can be obtained from the Downloads page TOUCHPNL Library of Crestron s website www crestron com New users are required to register in order to obtain access to the FTP site NOTE There is no need to recreate the CNXTA basic touchpanel or SIMPL Windows program Both are available from t...

Page 22: ...e inputs and outputs respectively and their functional descriptions NOTE The DTMF input and output names of the CNXTA symbol have been combined for clarity Refer to SIMPL Windows for the discreet inputs and outputs Detail View of the CNXTA Symbol in SIMPL Windows Programming Manager 18 CNX Telephone Audio Interface Card CNXTA Operations Installation Guide DOC 8144A ...

Page 23: ...e the CNXTA telephone functions are enabled this input opens the telephone line to allow the CNXTA to dial out Refer to Off hook F in the next table for related information W hile the CNXTA audio line functions are enabled this input sets the audio lines to Off Line W hile the CNXTA telephone functions are enabled this input disconnects or hangs up the CNXTA from the telephone line Play Activates ...

Page 24: ...NXTA is receiving a ring back tone Dial_tone Active while the CNXTA is receiving a dial tone Busy Active while the CNXTA is receiving a busy signal when m aking an outgoing call M essage This analog output is the reference num ber of the currently selected m essage Play_volum e This analog output provides user feedback indicating the playback volum e level of a selected m essage Refer to Play_volu...

Page 25: ...Crestron CNXTA CNX Telephone Audio Interface Card CNXTA Basic SIMPL Program Sheet 1 of 2 Operations Installation Guide DOC 8144A CNX Telephone Audio Interface Card CNXTA 21 ...

Page 26: ...CNX Telephone Audio Interface Card Crestron CNXTA CNXTA Basic SIMPL Program Sheet 2 of 2 22 CNX Telephone Audio Interface Card CNXTA Operations Installation Guide DOC 8144A ...

Page 27: ...r slot as defined by program Poll the network F4 via the Crestron Viewport CNXTA functions properly but feedback indicator s do es not illuminate Feedback signal names incorrect in SIMPL W indows program Verify SIMPL W indows program for feedback signal names CNXTA does not function Further Inquiries If after reviewing this Operations Installation Guide for the CNXTA you cannot locate specific inf...

Page 28: ...ps are not covered This warranty extends to products purchased directly from CRESTRON or an authorized CRESTRON dealer Purchasers should inquire of the dealer regarding the nature and extent of the dealer s warranty if any CRESTRON shall not be liable to honor the terms of this warranty if the product has been used in any application other than that for which it was intended or if it has been subj...

Page 29: ...Crestron CNXTA CNX Telephone Audio Interface Card This page intentionally left blank Operations Installation Guide DOC 8144A CNX Telephone Audio Interface Card CNXTA 25 ...

Page 30: ...CNX Telephone Audio Interface Card Crestron CNXTA This page intentionally left blank 26 CNX Telephone Audio Interface Card CNXTA Operations Installation Guide DOC 8144A ...

Page 31: ...Crestron CNXTA CNX Telephone Audio Interface Card Operations Installation Guide DOC 8144A CNX Telephone Audio Interface Card CNXTA 27 This page intentionally left blank ...

Page 32: ...restron Electronics Inc Operations Installation Guide DOC 8144A 15 Volvo Drive Rockleigh NJ 07647 11 99 Tel 888 CRESTRON Fax 201 767 7576 Specifications subject to www crestron com change without notice ...

Reviews: