background image

8x8 DigitalMedia™ Switcher 


Crestron 

DM-MD8X8


DMC-VID-RCA-A RCA 
Analog Video Input Card 
w/Analog Audio for DM 
Switchers 

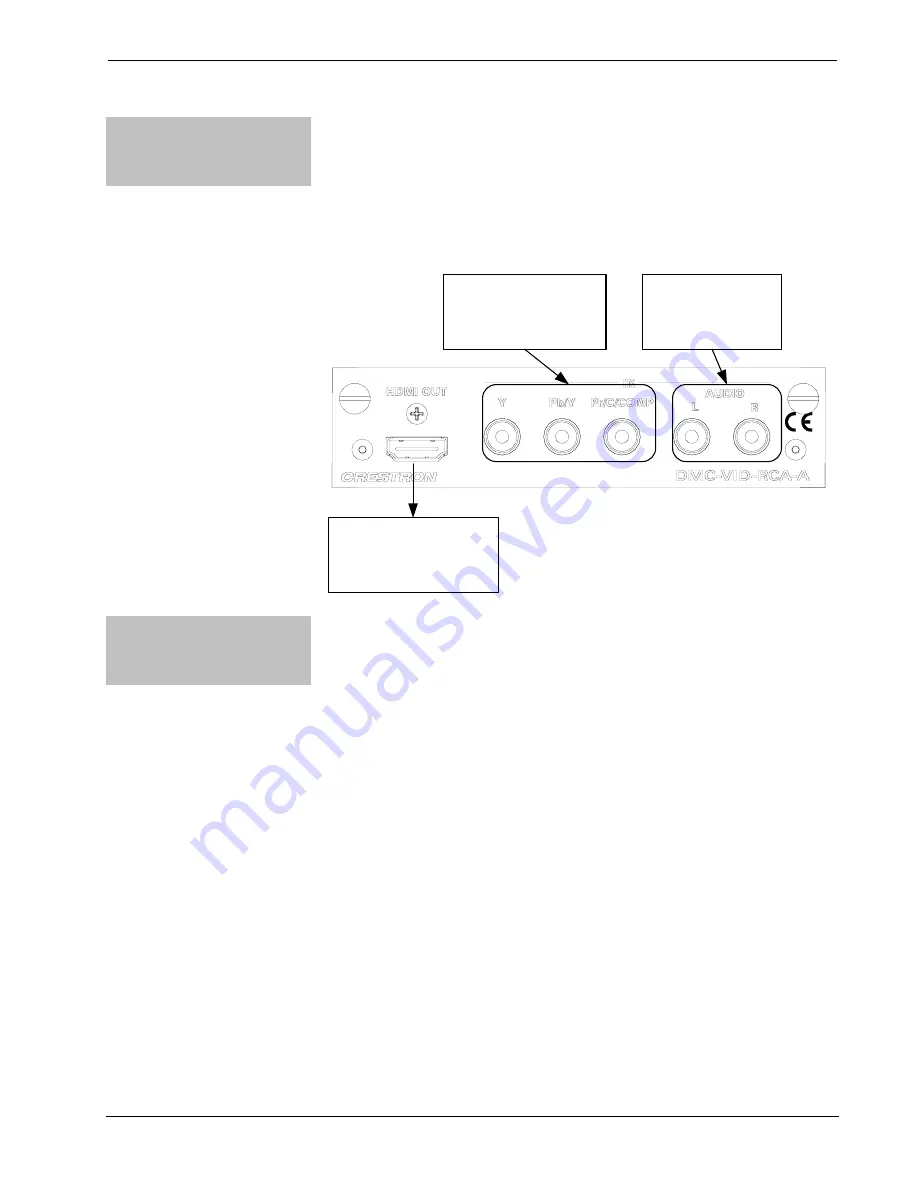
The DMC-VID-RCA-A is an input card for a DigitalMedia Switcher, providing one 
analog video input and one stereo analog audio input. The DMC-VID-RCA-A 
accepts component HDTV signals up to 1080p, as well as standard definition 
NTSC/PAL composite and S-video. An HDMI pass-thru output connection is also 
provided, which passes the audio and video input signals through digitally to feed a 
local device, or to feed a second DM switcher for output expansion purposes. 

Hardware Hookup for DMC-VID-RCA-A RCA Analog Video Input Card w/Analog Audio 
for DM Switchers 

HDMI OUT:

TO LOCAL HD DISPLAY OR 

HDMI INPUT ON DAISY-

CHAINED DM SWITCHER

VIDEO IN:

FROM YP

b

P

r

, COMPOSITE 

OR S-VIDEO SOURCE

AUDIO IN:

FROM ANALOG 

AUDIO OUTPUT


DMC-VID-RCA-D RCA 
Analog Video Input Card 
w/Digital Audio for DM 
Switchers 

The DMC-VID-RCA-D is an input card for a DigitalMedia Switcher, providing one 
analog video input and one S/PDIF coaxial digital audio input. The  
DMC-VID-RCA-D accepts component HDTV signals up to 1080p, as well as 
standard definition NTSC/PAL composite and S-video. Its S/PDIF input supports  
2-channel stereo and 5.1 surround-encoded digital audio sources up to 24-bit,  
96 kHz. 

An HDMI pass-thru output connection is also provided, which passes the audio and 
video input signals through digitally to feed a local device, or to feed a second DM 
switcher for output expansion purposes. 


62  

  8x8 DigitalMedia™ Switcher: DM-MD8X8 

Operations Guide – DOC. 6755A 

Summary of Contents for 8x8 DigitalMedia DM-MD8X8

Page 1: ...Crestron DM MD8X8 8x8DigitalMedia Switcher Operations Guide ...

Page 2: ...e apparatus has been exposed to rain or moisture does not operate normally or has been dropped Disconnect power prior to connecting or disconnecting equipment Do not install in direct sunlight The apparatus must be installed in a way that the power cord can be removed either from the wall outlet or from the device itself in order to disconnect the mains power Prevent foreign objects from entering ...

Page 3: ...34 Message Log 38 Commission System 39 Programming Software 47 Earliest Version Software Requirements for the PC 47 Programming with SIMPL Windows 47 Example Program 49 Uploading and Upgrading 50 Establishing Communication 50 Programs and Firmware 51 Program Checks 51 Operation 53 Operating Modes 53 Route Mode 53 View Mode 54 Info Mode 55 Problem Solving 56 Troubleshooting 56 Check Network Wiring ...

Page 4: ...7 DMC VID RCA A 84 DMC VID RCA D 90 Appendix C Output Configuration 96 Glossary 99 Return and Warranty Policies 103 Merchandise Returns Repair Service 103 CRESTRON Limited Warranty 103 Trademark Information 104 GNU General Public License 105 ii Contents Operations Guide DOC 6755A ...

Page 5: ... 137 m using DigitalMedia Cable 3280 feet 1 km using CresFiber Supports up to eight DM room controllers with easy expansion for more outputs Configurable inputs support a complete range of digital and analog signal types Detects and displays detailed video and audio input information QuickSwitch HD technology minimizes HDMI switching latency Manages HDCP digital rights management for every device ...

Page 6: ...ages all of the different signals and devices matching each source s output to the capabilities of the selected display s without using scaling or compression Every signal is preserved in its native video resolution and audio format ensuring a pure lossless signal path throughout Integrated Ethernet and USB HID distribution allows computers media servers and video game consoles to be installed out...

Page 7: ...ies 10 100 Ethernet to each room controller supporting streaming media for multimedia devices or providing LAN connectivity for any room device that requires Ethernet or Internet access Its Gigabit Ethernet connection to the external LAN helps maximize bandwidth for each network port Ethernet is also utilized internally by the Crestron control bus to manage all of the DM devices in the system and ...

Page 8: ...curs between any two devices Every HDMI source device has a limit to how many downstream devices it can support determined by the number of HDCP keys it has available Rarely is that limit advertised or specified by the manufacturer or service provider so connect too many displays or processors and the source will simply stop outputting a signal without warning To prevent such surprises the DM MD8X...

Page 9: ...D8X8 8x8 DigitalMedia Switcher Applications The following diagram shows a DM MD8X8 in a lecture hall application DM MD8X8 in a Lecture Hall Application Operations Guide DOC 6755A 8x8 DigitalMedia Switcher DM MD8X8 5 ...

Page 10: ...To From DM MD8X8 CPU To From external LAN port Gbit ENET DM MD8X8 Internal Block Diagram Specifications Specifications for the DM MD8X8 are listed in the following table DM MD8X8 Specifications SPECIFICATION DETAILS Video Switcher Input Signal Types Output Signal Types 8x8 digital matrix modular input output cards resolution management HDCP v 1 1 content protection support Crestron QuickSwitch HD ...

Page 11: ...wed by HDMI v 1 3a 480i 576i 480p 576p 720p50 720p60 1080i25 1125 lines 1080i30 1080p24 1080p25 1080p30 1080p50 1125 lines 1080p60 480i 576i Matched to inputs Audio Switcher Input Signal Types Output Signal Types Formats HDMI only HDMI SPDIF Analog 8x8 digital multi channel audio follow video matrix switching plus independent 8x8 stereo matrix for audio breakaway Configurable via modular plug in c...

Page 12: ...Volts AC 50 60 Hz 55 Watts 2 3 Amps 24 Volts DC from internal power supply Minimum 2 Series Control System Update File 2 3 Version 4 001 or later Environmental Temperature Humidity Heat Dissipation 32º to 104º F 0º to 40º C 10 to 90 RH non condensing 475 BTU Hr Enclosure Chassis Faceplate Mounting Steel black matte powder coat finish vented sides fan cooled Extruded aluminum black matte powder coa...

Page 13: ...Video Input Card w Analog Audio RCA Analog Video Input Card w SPDIF Audio Security Camera Input Card 1 Future option not currently available 2 The latest software versions can be obtained from the Crestron website Refer to the NOTE following these footnotes 3 Crestron 2 Series control systems include the AV2 and PRO2 Consult the latest Crestron Product Catalog for a complete list of 2 Series contr...

Page 14: ...edia Switcher DM MD8X8 Operations Guide DOC 6755A Physical Description This section provides information on the connections controls and indicators available on your DM MD8X8 DM MD8X8 Physical View Front DM MD8X8 Physical View Rear shown with optional DM cards ...

Page 15: ... MD8X8 Overall Dimensions 18 06 in 45 87 cm 6 97 in 17 68 cm 17 28 in 43 90 cm NOTE Cable connections can extend the overall depth of the DM MD8X8 by approximately two to three inches Operations Guide DOC 6755A 8x8 DigitalMedia Switcher DM MD8X8 11 ...

Page 16: ...8x8 DigitalMedia Switcher Crestron DM MD8X8 DM MD8X8 Buttons and Ports 1 2 3 4 5 6 9 8 7 10 11 12 13 14 15 17 16 18 17 15 19 20 12 8x8 DigitalMedia Switcher DM MD8X8 Operations Guide DOC 6755A ...

Page 17: ...eo audio signal information Ethernet configuration and setup menus SOFT BUTTONS 4 pushbuttons for activation of LCD driven functions 3 HW R BUTTON 1 recessed miniature pushbutton for hardware reset reboots the switcher 4 ROUTE BUTTON LED 1 pushbutton and red LED selects Route mode to allow routing changes 5 VIEW BUTTON LED 1 pushbutton and red LED selects View mode for viewing current routes 6 INF...

Page 18: ...00BaseT Ethernet port Green LED indicates link status Yellow LED indicates Ethernet activity 17 DM OUTPUT SLOT 1 2 2 DM switcher output card slots Each slot accepts 1 4 channel DM output card 18 24ABG EIG 1 4 SLOT 1 2 8 sets of 1 4 pin and 1 3 pin 3 5 mm detachable terminal blocks Comprises 8 DMNet ports with EIG power selection ports each set associated with a corresponding DM output port on the ...

Page 19: ...ce received including interference that may cause undesired operation This equipment has been tested and found to comply with the limits for a Class B digital device pursuant to part 15 of the FCC Rules These limits are designed to provide reasonable protection against harmful interference in a residential installation This equipment generates uses and can radiate radio frequency energy and if not...

Page 20: ...estron e Control Reference Guide Doc 6052 which is available for download from the Crestron website www crestron com manuals DigitalMedia Cable The Crestron DigitalMedia cable contains two CAT5E cables one shielded one unshielded and one DMNet cable in triamese jackets Installation of any DigitalMedia device is as simple as connecting DigitalMedia cable from the output of the DigitalMedia switcher...

Page 21: ...to canceling out interference between the wires The maximum transmission distances between repeaters are determined by the video resolution sent over the wires The total distance that video can be sent using repeaters is shown in the following table for CAT5e Shielded Twisted Pair STP cable and DigitalMedia cable While up to three repeaters may be used to extend the transmission distance the aggre...

Page 22: ...1 9 meters NOTE 1080p 60 Hz is the most common resolution used in residential installations NOTE Deep Color is part of the HDMI 1 3a specification It allows devices to transmit video using 36 bits per pixel instead of 24 bits per pixel The color depth allows for 4096 shades each of red green and blue instead of 256 Due to bandwidth requirements and limited support Deep Color is not often used Up t...

Page 23: ...s well NOTE 1080p 60 Hz is the most common resolution used in residential installations NOTE Deep Color is part of the HDMI 1 3a specification It allows devices to transmit video using 36 bits per pixel instead of 24 bits per pixel The color depth allows for 4096 shades each of red green and blue instead of 256 Due to bandwidth requirements and limited support Deep Color is not often used For more...

Page 24: ...et Setup The DigitalMedia switchers are designed to control the Ethernet settings of lightweight DM devices around them in order to reduce the amount of IP configuration necessary and make the certain DM devices swappable without reconfiguration 20 8x8 DigitalMedia Switcher DM MD8X8 Operations Guide DOC 6755A ...

Page 25: ...00 DM TX 205 and DM TX 210 If two DigitalMedia switchers were connected to one another via a DMC CATO output card and DMC CAT input card each switcher would maintain control over its own IP configuration IP Table Setup DigitalMedia devices that receive their IP address configuration via the switcher can also receive their IP table configuration from the DM switcher For more information refer to IP...

Page 26: ...o the top with the heaviest component at the bottom of the rack If the rack is provided with stabilizing devices install the stabilizers before mounting or servicing the unit in the rack NOTE If rack mounting is not required rubber feet are provided for tabletop mounting or stacking Apply the feet near the corner edges on the underside of the unit NOTE Reliable earthing of rack mounted equipment s...

Page 27: ...No more than two DM MD8X8 units should be stacked Hardware Hookup Connect the Device Make the necessary connections as called out in the illustration that follows this paragraph For details on making connections to installed DM input cards and DM output cards refer to Appendix A Hardware Hookup for DM Cards on page 59 Apply power after all connections have been made When making connections to the ...

Page 28: ...NAL OR EXTERNAL POWER NOTE Ensure the unit is properly grounded NOTE For optimum performance Crestron strongly recommends using DM cable or CresFiber fiber optic cable available from Crestron Other high quality CAT5e STP wiring such as CresCAT D or fiber optic cable such as InfiniCor300 may also be used with varying performance Do not use low skew CAT5e STP cable NOTE When using fiber it is recomm...

Page 29: ...wn in the following diagram Providing DMNet Power Externally Label the Buttons Use Crestron Engraver software to print custom labels for the DM MD8X8 s front panel buttons and LEDS Crestron recommends printing on 100 pound paper Paper with a weight less than 100 pounds will tend to crumple while sliding in while paper with a weight of more than 100 pounds may not fit Operations Guide DOC 6755A 8x8...

Page 30: ... password Enter Password 0000 Enter Password NOTE If the password contains digits greater than 0 and less than 9 the IN buttons 1 through 8 can be used to enter the password Turn the selection knob until the correct digit is displayed Press the h button to move the cursor to the next digit and select the next digit in the password with the volume control Press the g button to move to the previous ...

Page 31: ... will only be saved upon exiting Installer Tools For instructions on exiting Installer Tools refer below Exit Installer Tools To exit Installer Tools press the MENU button Press the soft button labeled Yes to save any changes and exit Installer Tools or press the soft button labeled No to return to Installer Tools Inputs The Inputs section of Installer tools is used to configure and view informati...

Page 32: ...the DM MD8X8 Any changes made to the Outputs section will be saved upon exiting Installer Tools For more information on exiting Installer Tools refer to Exit Installer Tools on page 27 To open the Outputs section of Installer Tools Open Installer Tools as described on page 26 Turn the selection knob to highlight Outputs and press the ENTER button A list of outputs will be displayed Output Setup Ou...

Page 33: ...r information on enabling or disabling DHCP refer to DHCP on page 31 Ethernet Link The front panel can display the status of the DM MD8X8 s Ethernet connection Online or Offline To view the status of the Ethernet connection Open the Network section as described above Turn the selection knob to highlight Ethernet Link and press the ENTER button to display the status of the Ethernet connection Press...

Page 34: ...o the Network section press the MENU button Set the Subnet Mask The DM MD8X8 can be configured to use a Subnet Mask for TCP IP communications To view or set the address of the Subnet Mask Open the Network section as described on page 29 Turn the selection knob to highlight Subnet Mask and press the ENTER button to display the address of the Subnet Mask If DHCP is disabled controls changing the add...

Page 35: ...Use Softbutton to select The use Knob to edit Press ENTER to accept 000 000 000 000 Press the soft button under the octet to be adjusted Turn the selection knob to the desired number Repeat for each octet until the Default Router address is displayed To save the Default Router address and return to the Network section press the ENTER button To cancel the operation and return to the Network section...

Page 36: ...he ENTER button to display the Hostname controls Hostname Edit Hostname Del Done DM MD8X8 01F762 Select letters upper and lower case numbers or other characters by turning the selection knob until the desired letter number or other character is displayed on the LCD Valid hostname characters are ASCII letters a through z case insensitive the digits 0 through 9 and the hyphen Hostname cannot begin o...

Page 37: ...nd the value on the control system s IP table To view and set the IP ID Open the Network section as described on page 29 Turn the selection knob to highlight Control System IP ID and press the ENTER button to display the Control System IP ID controls The current IP ID will be displayed Control System IP ID Edit Control System IP ID A0 Turn the selection knob to display the desired IP ID and press ...

Page 38: ...he MAC address Open the Network section as described on page 29 Turn the selection knob to highlight MAC Address and press the ENTER button to display the MAC Address Press the MENU button to return to the Network section Control The Control section of Installer Tools is used to configure the front panel of the DM MD8X8 Any changes made to the Control section will be saved upon exiting Installer T...

Page 39: ...current setting is underlined Backlight Controls Backlight High Med Low Select Backlight Level Press the soft button under the desired backlight brightness Press the ENTER button to save the backlight brightness and return to the Control section Password The front panel password can be changed To set a new password Open the Control section as described on page 34 Turn the selection knob to highlig...

Page 40: ...g the password to 0000 will remove password protection from Installer Tools Front Panel Lock The front panel controls of the DM MD8X8 can be locked to prevent changes to signal routings However signal and routing information can still be displayed To lock the front panel controls Open the Control section as described on page 34 Turn the selection knob to highlight Front Panel Lock and press the EN...

Page 41: ...ll settings Turn the selection knob to highlight the defaults to be restored and press the ENTER button A confirmation message will be displayed To continue restoring the default settings press the soft button labeled Yes To cancel restoring the default settings and return to the Restore Defaults control press the soft button labeled No To cancel the operation and return to the Restore Defaults co...

Page 42: ...e Configuration Frm v4 001 002 Oct 20 2 Prg DM Switcher v2 1 7 Pnl dm switcher v2 1 7 Turn the selection knob to view other data Press the MENU button to return to the About controls Press the MENU button to return to the Control section Message Log The Message Log section of Installer Tools contains system messages from the DM MD8X8 Open Message Log To open the Message Log section of Installer To...

Page 43: ... section of Installer Tools Open Installer Tools as described on page 26 Turn the selection knob to highlight Commission System and press the ENTER button A list of functions will be displayed Commission System Functions Commission System HDCP Check HDCP Check The switcher can test HDMI sources and displays for switching limitations due to HDCP keys The number of HDCP keys specify the number of di...

Page 44: ...e HDCP check press the soft button labeled No Instructions for HDCP Check HDCP Check Please verify that all sources and endpoints are powered on before proceeding OK Verify that all source and display devices are powered on Press the soft button labeled OK to begin the HDCP check A progress bar will be displayed to show the progress of the HDCP check HDCP Check in Progress HDCP Check Test in Progr...

Page 45: ...Results HDCP Check Results HDCP Check Results Input 1 DVD Max HDCP Keys 9 Possible Destinations 8 DONE Press the soft buttons labeled gg and hh to scroll through the results for other inputs Press the soft button labeled DONE to return to the Commission System section Data Rate Check The switcher can test the cable run on each output to determine the maximum data rate that can be delivered To run ...

Page 46: ...ess the soft button labeled Next to continue Select Outputs to Test Select Outputs to Test Kid s Room Living Room Kitchen All None Next Turn the selection knob to highlight an output for testing and press the ENTER button to mark it Outputs to be tested are marked with an asterisk To test all of the outputs press the soft button labeled All To remove all of the outputs from the test list press the...

Page 47: ...ata Rate Check in Progress Data Rate Check Test in Progress OK When the test is complete the results will be displayed Data Rate Check Results Success Data Rate Check Success Kid s Room 2 22Gbps Living Room 3 60Gbps Kitchen 2 22Gbps Resolution Done If an error was encountered during the data rate check an error message will be displayed Data Rate Check Results Error Data Rate Check Error Kid s Roo...

Page 48: ...channels According to the HDMI standard HDMI sources are expected to only deliver audio and video formats that are supported by the destination To do this the DM switcher reads the EDID information from devices connected to the outputs and determines the video resolutions and audio format to send to the input cards to program EDID on the input card receivers Using Crestron Toolbox the DM MD8X8 can...

Page 49: ...le in all of the displays that are connected will be transmitted to the source This ensures that any video signal coming in from the source will be able to be shown on all displays If certain resolutions are only available on a subset of the displays they will be omitted Both Best Overall and Best Common are initially set to use information from all displays but can be modified to use information ...

Page 50: ...receiver sends its supported audio formats to the source in the following format Format Maximum of channels sampling freq supported For example a 5 1channel audio processor may have the following audio EDID information Linear PCM 2ch 32 44 1 48kHz AC3 6ch 32 44 1 48kHz DTS 6ch 32 44 1 48kHz Under Best Common and Best Overall the same rules apply to audio as video For more information refer to the ...

Page 51: ...s based software tools to develop a controlled DigitalMedia system You can create a program to control the DM MD8X8 using SIMPL Windows For the minimum recommended software versions visit the Version Tracker page of the Crestron website www crestron com versiontracker Programming with SIMPL Windows SIMPL Windows is Crestron s premier software for programming Crestron control systems It is organize...

Page 52: ...ows program must match the IP ID of each unit Refer to Identity Code on page 21 IP Table Options DigitalMedia devices like the DM RMC 100 that receive their IP address configuration via the switcher can also receive their IP table configuration from the DM switcher or have their IP table manually configured Depending on the application add DM devices as described below Scenario 1 Control Center wi...

Page 53: ...ontroller DM MD8X8 DM RMC 100 Ethernet Ethernet Ethernet DMNet CLASSROOM CONTROL CENTER CONTROL SYSTEM CONTROL SYSTEM To configure a SIMPL Windows program for this layout drop DM RMC 100 devices onto the control system s Ethernet slot The IP table of each DM RMC 100 will require manual configuration Program Manager Program Manager is the view where programmers program a Crestron control system by ...

Page 54: ...s to the USB port on the PC via the included Type A to Type B USB cable Use the Address Book in Crestron Toolbox to create an entry using the expected communication protocol USB When multiple USB devices are connected identify the DM MD8X8 by entering DM MD8X8 in the Model textbox the unit s serial number in the Serial textbox or the unit s hostname in the Hostname textbox The hostname can be foun...

Page 55: ...MPL Windows If a SIMPL Windows program is provided it can be uploaded to the control system using SIMPL Windows or Crestron Toolbox Firmware Check the Crestron website to find the latest firmware New users may be required to register to obtain access to certain areas of the site including the FTP site Upgrade DM MD8X8 firmware via Crestron Toolbox Establish communication with the DM MD8X8 and disp...

Page 56: ... control system s IP table to include an entry for the DM MD8X8 The entry should list the DM MD8X8 s IP ID specified on the DM MD8X8 s IP table and the internal gateway IP address 127 0 0 1 52 8x8 DigitalMedia Switcher DM MD8X8 Operations Guide DOC 6755A ...

Page 57: ...nfo Mode on page 55 Route Mode Signals coming in to the DM MD8X8 can be switched to single or multiple outputs Additionally the audio video and USB portions of an input signal can be switched simultaneously or separately To enter the Route mode press the ROUTE button The ROUTE LED will light Switch Audio Video and USB Simultaneously 1 Press the AUDIO VIDEO and USB buttons to select the audio video...

Page 58: ...urrent routing the LEDs of the newly selected outputs will flash and the display will state Press ENTER to Route 4 Press ENTER to make the connection s shown on the front panel Changes made on the front panel are made only after the ENTER button is pressed If you do not press ENTER the connection is not made Only one input can be routed at a time Pressing a different input button will lose any rou...

Page 59: ...about the input signal The accompanying LED will flash NOTE If the DMC VID4 is selected each composite video input can be selected for viewing by pressing the soft button of the desired input Turn the selection knob to display available information Press another input button to view its information View Output Information Press an output button to display information about the output signal The ac...

Page 60: ...th specification Reconfigure signal path to remove midpoint devices that increase overall device depth Bandwidth Test Failure Message during commissioning Poor cable connection to a DM RMC 100 on the D line Verify that cable is not crimped or damaged DM DR Repeater or DM RMC 100 Room Controller do not report to DM Switcher Poor cable connection to the DM DR or DM RMC 100 on the D line Verify that ...

Page 61: ...between before or after repeaters Maximum total length using up to 3 repeaters 720p 1080i 1080p 24 200 ft 60 m 450 ft 137 m 150 ft 45 m 400 ft 120 m 1024x768 75Hz 200 ft 60 m 450 ft 137 m 150 ft 45 m 400 ft 120 m 1080p 60 150 ft 45 m 450 ft 137 m 100 ft 30 m 400 ft 120 m 1280x1024 75Hz 150 ft 45 m 450 ft 137 m 100 ft 30 m 400 ft 120 m 1920x1200 60Hz 150 ft 45 m 450 ft 137 m 100 ft 30 m 400 ft 120 ...

Page 62: ...ime users will need to establish a user account to fully benefit from all available features Future Updates As Crestron improves functions adds new features and extends the capabilities of the DM MD8X8 additional information may be made available as manual updates These updates are solely electronic and serve as intermediary supplements prior to the release of a complete technical documentation re...

Page 63: ...HD HDMI Input Card for DM Switchers The DMC HD is an input card for a DigitalMedia Switcher providing one HDMI input The DMC HD supports HDMI 1 3a with Deep Color handling sources with resolutions and frame rates up to 1080p60 HD lossless audio and color depths up to 12 bit Additional connections on the card include an HDMI pass thru output a stereo analog audio pass thru output and a USB HID port...

Page 64: ...ers and other HD sources that output multi channel surround sound audio via HDMI allowing the multi channel signal to reach the surround sound system without requiring any decoding while also providing a 2 channel down mix to feed a stereo zone or audio distribution system Additional connections on the card include an HDMI pass thru output a stereo analog audio pass thru output and a USB HID port ...

Page 65: ... The DMC VID4 allows up to four security cameras to be viewed individually or simultaneously in quad dual or full screen modes When viewing full screen the input may be selected manually or sequentially The sequential switching function cycles automatically through each available input displaying each source one at a time per a user definable duration In any mode dynamic colored text overlay capab...

Page 66: ... HDMI OUT TO LOCAL HD DISPLAY OR HDMI INPUT ON DAISY CHAINED DM SWITCHER VIDEO IN FROM YPbPr COMPOSITE OR S VIDEO SOURCE AUDIO IN FROM ANALOG AUDIO OUTPUT DMC VID RCA D RCA Analog Video Input Card w Digital Audio for DM Switchers The DMC VID RCA D is an input card for a DigitalMedia Switcher providing one analog video input and one S PDIF coaxial digital audio input The DMC VID RCA D accepts compo...

Page 67: ...restron DM MD8X8 8x8 DigitalMedia Switcher Hardware Hookup for DMC VID RCA D RCA Analog Video Input Card w Digital Audio for DM Switchers Operations Guide DOC 6755A 8x8 DigitalMedia Switcher DM MD8X8 63 ...

Page 68: ...utput Card w HDMI for DM Switchers The DMC CATO HD is an output card for a DigitalMedia Switcher providing four DigitalMedia DM outputs to feed up to four individual DM receivers via CAT5e STP or DigitalMedia cable The DMC CATO HD also provides two local HDMI outputs configured in parallel with DM Outputs 1 and 3 Each HDMI output carries the same audio and video signals as its companion DM output ...

Page 69: ... Card for DM Switchers refer to DMC VID4 on page 77 For information on configuring the DMC VID RCA A RCA Analog Video Input Card w Analog Audio for DM Switchers refer to DMC VID RCA A on page 84 For information on configuring the DMC VID RCA D RCA Analog Video Input Card w Digital Audio for DM Switchers refer to DMC VID RCA D on page 90 DMC HD The front panel controls for the DMC HD allow the user...

Page 70: ...it Input Name Del Done Blu ray Select letters upper and lower case numbers or other characters by turning the selection knob until the desired letter number or other character is displayed on the LCD Move the cursor to another position by pressing the soft buttons labeled g and h To delete a character press the soft button marked Del NOTE The maximum length for any input name is 32 characters Afte...

Page 71: ...selection knob to highlight Audio Settings and press the ENTER button Audio Settings Audio Format PCM Frequency 480kHz Channels 2 Press the MENU button to return to the list of options for the input card Loopback Settings The DMC HD can display information about the device connected to the HDMI OUT port as well as information about the signal passed to the HDMI OUT port on the DMC HD Available inf...

Page 72: ...of the HDMI output signal turn the selection knob to highlight Audio and press the ENTER button Audio Details Audio Format PCM Frequency 480kHz Channels 2 Press the MENU button to return to the Loopback Settings EDID Information To view EDID information about the display device connected to the HDMI OUT port turn the selection knob to highlight EDID Information and press the ENTER button 68 8x8 Di...

Page 73: ...button Show Full EDID Show Full EDID Preferred Resolution Supported Resolutions Audio Formats Turn the selection knob to highlight the data to be viewed and press the ENTER button Press the MENU button to return to list of available EDID data Press the MENU button to return to the list of options for the input card Perform KSV Limit Test The DMC HD can analyze the connected source to determine the...

Page 74: ...mplete KSV Limit Test Results KSV Limit Test KSV Limit Test complete Maximum devices Supported 10 OK Press the soft button labeled OK to return to the list of options for the input card Restore Defaults Use the Restore Defaults function to reset the card to its factory settings for input name To restore the card s default settings Turn the selection knob to highlight Restore Defaults and press the...

Page 75: ...onnected to the HDMI OUT loopback port View the status of the USB HID port View the EDID mode setting View the setting for the EDID maximum resolution Show all of the EDID capabilities of the source device connected to the HDMI IN port Perform a Key Selection Vector KSV Limit Test to determine how many endpoints can be connected to the source Restore the input name to its default setting Name Rena...

Page 76: ...save the name and return to the list of options for the input card Video Settings The DMC HD DSP can display information about the video portion of the incoming signal Available information includes video type resolution frame rate aspect ratio Deep Color setting HDCP state and the maximum amount of downstream devices To view video settings Turn the selection knob to highlight Video Settings and p...

Page 77: ...o the HDMI O port on the DMC HD DSP Available information includes HDCP state Deep Color setting audio details and EDID information To view the loopback settings Turn the selection knob to highlight Loopback Settings and press th ENTER button Loopback Settings Loopback Settings HDCP State Inactive Deep Color Mode 8 bit Audio Turn the selection knob to view the available informatio ailed informatio...

Page 78: ...ghlight EDID Information and press the ENTER button EDID Information EDID Information Manufacturer SHP Name SHARP HDMI Timing 1920x1080 60Hz Press the MENU button to return to the Loopback Settings Show Full EDID The DMC HD can display all EDID data for the source connected to the HDMI IN port To view EDID information for the connected source Turn the selection knob to highlight Show Full EDID and...

Page 79: ...o determine the maximum number of KSVs it can support To perform a KSV Limit test Turn the selection knob to highlight KSV Limit Test and press the ENTER button KSV Limit Test KSV Limit Test Perform KSV Limit Test on this input stream No Yes Press the soft button labeled Yes to begin the test To cancel and return to the list of options for the input card press the soft button labeled No If Yes is ...

Page 80: ... Use the Restore Defaults function to reset the card to its factory settings for input name To restore the card s default settings Turn the selection knob to highlight Restore Defaults and press the ENTER button Press the soft button labeled Yes to restore the default setting or press the soft button labeled No to cancel and return to the list of options for the input card 76 8x8 DigitalMedia Swit...

Page 81: ...tails on the signal delivered to the HDMI OUT loopback port View details about the device connected to the HDMI OUT loopback port Restore the input name to its default setting Name Rename the Input To name and or rename the input Turn the selection knob to highlight Name and press the ENTER button A cursor will appear next to the current name and controls for changing the name will also be display...

Page 82: ...input to view Turn the selection knob to highlight Input Select and press the ENTER button Select Input to View Select Input To View Input 1 Front Gate Input 2 Garage Input 3 Front Door Turn the selection knob to highlight an input and press the ENTER button The current selection is indicated with an asterisk In addition to choosing an individual input the user can select to view all of the inputs...

Page 83: ...eo Input 4 Settings and press the ENTER button Video Settings Video Settings Name Front Door Video Type No Video Resolution No Video Turn the selection knob to view information on video type resolution frame rate and aspect ratio The name of the selected video input and the picture controls for the selected video input can also be adjusted Name The name of the video input can be set to provide a l...

Page 84: ...e is 32 characters After the new name has been entered press Done to save the name and return to the list of selections for the video input Picture Controls Picture controls can be used to adjust the picture s brightness contrast saturation and hue levels To adjust the picture Turn the selection knob to highlight Picture Controls and press the ENTER button Turn the selection knob to highlight the ...

Page 85: ...deo Settings Hue 50 Turn the selection knob to display the desired level and press the ENTER button to save the setting and return to the list of picture controls Press the MENU button to return to the list of options for the video input Press the MENU button to return to the list of options for the input card Operations Guide DOC 6755A 8x8 DigitalMedia Switcher DM MD8X8 81 ...

Page 86: ...0Hz Press the MENU button to return to the Loopback Settings Press the MENU button to return to the list of options for the input card Restore Defaults Use the Restore Defaults function to reset the card to its factory settings The cards factory settings are Input Select Input 1 Rotate Rate 3 seconds Image Display Full or Quad Full Image Format NTSC Image Cycle Enable Disable Disabled Text Oversca...

Page 87: ...puts 1 4 50 Hue level for inputs 1 4 50 Input Names for inputs 1 4 Camera 1 Camera 4 To restore the card s default settings Turn the selection knob to highlight Restore Defaults and press the ENTER button Press the soft button labeled Yes to restore the default setting or press the soft button labeled No to cancel and return to the list of options for the input card Operations Guide DOC 6755A 8x8 ...

Page 88: ...etails on the audio portion of the incoming signal View details on the signal delivered to the HDMI OUT loopback port View details about the device connected to the HDMI OUT loopback port Restore the input name to its default setting Name Rename the Input To name and or rename the input Turn the selection knob to highlight Name and press the ENTER button A cursor will appear next to the current na...

Page 89: ...signal and adjust the picture To view and or adjust the video settings Turn the selection knob to highlight Video Settings and press the ENTER button Video Settings Video Settings Input Type Component Video Type Interlaced Resolution 1920x1080 Turn the selection knob to view information on input type video type resolution frame rate and aspect ratio The picture settings can also be adjusted Pictur...

Page 90: ...DM MD8X8 Brightness Control Input 4 Video Settings Brightness 50 Contrast Control Input 4 Video Settings Contrast 50 Saturation Control Input 4 Video Settings Saturation 50 86 8x8 DigitalMedia Switcher DM MD8X8 Operations Guide DOC 6755A ...

Page 91: ...mat frequency and channels To view audio settings Turn the selection knob to highlight Audio Settings and press the ENTER button Audio Settings Audio Format PCM Frequency 480kHz Channels 2 Press the MENU button to return to the list of options for the input card Loopback Settings The DMC VID RCA A can display information about the device connected to the HDMI OUT port as well as information about ...

Page 92: ... the HDMI output signal turn the selection knob to highlight Audio and press the ENTER button Audio Details Audio Format PCM Frequency 480kHz Channels 2 Press the MENU button to return to the Loopback Settings EDID Information To view EDID information about the display device connected to the HDMI OUT port turn the selection knob to highlight EDID Information and press the ENTER button 88 8x8 Digi...

Page 93: ...ngs are Loopback Deep Color Mode 12 bit Color Space Mode Force RGB Enable Disable input Input enabled Brightness level for inputs 1 4 50 Contrast level for inputs 1 4 50 Saturation level for inputs 1 4 50 Hue level for inputs 1 4 50 To restore the card s default settings Turn the selection knob to highlight Restore Defaults and press the ENTER button Press the soft button labeled Yes to restore th...

Page 94: ...etails on the audio portion of the incoming signal View details on the signal delivered to the HDMI OUT loopback port View details about the device connected to the HDMI OUT loopback port Restore the input name to its default setting Name Rename the Input To name and or rename the input Turn the selection knob to highlight Name and press the ENTER button A cursor will appear next to the current na...

Page 95: ...signal and adjust the picture To view and or adjust the video settings Turn the selection knob to highlight Video Settings and press the ENTER button Video Settings Video Settings Input Type Component Video Type Interlaced Resolution 1920x1080 Turn the selection knob to view information on input type video type resolution frame rate and aspect ratio The picture settings can also be adjusted Pictur...

Page 96: ...DM MD8X8 Brightness Control Input 2 Video Settings Brightness 50 Contrast Control Input 2 Video Settings Contrast 50 Saturation Control Input 2 Video Settings Saturation 50 92 8x8 DigitalMedia Switcher DM MD8X8 Operations Guide DOC 6755A ...

Page 97: ...t frequency and channels To view audio settings Turn the selection knob to highlight Audio Settings and press the ENTER button Audio Settings Audio Format PCM Frequency 480kHz Channels 2 Press the MENU button to return to the list of options for the input card Loopback Settings The DMC VID RCA D can display information about the device connected to the HDMI OUT port as well as information about th...

Page 98: ... the HDMI output signal turn the selection knob to highlight Audio and press the ENTER button Audio Details Audio Format PCM Frequency 480kHz Channels 2 Press the MENU button to return to the Loopback Settings EDID Information To view EDID information about the display device connected to the HDMI OUT port turn the selection knob to highlight EDID Information and press the ENTER button 94 8x8 Digi...

Page 99: ...ngs are Loopback Deep Color Mode 12 bit Color Space Mode Force RGB Enable Disable input Input enabled Brightness level for inputs 1 4 50 Contrast level for inputs 1 4 50 Saturation level for inputs 1 4 50 Hue level for inputs 1 4 50 To restore the card s default settings Turn the selection knob to highlight Restore Defaults and press the ENTER button Press the soft button labeled Yes to restore th...

Page 100: ...ER button A list of options is displayed Turn the selection knob to highlight an option and press the ENTER button Output Settings for Output 1 1 DMC CATO HD CAT Name 1 DM Output Settings HDMI Output Settings To return to the list of outputs press the MENU button Name Rename an Output To name and or rename an output Open the Outputs section and select an output as described above Turn the selectio...

Page 101: ...vice Depth will display detailed information when highlighted with the selection knob and selected by pressing the ENTER button When DM Cable Type is selected the type of DM cable used to connect the output can be displayed or changed DM Cable Type DM Cable Type Digital Media Category 6 Category 5e The selected cable type is displayed with an asterisk To select a different cable type Turn the sele...

Page 102: ...labeled Yes to restore the default settings or press the soft button labeled No to cancel and return to the list of available functions If Yes is chosen the settings will be restored as follows Output 1 Deep Color Setting 8 bit Output 2 Deep Color Setting HDMI output on outputs 1 3 5 and 7 12 bit DM Cable Type DM Cable Maximum Pixel Rate on Output 1 165 Maximum Pixel Rate on Output 2 HDMI output o...

Page 103: ...rogressive form of standard definition digital television SDTV comparable to VGA computer displays but not considered high definition television HDTV though 480p is discernibly cleaner and slightly sharper than analog television The native resolution of DVD is 480p but that resolution can be seen only if a DVD player outputs a progressive scan signal and the DTV has progressive scan or component v...

Page 104: ...ta transmissions are delivered to the intended receiver Authentication also assures the receiver of the integrity of the message and its source where or whom it came from The simplest form of authentication requires a username and a password to gain access to a particular account But authentication protocols can also be based on secret key encryption such as DES or on public key systems using digi...

Page 105: ...ce announcing its resolution capabilities HDMI High Definition Multimedia Interface USB like digital video connectivity standard designed as a successor to DVI can transmit both digital audio and video signals incorporates HDCP digital copy protection Interlaced scanning Scan method used by the majority of televisions and the 1080i HDTV format As opposed to progressive scanning in which the CRT s ...

Page 106: ...th an aspect ratio greater than 1 33 1 or a picture wider and narrower than a standard television image Typically refers to TVs in the 16 9 aspect ratio Y Pb Pr Luminance two chrominance channels of blue minus luminance red minus luminance This technical shorthand for component video is also written as Y Cb Cr or Y R Y B Y 102 8x8 DigitalMedia Switcher DM MD8X8 Operations Guide DOC 6755A ...

Page 107: ...pan tilt heads and power supplies are covered for a period of one 1 year touchscreen display and overlay components are covered for 90 days batteries and incandescent lamps are not covered This warranty extends to products purchased directly from CRESTRON or an authorized CRESTRON dealer Purchasers should inquire of the dealer regarding the nature and extent of the dealer s warranty if any CRESTRO...

Page 108: ... pending DTS DTS Digital Surround ES and Neo 6 are registered trademarks and the DTS logos Symbol and DTS 96 24 are trademarks of DTS Inc 1996 2008 DTS Inc All Rights Reserved DTS HD High Resolution Audio Manufactured under license under U S Patent s 5 451 942 5 956 674 5 974 380 5 978 762 6 226 616 6 487 535 7 212 872 7 333 929 other U S and worldwide patents issued pending DTS is a registered tr...

Page 109: ...one understands that there is no warranty for this free software If the software is modified by someone else and passed on we want its recipients to know that what they have is not the original so that any problems introduced by others will not reflect on the original authors reputations Finally any free program is threatened constantly by software patents We wish to avoid the danger that redistri...

Page 110: ...the Program or a work based on it under Section 2 in object code or executable form under the terms of Sections 1 and 2 above provided that you also do one of the following a Accompany it with the complete corresponding machine readable source code which must be distributed under the terms of Sections 1 and 2 above on a medium customarily used for software interchange or b Accompany it with a writ...

Page 111: ...ginal copyright holder who places the Program under this License may add an explicit geographical distribution limitation excluding those countries so that distribution is permitted only in or among countries not thus excluded In such case this License incorporates the limitation as if written in the body of this License 9 The Free Software Foundation may publish revised and or new versions of the...

Page 112: ...Crestron Electronics Inc Operations Guide DOC 6755A 15 Volvo Drive Rockleigh NJ 07647 2022812 Tel 888 CRESTRON 02 09 Fax 201 767 7576 Specifications subject to www crestron com change without notice ...

Reviews: