
LPN000129_B
2 of 2
© 2019 Cree Lighting, A company of IDEAL INDUSTRIES. All rights reserved. For informational purposes only. Content
is subject to change. See www.creelighting.com/warranty for warranty and specifications. Cree
®
and the Cree logo are
registered trademarks of Cree, Inc. CR14™, CR22™ and CR24™ are trademarks of Cree Lighting, A company of IDEAL
INDUSTRIES.
www.creelighting.com
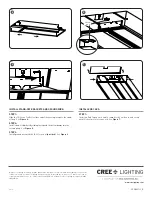
INSTALL STAND-OFF BRACKETS AND GROUND WIRE:
STEP 1:
Slide the CR Series Troffer to either end of the housing to expose the stand-
off loop. See
Figure 4.
STEP 2:
Install stand-off brackets by sliding the tab with the detent bumps into the
receiving loop. See
Figure 5.
STEP 3:
Install ground wire with the (8-32) star nut
(provided)
. See
Figure 6.
INSTALL END CAPS:
STEP 1:
Install an End Cap on each end to complete the enclosure and secure
with (2) sheet metal screws each. See
Figure 7.
4
5
7
6
Stand-Off
Bracket


