background image

12

13


Enjoy 5.1 audio via USB connection

9.1

Windows XP setup

1.  Plug in the USB cable, wait for a series of “

Found New Hardware

” messages to appear on your  


computer screen. 

Note: If you do not see these messages, the capability to display them may be disabled in your computer. 

Wait for 1-2 minutes before proceeding to the next step. Alternatively, you could try another USB port. 

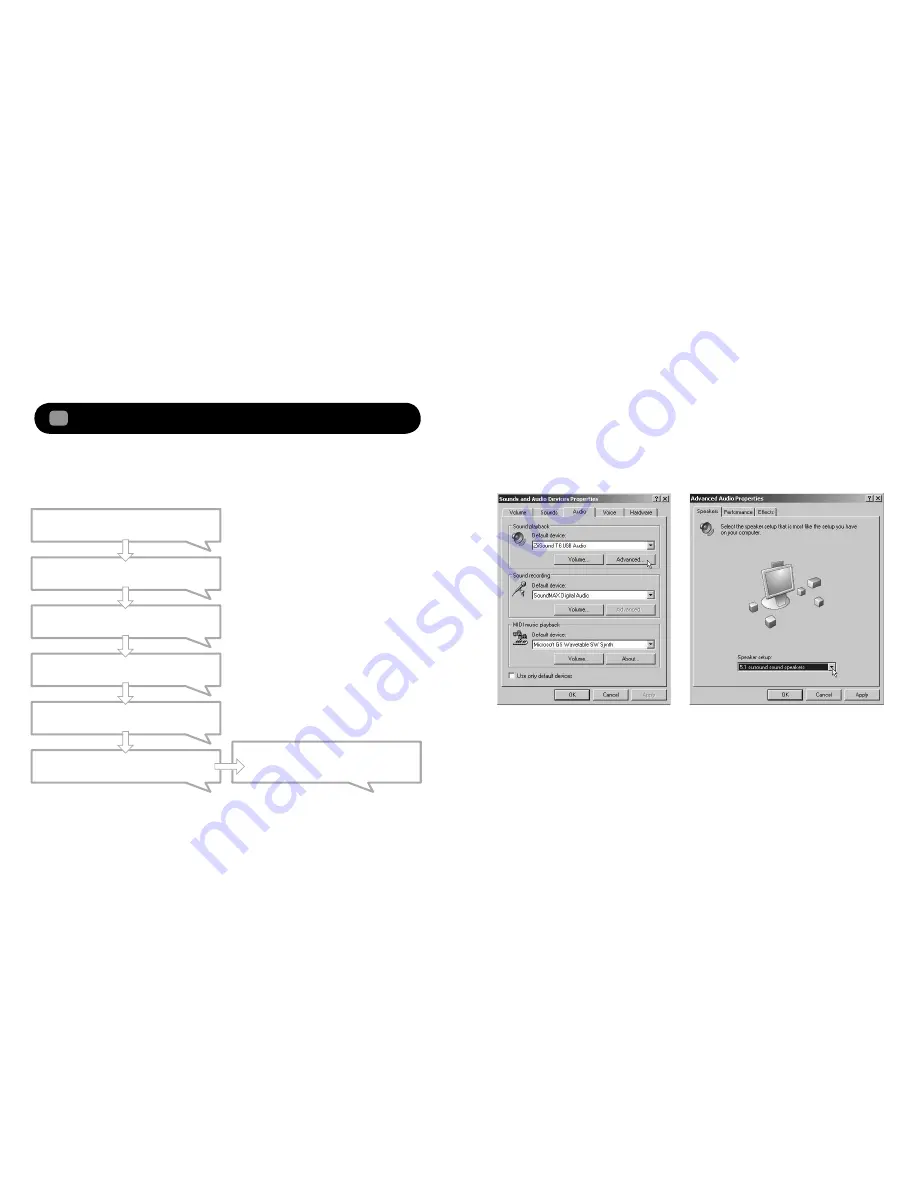
In Windows XP Control Panel, open 

Sounds and Audio Devices Properties.

Under the Audio tab, verify that 

ZiiSound T6 USB Audio

 is selected under 

Sound playback

Under 

Sound playback

 setting, click the 

Advanced

 button to open 

Advanced Audio Properties.

In the 

Speaker 

setup drop list, select 

5.1 surround sound speakers.

Click 

Apply

 and then 

OK.

Your ZiiSound T6 is now ready for use.

Found New Hardware

USB Composite Device

Found New Hardware

ZiiSound T6 USB Audio 

Found New Hardware

ZiiSound T6 USB Audio 

Found New Hardware

USB Audio Device

Found New Hardware

ZiiSound T6 USB Audio

Found New Hardware

USB Human Interface Device

Found New Hardware

Your new hardware is installed and 

ready to use

Summary of Contents for ZIISOUND T6 -

Page 1: ...1 2 23 43 63 83 103 123 143 163 183 203 223 243 263 283 303 323 343...

Page 2: ...ery and do not use it again Clean your hands well before touching food or sensitive areas such as your eyes Do not expose to excessive heat such as sunshine re or the like The following statement only...

Page 3: ...ion AUX In Auxiliary line in for Audio Devices SLAM Subwoofer 9 10 11 12 13 13 12 Side views of the Audio Control Pod 1 2 3 4 5 6 7 4 2 3 8 9 10 11 Audio Control Pod LED status indications GREEN Line...

Page 4: ...back to remote control Enjoy high performance wireless audio from ZiiSoundT6 via Bluetooth AudioTransmitter BT D1 3 1 2 3 4 5 6 7 8 9 A B Bluetooth Audio BT D1 is paired with ZiiSound T6 at factory Si...

Page 5: ...r OFF the speaker Press and hold Power button for 7 seconds ZiiSound T6 will auto Power up When the Blue LED starts to blink ZiiSound T6 is ready for pairing Blue LED fast blinks Pairing mode Ready to...

Page 6: ...including startup shutdown or warning tones played from your computer Ensure that the volume is kept to a comfortable level Pairing Pairing Connected 2 sec blink interval 10 11 To establish a new conn...

Page 7: ...s Properties Under the Audio tab verify that ZiiSound T6 USB Audio is selected under Sound playback Under Sound playback setting click the Advanced button to open Advanced Audio Properties In the Spea...

Page 8: ...on the system tray A Select Playback Devices B Click on Con gure and ensure that 5 1 surround is selected under Audio Channels D Click Next for the next few con guration windows to accept defaults unt...

Page 9: ...Audio MIDI Setup A Select on ZiiSound T6 USB Audio click on Output click on Con gure Speakers B Select 5 1 Surround click Apply and then click Done C Close all panels Your ZiiSound T6 is now ready for...

Page 10: ...AUX In 10 Wall mountable satellites 11 Ziisound T6 satellites can be wall mountable for more speci c instructions on wall mounting please consult your wall mount adapter manufacturer s manual For more...

Page 11: ...Europe CE requirement this device must be installed with CE certi ed computer equipment which meet with Class B limits All cables used to connect this device must be shielded grounded and no longer t...

Page 12: ...by Creative Technology Ltd declares that this wireless speaker is in compliance with the essential requirements and other relevant provisions of Directive 1999 5 EC Par le pr sent document Creative Te...

Reviews: