Creative Sound Blaster Pro, Getting Started
Discover the ultimate audio experience with the Creative Sound Blaster Pro. Enhance your sound system easily by following the step-by-step instructions provided in the "Getting Started" manual. Download this comprehensive guide for free from manualshive.com and unlock the full potential of your Sound Blaster Pro.
Share
Download


Reviews:
No comments
Related manuals for Sound Blaster Pro

PEX3U3F800
Brand: StarTech.com Pages: 10

3054 PCI Aries
Brand: SENAO Pages: 26

LVDS 8R
Brand: Dynamic Engineering Pages: 46

PrPMC800
Brand: Emerson Pages: 4

CPCI-6200
Brand: Emerson Pages: 196

DF PROFINET IO PCI
Brand: Kunbus Pages: 7

PCX 22
Brand: Digigram Pages: 8

Quantum Parametrics SAS2
Brand: ASTEK Pages: 5

DWL-500 - 11Mb Wireless LAN PCI Network Card
Brand: D-Link Pages: 80

PCI-AIO05
Brand: DAQ system Pages: 23

TEM-370B Series
Brand: Lanner electronics Pages: 59

3PCIOU1
Brand: B&B Pages: 57

802.11a/b/g Wireless MiniPCI Card WCM6002
Brand: Abocom Pages: 2

USB 3.0 PCI Express
Brand: Clas Ohlson Pages: 5
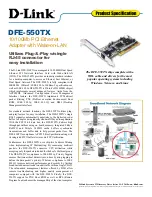
DFE-550TX
Brand: D-Link Pages: 2

324007
Brand: Manhattan Pages: 8

SC500 EC
Brand: JMC Pages: 2

TL-WN353GD
Brand: TP-Link Pages: 35


