


8
Indicators and Controls
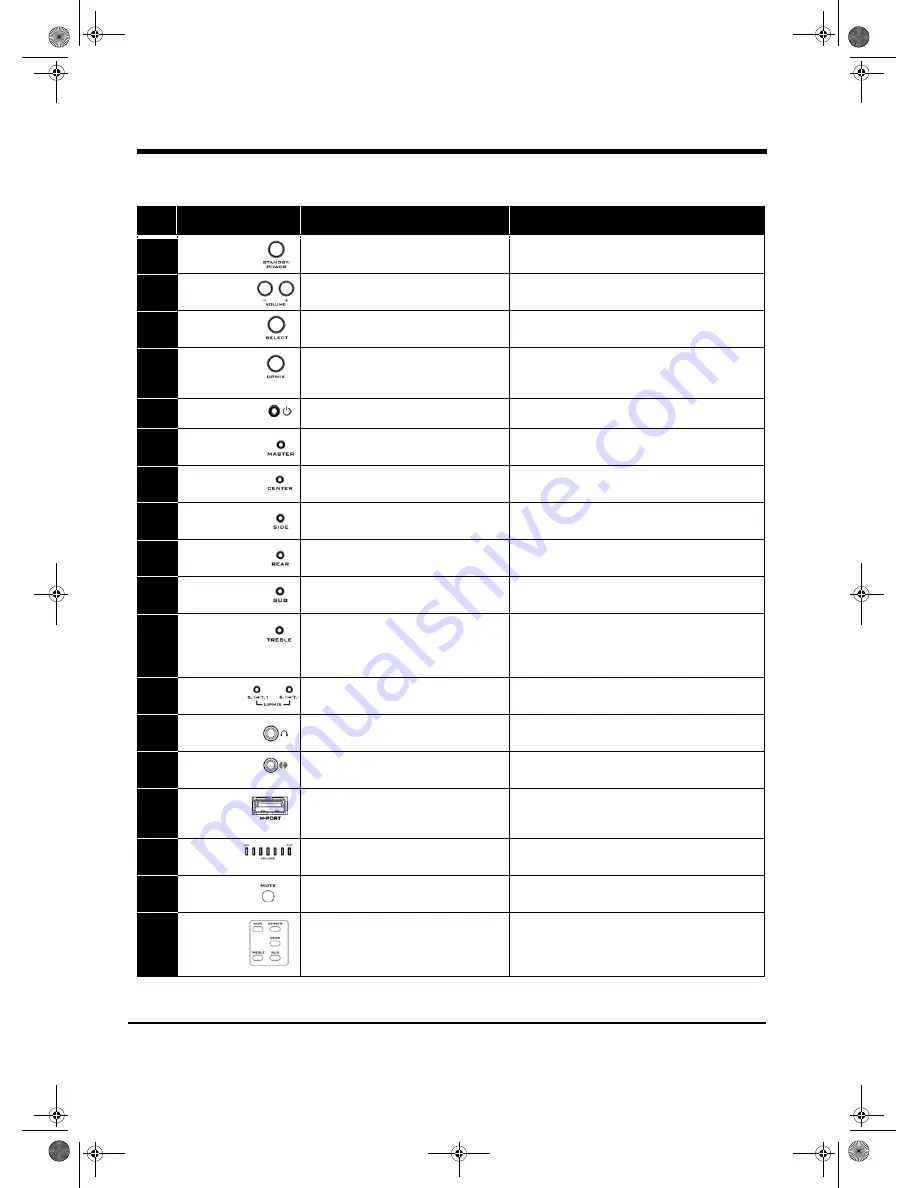
No.
Button/Indicator
Description
Notes
1
Standby/Power
button
Turns the system on or off the Standby
mode
Previous user settings are restored when system
is turned on.
2
Volme Adjust
buttons
Decreases or increases the selected
output level.
Use the Select button to choose Master, Center,
Side, Rear speaker and Sub/Treble output levels.
3
Select button
Selects Master, Center, Side, Rear, Sub
or Treble modes for adjustment.
Use the Volume Adjust buttons to adjust the
selected output levels.
4
Upmix button
5.1
→
7.1 upmixing
6.1
→
7.1 upmixing
OFF (No upmix)
See Page 11, “Understanding Upmixing” for
details.
5
Power indicator
Displays the power status of the system
Red denotes system standby mode.
6
Master Volume
Mode indicator
Illuminates when the Master Volume
adjustment mode is selected.
The output levels of all speakers are adjusted
simultaneously, including headphones volume.
7
Center Mode
indicator
Illuminates when the Center Volume
adjustment mode is selected.
The output level of the Center speaker is
adjusted.
8
Side Mode
indicator
Illiuminates when the Side Mode Volume
adjustment mode is selected.
The output levels of the Side speakers are
adjusted.
9
Rear Mode
indicator
Illuminates when the Rear Volume
adjustment mode is selected.
The output levels of the Rear speakers are
adjusted.
10
Subwoofer Mode
indicator
Illuminates when the Sub Volume
adjustment mode is selected.
The output level of the Subwoofer is adjusted.
Also adjusts bass level for headphones.
11
Treble Mode
indicator
Illuminates when the Treble Volume
adjustment mode is selected.
The output level of the Treble is adjusted for all
speakers. Also adjusts treble levels
for headphones.
12
Upmix status
indicator
Illuminates when upmixing is active.
5.1
→
7.1 For 5.1 source devices
6.1
→
7.1 For 6.1 source devices
13
Headphone
output
Connects to any headphones with a 3.5
mm (1/8 inch) plug.
All speakers are muted when headphones are
connected.
14
Line input
Allows connection of an analog stereo
device.
Connect to the line output of a Jukebox, MD
Player and other portable audio devices.
15
M-PORT
Portable Audio Docking Point.
Allows direct connection of your Creative Digital
Audio Player or any device featuring the M-PORT
logo for streaming audio.
16
Volume
Level indicators
Indicate volume or output level being
adjusted.
Dependent on mode setting.
17
Mute button
Silences the speaker and headphones
outputs.
In mute mode, all illuminated indicators will blink
continuously.
18
Select
buttons
Directly select Sub or Treble volume
adjustment modes, as well as level
adjustment modes for Center, Side, or
Rear speakers.
These buttons on the remote control let you
directly select Side, Center, Rear, Sub and Treble
modes for adjustment.
Table 1: Overview of the Audio Control Pod and Remote Control
Selects
MWorks THX S750 CLE.book Page 8 Friday, September 5, 2003 12:05 PM


