background image

pg 19 of 30

REF: WO106 - HEARTWOOD

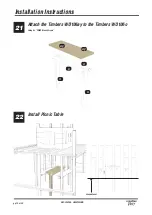
Attach the Timbers WO106ay to the Timbers WO106o

Using  6x “FM80 Brass Screws”

Install Picnic Table

21

22

Installation Instructions

n

n

o

o

ay

ay

Ground Level

Summary of Contents for Heartwood WO106

Page 1: ...HEARTWOOD Installation Instructions REF WO106 HEARTWOOD pg 1 of 30...

Page 2: ...RACKET x1 SWING BRACKET x1 L BRACKET x4 M12 x 120 SQUARE CUP HEX BOLTS x5 M12 x 170 SQUARE CUP HEX BOLTS x21 M12 x 200 SQUARE CUP HEX BOLTS x2 M12 x 250 SQUARE CUP HEX BOLTS x164 FM40 Brass screws x28...

Page 3: ...1 143x43 x1 143x43 x2 218x43 x1 218x43 x2 90x43 x4 59x43 x1 143x43 x1 218x43 x6 218x43 x2 218x43 x4 93x43 x2 90x90 x1 90x90 x52 93x17 5 x1 90x90 x2 90x90 x4 218x17 5 WO106a WO106h WO106q WO106d WO106m...

Page 4: ...pg 4 of 30 REF WO106 HEARTWOOD PARTS required x1 1 5m SLIDE x1 CURVED SLIDE PARTS x10 CLIMBING BLOCKS x2 SWINGS x1 NET x1 ENTRANCE PANEL x1 BACK PANEL x2 SIDES PANEL x2 WINDOWS x1 RAMP PANEL...

Page 5: ...pg 5 of 30 REF WO106 HEARTWOOD TOOLS required...

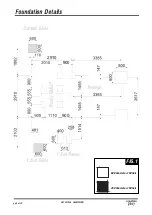
Page 6: ...pg 6 of 30 REF WO106 HEARTWOOD Foundation Details 600 Concrete 150 Soil 450 Concrete 150 Soil FIG 1 Curved Slide Swings 1 5m Slide 1 5m Ramp Picnic TABLE 2910 900 900...

Page 7: ...pg 7 of 30 REF WO106 HEARTWOOD Surfacing Details MINIMUM SPACE SURFACE AREA...

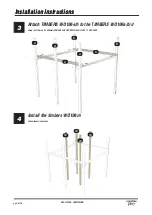
Page 8: ...ions Install the timbers WO106a b d Follow fundation details 1 2 Installation Instructions Attach TIMBERS WO106h to the TIMBERS WO106a b Using 4x 200mm SQUARE CUP HEX BOLTS 6x NYLOCS 4 RED CAPS ENSURE...

Page 9: ...ation Instructions Attach TIMBERS WO106e h to the TIMBERS WO106a b d Using 4x 170mm 1x 200mm SQUARE CUP HEX BOLTS 5x NYLOCS 1 RED CAPS Install the timbers WO106m Follow fundation details Installation...

Page 10: ...TIMBERS WO106f g to the TIMBERS WO106m Using 4x 200mm SQUARE CUP HEX BOLTS 4x NYLOCS 4 RED CAPS Install TIMBERS WO106c and Attach it to the TIMBER WO106f Using 4x 170mm 1x 200mm SQUARE CUP HEX BOLTS 5...

Page 11: ...nstallation Instructions 7 m m m o ax ax o m Attach TIMBERS WO106o to the TIMBERS WO106m and WO106ax to them Using 4x 200mm SQUARE CUP HEX BOLTS 4x NYLOCS 4 RED CAPS Attach TIMBERS WO106aj to the TIMB...

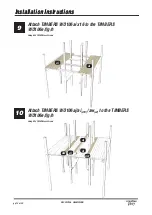
Page 12: ...on Instructions Installation Instructions 9 10 Attach TIMBERS WO106ai x16 to the TIMBERS WO106e f g h Using 64x FM80 Brass Screws Attach TIMBERS WO106aj ai x10 aw x2 to the TIMBERS WO106e f g h Using...

Page 13: ...BER WO106i to the TIMBER WO106b Using 2x 200mm SQUARE CUP HEX BOLTS 2x NYLOCS 2 RED CAPS Attach SWINGS PANEL Using 52x FM40 Brass Screws 0B TORKTAINER x 2 N1 TORKTAINER x2 2 RED CAPS i b b WO106af WO1...

Page 14: ...llation Instructions Installation Instructions 13 14 Attach SWINGS PANEL to TIMBERS WO106a d Using 39x FM80 Brass Screws Attach TIMBER WO106ac aq to the TIMBER WO106a v Using 26x FM80 Brass Screws and...

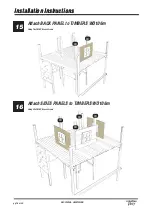
Page 15: ...WO106 HEARTWOOD Installation Instructions Installation Instructions 15 16 Attach BACK PANEL to TIMBERS WO106m Using 16x FM80 Brass Screws Attach SIDES PANELS to TIMBERS WO106m Using 32x FM80 Brass Scr...

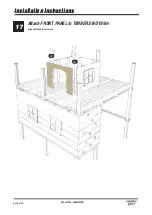
Page 16: ...pg 16 of 30 REF WO106 HEARTWOOD Installation Instructions Installation Instructions 17 Attach FRONT PANEL to TIMBERS WO106m Using 16x FM80 Brass Screws m m...

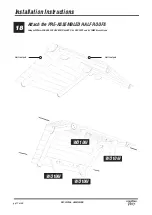
Page 17: ...106 HEARTWOOD Attach the PRE ASSEMBLED HALF ROOFS Using 4x 200mm SQUARE CUP HEX BOLTS 4x NUTS 4x RED CAPS and 8x FM80 Brass Screws 18 Installation Instructions WO106l WO106l WO106l WO106l Half roof pa...

Page 18: ...D Attach the ROOF to the TIMBERS WO106m Using 16x FM80 Brass Screws and ROOF METAL BRACKETS 19 Installation Instructions Attach the Timbers WO106o to the Timbers WO106n Using 2x 250mm SQUARE CUP HEX B...

Page 19: ...pg 19 of 30 REF WO106 HEARTWOOD Attach the Timbers WO106ay to the Timbers WO106o Using 6x FM80 Brass Screws Install Picnic Table 21 22 Installation Instructions n n o o ay ay Ground Level...

Page 20: ...pg 20 of 30 REF WO106 HEARTWOOD Attach the SLIDE RAMP PANEL Using 24x FM40 Brass Screws 8x FM80 Brass Screws 23 Installation Instructions r r am as a b r r QTY x 12...

Page 21: ...pg 21 of 30 REF WO106 HEARTWOOD Attach the CLIMBING WALL CURVED SLIDE PANEL Using 16x FM40 Brass Screws 8x FM80 Brass Screws 24 Installation Instructions r ap at r r QTY x 9 a c b...

Page 22: ...22 of 30 REF WO106 HEARTWOOD Attach the SWINGS SIDE PANEL Using 36x FM40 Brass Screws 8x FM80 Brass Screws 1x 200mm SQUARE CUP HEX BOLT 1x NUTS 1x RED CAP 25 Installation Instructions r QTY x 18 r an...

Page 23: ...pg 23 of 30 REF WO106 HEARTWOOD 26 Installation Instructions Attach the NET SIDE PANEL Using 24x FM40 Brass Screws 8x FM80 Brass Screws r r ao av QTY x 12...

Page 24: ...pg 24 of 30 REF WO106 HEARTWOOD 27 28 Attach the NET Using 20x NYLOCS 20x RED CAPS Attach the RAMP to the RAMP PANEL Using 4x FM40 Brass Screws 4x FM80 Brass Screws Installation Instructions b b i av...

Page 25: ...pg 25 of 30 REF WO106 HEARTWOOD Attach the SLIDE TO THE PLATFORM Using 2x FM40 Brass Screws and Slide Fittings 29 Installation Instructions...

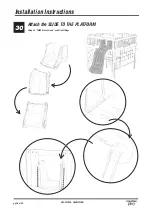
Page 26: ...pg 26 of 30 REF WO106 HEARTWOOD Attach the SLIDE TO THE PLATFORM Using 2x FM40 Brass Screws and Slide Fittings 30 Installation Instructions...

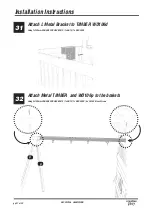
Page 27: ...al Bracket to TIMBER WO106d Using 1x 120mm SQUARE CUP HEX BOLTS 1x NUTS 1x RED CAPS Attach Metal TIMBER and WO106p to the brakets Using 2x 120mm SQUARE CUP HEX BOLTS 1x NUTS 1x RED CAPS 4x FM 80 Brass...

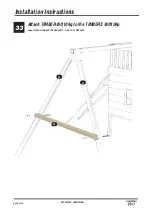
Page 28: ...pg 28 of 30 REF WO106 HEARTWOOD Attach TIMBER WO106q to the TIMBERS WO106p Using 2x 200mm SQUARE CUP HEX BOLTS 1x NUTS 1x RED CAPS 33 Installation Instructions p p q...

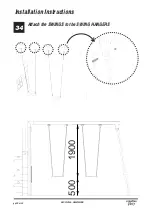
Page 29: ...pg 29 of 30 REF WO106 HEARTWOOD Attach the SWINGS to the SWING HANGERS 34 Installation Instructions 1900 500...

Page 30: ...pg 30 of 30 REF WO106 HEARTWOOD Additional Dimensions...

Reviews: