background image

9. Time lapse video

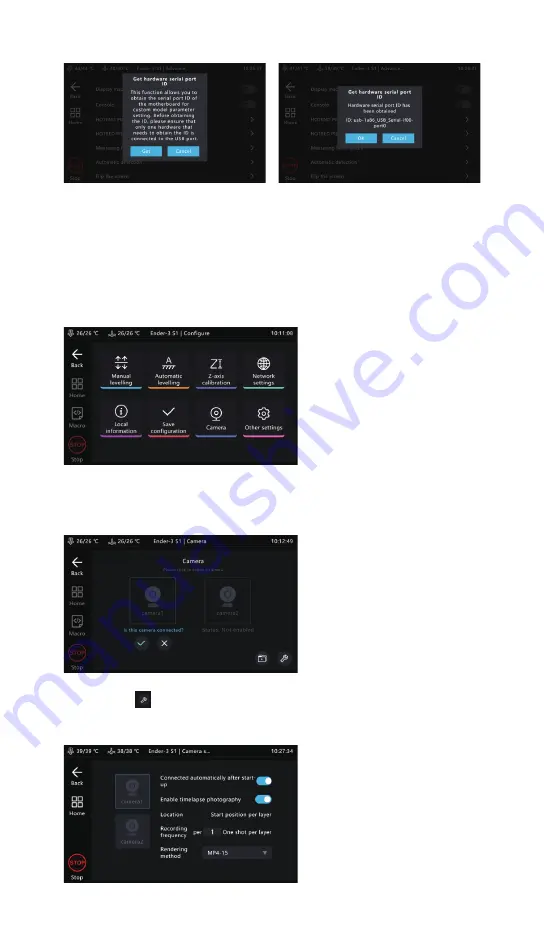
1.  Power off the Creality Sonic Pad before connecting the camera to the 

USB interface.  Power it on then enter the Configure page and click the 

camera.

2. Go to the Camera page, click the camera icon, and check Connect 
camera.

3. Click the          logo in the lower right corner of this page to enter the 
setting page.

14

Summary of Contents for Sonic Pad

Page 1: ...Creality Sonic Pad User Manual V2 0 SHENZHEN CREALITY 3D TECHNOLOGY CO LTD...

Page 2: ...will always be ready to provide you the best service Please con tact us by phone or email provided at the end of this document if you encounter any problem with our product In addition you can visit o...

Page 3: ...ion 04 Operation Precautions 05 First use 06 Daily use 07 System upgrade 08 Advanced options 09 Time lapse video 10 Slicing software displays previews and thumbnails 11 Adaptation of other printers 12...

Page 4: ...core system of the printer Hardware Speci cations 1 Product Description CPU RAM ROM USB 2 0 interface Screen resolution size Wi Fi protocol LAN interface Gsensor interface Power interface Input volta...

Page 5: ...ata cable x1 4 G sensor x1 5 USB cable x1 6 USB drive x1 7 MicroUSB to MiniUSB connector x1 8 MicroUSB to Type C connector x1 9 Instructions x1 10 Screw Pack x1 3 Interface and button description Rese...

Page 6: ...ne 4 Do not place this product in a vibration or unstable environ ment 5 Please power off to clean the product regularly 6 Users should comply with the laws and regulations of the corre sponding count...

Page 7: ...er if necessary LAN CAM DC USB SENSOR 2 Boot Settings After the connection is completed press the power button of the Creality Sonic Pad to enter the boot up operation follow the order of the guide in...

Page 8: ...cting the checkbox 2 6 Device Rename 2 7 Printer rmware ashing 2 7 1 Select printer model users need to open up the printer to check the mother board chip model 2 7 2 Taking the model Ender 3 S1 as an...

Page 9: ...red on 2 7 5 After the printer rmware is ashed click Restart 3 Functional self check After the printer rmware is ashed the Creality Sonic Pad will automatically restart the printer After restarting it...

Page 10: ...6 Daily use 1 Print 1 1 Enter the Home page and click Print 1 2 Select the gcode le saved locally or in the USB drive click on the to print the le 07...

Page 11: ...shown in the gure 1 5 During the printing process you can choose to Pause Stop printing It can resume after pause but it will exit the printing interface and go back to Home page if you stop printing...

Page 12: ...le management 2 1 Enter the gcode selection page and perform the following opera tions Manage gcode les USB drive and local les can be copy from and to each other or vise versa Files can also be dele...

Page 13: ...le Decompression it and copy to the root directory of the USB drive After inserting the machine an upgrade prompt will pop up automatically Follow the instructions to upgrade 1 2 Click System Upgrade...

Page 14: ...ibration and con rm that the calibration is com pleted according to the prompts the system will automatically save 4 HOTBED PID calibration Click to enter the calibration page after setting the calibr...

Page 15: ...ngs Advanced options and click Measuring resonances 5 2 After connecting the sensor and installing it click Next step to enter the detection page 5 1 Enter the Measuring resonances page connect and in...

Page 16: ...automatic detection 6 Automatic detection The self test items can be freely selected After selecting click to start the detection and follow the guidance to complete the detection After completion you...

Page 17: ...connecting the camera to the USB interface Power it on then enter the Con gure page and click the camera 2 Go to the Camera page click the camera icon and check Connect camera 3 Click the logo in the...

Reviews: