background image


END-OF-SEASON MAINTENANCE & STORING YOUR HUMIDIFIER 
 

1.


Always turn off and unplug from outlet before cleaning. 

2.


Empty water from the water tank and humidifier base. 

3.


Disinfect water tank and humidifier base with the white vinegar and water solution as 
described in weekly maintenance. 

4.


Make sure that water tank has air dried without the cover and mist channel on the 
tank. 

5.


Make sure the humidifier base, mist channel, cover and water tank are completely 
dry before end of season storage.  Store the humidifier in a cool dry place.  

6.


DO NOT

 place any heavy items on top of humidifier during storage as this may result 

in possible damage of the humidifier. 

7.


Store the cord in a clean, dry location away from metal objects.  Always check the 
plug before use to ensure metal items have not become attached. 
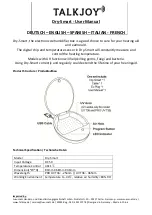
 

CRANE CUSTOMER CARE 

If you have any questions with regard to the operation of this humidifier, or are in need 

of a spare part, please contact Crane Customer Care. 


TROUBLESHOOTING 

DO NOT attempt to repair the motor yourself. 

If the humidifier continues to not operate, please contact Crane Customer Care. 


Problem 

Possible Cause 

Leaking water 


Check to make sure the water tank is properly placed on 
the Base 


Make sure the Mist Channel is securely attached in the 
Water Tank 

No mist/Weak mist being 

produced


Raise the humidity level setting 


Check to make sure the humidifier is plugged in correctly 
and press the Power Button 


Add water to the Water Tank 


Perform weekly maintenance on the Base (pg.7) 

Mist falling to the surface 


Adjust the Mist Setting to a lower setting 


Clean the Mist Nozzle, Cover and Mist Chamber to make 
sure it is free of debris 

Strange Odor 


Clean the Water Tank and Base as instructed on the 
Maintenance (pg.7) 

Dripping from Mist Nozzle 


Ensure Mist Nozzle is attached securely to the Cover 


Turn down mist level to a lower setting 


No Power/No lights on Display  


Ensure humidifier is plugged into a wall outlet 


Check to make sure the power is on 

Out of Water Indicator when Full 
of Water 


Clean Water Level Float (pg.7) 


Remove Water Level Sensor Cap and Float from the post 
they are on. Wash both parts in warm soapy water and 
rinse well. Replace the Water Level Sensor Cap and Float 
securely back onto the post 


Replacement parts available at www.crane-usa.com 


Summary of Contents for EE-6917

Page 1: ...ou have any questions about the operation of your humidifier please contact Crane Customer Care Toll Free 1 888 599 0992 Email Customer Service Crane usa com Information to the user a The interference potential of the device or system b Maintenance of the system c Simple measures that can be taken by the user to correct interference ...

Page 2: ...SAVE YOUR DATED PROOF OF PURCHASE You will need this in case of warranty staple tape or paperclip your receipt HERE ...

Page 3: ...m recycled materials with no added finishes or harmful dyes If the humidifier should no longer operate please be sure to dispose of the unit in an environmentally friendly way by taking it to a public collection point PLEASE DO NOT PLACE BROKEN HUMIDIFIERS WITH YOUR REGULAR HOUSEHOLD WASTE Table of Contents Sustainability P 1 Safety Instructions P 2 3 List of Main Parts P 4 Technical Specification...

Page 4: ...nd level surface and position unit away from direct sunlight Keep the cord away from heated surfaces and areas where it could be walked on or tripped over Unplug the unit when not in use and whenever you clean or move the unit 9 Do not add medication or essential oils into the Water Base or Water Tank Do not cover any openings on the unit or insert objects into any openings 10 The unit should not ...

Page 5: ... an extension cord is required special care and caution is necessary Also the extension cord must be 1 marked with an electrical rating of 120 V and at least 13 A 1625 W and 2 the cord must be arranged so that it will not drape over the countertop or tabletop where it can be pulled on by children or accidently tripped over ELECTRIC POWER If the electric circuit is overloaded by other appliances yo...

Page 6: ...Panel 6 Water Level Float 7 Water Level Sensor Cap and Float 8 Nebulizer 9 Fan Vent 10 Aroma Tray 11 Germicidal UV A Light 12 Color Changing Night Light Fig 3 Control Panel 13 Power 14 UV Light 15 Timer 16 Humidity Reading RH 17 Mist Level Indicator 18 Remote Control 1 2 3 4 6 4 8 5 9 12 11 13 14 15 16 17 18 7 ...

Page 7: ...d adjust mist intensity to the low output setting Too much humidity in the room may allow the moisture to accumulate on surfaces where bacteria and fungi can grow Moisture that gathers may also damage furniture and walls especially wallpaper Ideal relative humidity level is between 45 and 65 BEFORE FIRST USE 1 Ensure gasket is attached securely onto bottom of the mist chamber 2 Ensure the MIST CHA...

Page 8: ...d continuous mist CO setting 5 Adjust Mist Level Short Press to adjust the mist level to Low Medium and High 6 UV Light Touch to turn the UV light on and off UV indicator light is shown on the display panel when the UV is turned on 7 Timer Touch to set the timer in increments of 1 hour from 1 12 hours The unit will turn off when the scheduled operating time has elapsed To Cancel the Timer touch an...

Page 9: ...culate when not in use 4 Rinse clean water through mist channel 5 Clean aroma tray and replace aroma pad when changing oils 6 Wipe and dry humidifier base with a clean dry cloth or paper towel WEEKLY MAINTENANCE 1 Always turn off and unplug from outlet before cleaning 2 Empty water from the water tank as directed in Daily Maintenance above and humidifier base Attach Mist Chamber into tank by inser...

Page 10: ...ifier continues to not operate please contact Crane Customer Care Problem Possible Cause Leaking water Check to make sure the water tank is properly placed on the Base Make sure the Mist Channel is securely attached in the Water Tank No mist Weak mist being produced Raise the humidity level setting Check to make sure the humidifier is plugged in correctly and press the Power Button Add water to th...

Page 11: ...s or vapor pads in the aroma tray This warranty does not apply to normal wear and tear or commercial use In no event shall liability exceed the purchase price paid by the purchaser of the product Under no circumstances shall there be liability for any loss direct indirect or incidental or consequential damage arising out of or in connection with the use of this product This warranty is valid only ...

Page 12: ...10 ...

Reviews: