www.cranecpe.com
2
Replacing the diaphragms
In addition to the following assembly steps, please also
refer to the information contained within the DEPA®
Installation, Operation and Maintenance Manual (IOM).
1. Disassembling the old diaphragms
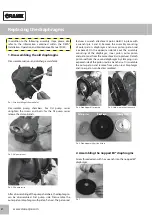
Disassemble suction- and discharge manifolds.
Pic. 1: Disassembling of the manifolds
Disassemble pump chambers. For DH pump series
untighten the screws and bolts, for the DL pump series
release the clamp bands.
Pic. 2: DH pump series
Pic. 3: DL pump series
After disassembling of the pump chambers, the diaphragms
can be disassembled. First pump side: Disassemble the
outer piston (diaphragm with piston fixture). The piston rod
features a wrench attachment point. Hold it in place with
a wrench (pic. 4 and 5). Remove the assembly consisting
of outer piston, diaphragm and inner piston (piston rod
is exposed). On the opposite side take out the assembly
consisting of the diaphragm, inner piston, outer piston
and piston rod, from the center block (w/o picture). Detach
piston rod from the second diaphragm by clamping in an
exposed side of the piston rod in a bench vise. Disassemble
the outer piston and remove from piston rod. Diaphragm
and inner piston can be disassembled.
Pic. 4: Diaphragm disassembly
Pic. 5: Hold it in place with wrench
Pic. 6: Diaphragm with piston fixture
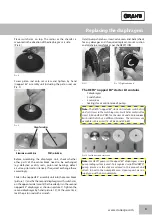
2. Assembling the nopped E4® diaphragms
Screw threaded pin with hex wrench into the nopped E4®
diaphragm.
Pic. 7
Outer piston
Inner piston
Diaphragm


