English
10
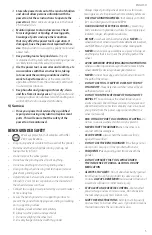
when turning toward the rear of the grinder and loosen
when turning toward the front of the grinder.
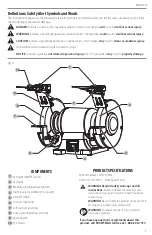
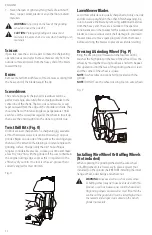
6. Remove the hex nut
26
, the outside wheel flange
27
and the wheel
8
.
7. Inspect the wheel
8
for cracks, chips or any other visible
damage (other than normal wear) and discard if such
damage is found. Inspect the blotter/cardboard disc for
damage. If the blotter id missing or severely damaged,
replace it withe a piece of thin cardboard of blotter
paper cut in the same shape. NEVER USE A GRINDING
WHEEL WITHOUT A BLOTTER.
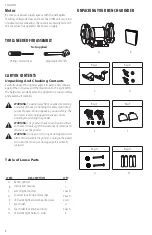
8. Install the new wheel and make sure both wheel
flanges
27
,
28
are in place with the concave sides
toward wheels.
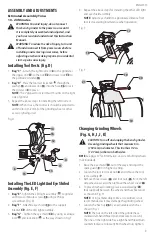
9. To prevent wheel rotating, place a wood wedge
25
(not
supplied) between the wheel and the wheel cover as
shown in Fig. K.
10. Tighten the hex nut
26
by an adjustable wrench.
nOTE:
Do not overtighten the nut as this can crack the
grinding wheel.
11. Replace the wheel cover
24
and screws
22
.
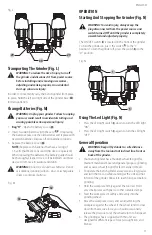
12. Reinstall and adjust the tool rest to 1/16 in. (1.6 mm)
away from the wheel and tighten securely.
13. Adjust the eye shield
10
to a point between your eyes
and the wheel.
Fig. G
Fig. H
22
24
25
23
10
9
7
6
Mounting The Tool On A Workbench (Fig. L)
nOTE:
FIRMLY BOLT THE GRINDER TO A WORK BENCH OR
LEG STAND to gain maximum stability for your machine.
1. Using the base of the bench grinder as a template, mark
the bench through two holes
29
in the casting.
2. Bolt the bench grinder on the bench with bolts, washers
and nuts.
nOTE:
The mentioned fasteners are not supplied with
the machine.
Fig. I
25
26
Fig. J
26
27
8
28
loosen
Fig. K
26
25
tighten


