background image

English

6

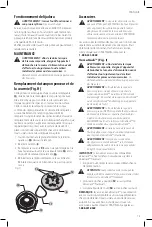
Accessories


WARNING: 

Since accessories, other than those 

offered by CRAFTSMAN,


have not been tested with 

this product, use of such accessories with this tool 
could be hazardous. To reduce the risk of injury, only  
CRAFTSMAN recommended accessories should be 
used with this product.

Recommended accessories for use with your tool are 
available at extra cost from your local dealer or authorized 

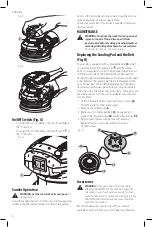
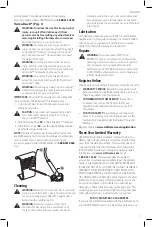
Replacing the Sanding Pad and the Belt 
(Fig. H)

Your sander is equipped with a replaceable belt 

 11 

 which 

is located between the sanding pad 

 4 

 and the sander 

body. It is designed to control the pad speed while the unit 
is off the work surface. The belt and the sanding pad are 
designed to be consumable parts and will occasionally need 
to be replaced. The sanding pad needs replacement when 
signs of wear become evident. Replacement of the belt is 
necessary when the pad speed increases very dramatically 
when the unit is lifted from the work surface. These parts are 
available at extra cost from your local dealer or authorized 
service center.

1.  Holding the platen firmly, remove the four screws 

 12 


from the bottom of the sanding pad.

2.  Remove the sanding pad 

 4 

.

3.  Replace worn or damaged belt 

 11 

 by wrapping it 

around the shoulder screw 

 14 

 and bearing retainer 

 13 

.

4.  Reinstall pad (replace with new pad if necessary). 

Replace the four screws. Be careful not to over-
tighten screws.

Fig. H

12

12

4

11

14

13

MAINTENANCE


WARNING: To reduce the risk of serious personal 
injury, turn unit off and  disconnect it from 
power source before making any adjustments or 
removing/installing attachments or accessories.


An accidental start-up  can cause injury.

Fig. E

7

Fig. F

On/Off Switch (Fig. G)

•  To switch the tool on, depress the on/off switch 

 1 

 at 

the “I” position.

•  To switch the tool off, depress the on/off switch 

 1 

 at 

the ”O” position.

Fig. G

1

Sander Operation


WARNING:


Let the tool work at its own pace.

 Do 

not overload.

Grasp the sander and turn it ON. Move it in long, sweeping 
strokes along the surface, letting it do the work. Pushing 

Versatrack Variables
1ST_Figure

1ST_Callout

2ND_Callout

H

15

16

down on the tool while sanding actually slows the removal 
rate and produces an inferior quality finish.
Check your work often. This sander is capable of removing 
material rapidly.

Summary of Contents for CMEW231

Page 1: ...e spéciale 127 mm 5 po Lijadora de Órbita Aleatoria 127 mm 5 CMEW231 INSTRUCTIONMANUAL GUIDED UTILISATION MANUALDEINSTRUCTIONES IFYOUHAVEQUESTIONSORCOMMENTS CONTACTUS POURTOUTEQUESTIONOUTOUTCOMMENTAIRE NOUSCONTACTER SITIENEDUDASOCOMENTARIOS CONTÁCTENOS 1 888 331 4569 WWW CRAFTSMAN COM ...

Page 2: ...English original instructions 1 Français traduction de la notice d instructions originale 9 Español traducido de las instrucciones originales 17 ...

Page 3: ... moderate injury Used without word Indicates a safety related message NOTICE Indicates a practice not related to personal injury which if not avoided may result in property damage Fig A 1 4 2 6 3 7 WARNING Read all safety warnings and all instructions Failure to follow the warnings and instructions may result in electric shock fire and or serious injury WARNING Never modify the product or any part...

Page 4: ...ention while operating power tools may result in serious personal injury b Use personal protective equipment Always wear eye protection Protective equipment such as dust mask non skid safety shoes hard hat or hearing protection used for appropriate conditions will reduce personal injuries c Prevent unintentional starting Ensure the switch is in the off position before connecting to power source an...

Page 5: ...t ingesting contaminated paint particles Workers should wash and clean up BEFORE eating drinking or smoking Articles of food drink or smoking should not be left in the work area where dust would settle on them Environmental Safety Paint should be removed in such a manner as to minimize the amount of dust generated Areas where paint removal is occurring should be sealed with plastic sheeting of 4 m...

Page 6: ...priate for the dust exposure Direct particles away from face and body WARNING Always wear proper personal hearing protection that conforms to ANSI S12 6 S3 19 during use Under some conditions and duration of use noise from this product may contribute to hearing loss Air vents often cover moving parts and should be avoided Loose clothes jewelry or long hair can be caught in moving parts An extensio...

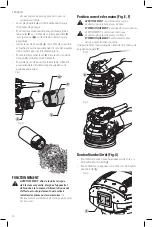
Page 7: ...r operate these tools unless the dust collector is in place Sanding dust exhaust may create a breathing hazard The dust bag 3 should be emptied after every 10 minutes of sanding To attach the dust bag to the sander line up the grooves 8 on the dust port 2 with the dust bag locks 10 on the side dust bag collar 9 Slide the dust bag 3 onto the dust port and turn the dust bag clockwise to lock it in p...

Page 8: ...om your local dealer or authorized service center 1 Holding the platen firmly remove the four screws 12 from the bottom of the sanding pad 2 Remove the sanding pad 4 3 Replace worn or damaged belt 11 by wrapping it around the shoulder screw 14 and bearing retainer 13 4 Reinstall pad replace with new pad if necessary Replace the four screws Be careful not to over tighten screws Fig H 12 12 4 11 14 ...

Page 9: ...ARNING Ensure that the tool weight does not exceed the maximum rated weight for the selected Versatrack hook WARNING When hanging objects on a Versatrack Trackwall rail adequately space the tools in order to not exceed 75 lb 35 kg per linear foot IMPORTANT Versatrack accessories mount compatible tools securely to the Versatrack Trackwall system 1 Turn tool off disconnect it from power source and r...

Page 10: ... does not apply to products sold in Latin America For products sold in Latin America see country specific warranty information contained in the packaging call the local company or see website for warranty information FREE WARNING LABEL REPLACEMENT If your warning labels become illegible or are missing call 1 888 331 4569 for a free replacement ...

Page 11: ...dangereuse qui si elle n est pas évitée pourrait entraîner des blessures légères ou modérées Si utilisé sans aucun terme Indique un message propre à la sécurité AVIS indique une pratique ne posant aucun risque de dommages corporels mais qui par contre si rien n est fait pour l éviter pourrait poser des risques de dommages matériels AVERTISSEMENT lire tous les avertissements de sécurité et toutes l...

Page 12: ... d un outil électrique à l extérieur se servir d une rallonge convenant à cette application L utilisation d une rallonge conçue pour l extérieur réduira les risques de choc électrique f S il est impossible d éviter l utilisation d un outil électrique dans un endroit humide brancher l outil dans une prise ou sur un circuit d alimentation dotés d un disjoncteur de fuite à la terre GFCI L utilisation...

Page 13: ...nt toute autre condition susceptible de nuire au bon fonctionnement de l outil électrique En cas de dommage faire réparer l outil électrique avant toute nouvelle utilisation Beaucoup d accidents sont causés par des outils électriques mal entretenus f S assurer que les outils de coupe sont aiguisés et propres Les outils de coupe bien entretenus et affûtés sont moins susceptibles de se coincer et so...

Page 14: ...nt des pièces mobiles Vêtements amples bijoux ou cheveux longs risquent de rester coincés dans ces pièces mobiles Pour la sécurité de l utilisateur utiliser une rallonge de calibre adéquat AWG American Wire Gauge calibrage américain normalisé des fils électriques Plus le calibre est petit et plus sa capacité est grande Un calibre 16 par exemple a une capacité supérieure à un calibre 18 L usage d u...

Page 15: ...IPXX Symbole IP Fixation de disque de ponçage à bandes velcro Fig B Votre ponceuse est conçue pour utiliser des disques de ponçage de 127 mm 5 po à huit trous d extraction de poussière Les disques de ponçage se fixent par un système de bandes autoagrippantes 1 Pour fixer le disque de ponçage 5 le centrer soigneusement sur le patin de ponçage 6 en vous assurant que les trous du disque s alignent av...

Page 16: ...après chaque 10 minutes de ponçage Pour fixer le sac de poussière à la ponceuse alignez les rainures 8 sur l orifice de sortie de poussière 2 avec les verrous 10 sur le côté du collet du sac de poussière 9 Glissez le sac de poussière 3 sur l orifice de poussière et tournez le sac de poussière dans le sens des aiguilles d une montre pour le verrouiller en place Pour le retirer tournez le sac 3 dans...

Page 17: ...a plaque fermement retirer les quatre vis 12 dessous le tampon 2 Retirez le tampon 4 3 Remplacez la courroie 11 usée ou endommagée en la faisant passer autour de la vis à épaulement 14 et du dispositif de retenue de roulement 13 4 Réinstallez le tampon remplacez le le cas échéant Réinsérez les quatre vis Attention à ne pas trop serrer les vis Fig H 12 12 4 11 14 13 Versatrack Fig I AVERTISSEMENT a...

Page 18: ...liquide Fig I 15 16 Garantie limitée de trois ans CRAFTSMAN réparera ou remplacera sans frais tout appareil défectueux pour cause de défaut de matériau ou de main d œuvre sur une période de trois ans à partir de la date d achat de l outil Cette garantie ne couvre pas les pièces en panne pour cause d abus ou d usure normale de l outil Pour plus de détails au sujet de la couverture de la garantie et...

Page 19: ...je de seguridad relacionado AVISO Se refiere a una práctica no relacionada a lesiones corporales que de no evitarse puede resultar en daños a la propiedad ADVERTENCIA Lea todas las advertencias de seguridad e instrucciones El incumplimiento de las advertencias e instrucciones puede provocar descargas eléctricas incendios o lesiones graves ADVERTENCIA Nunca modifique la herramienta eléctrica ni tam...

Page 20: ...Los cables dañados o enredados aumentan el riesgo de descarga eléctrica e Al operar una herramienta eléctrica en el exterior utilice un cable prolongador adecuado para tal uso Utilice un cable adecuado para uso en exteriores a fin de reducir el riesgo de descarga eléctrica f Si el uso de una herramienta eléctrica en un lugar húmedo es imposible de evitar utilice un suministro protegido con un inte...

Page 21: ...peligrosas si son operadas por usuarios no capacitados e Dé mantenimiento a las herramientas eléctricas y accesorios Revise que no haya piezas en movimiento mal alineadas o trabadas piezas rotas o cualquier otra situación que pueda afectar el funcionamiento de la herramienta eléctrica Si encuentra daños haga reparar la herramienta eléctrica antes de utilizarla Se producen muchos accidentes a causa...

Page 22: ...odos los juguetes muebles lavables y utensilios usados por niños deberán lavarse a fondo antes de volverlos a usar ventilada y llevando equipos de seguridad aprobados como mascarillas antipolvo especialmente diseñadas para filtrar partículas microscópicas Evite el contacto prolongado con polvo generado por el lijado aserrado pulido taladrado y otras actividades de construcción Vista ropas protecto...

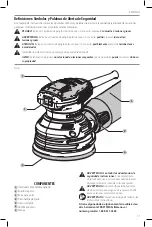
Page 23: ... voltaje de más del 10 producirá una pérdida de potencia y sobrecalentamiento Todas las herramientas son probadas en fábrica si esta herramienta no funciona verifique el suministro eléctrico Uso Debido Esta lijadora de órbita aleatoria está diseñada para aplicaciones doméstico NO utilice la herramienta en condiciones de humedad o en presencia de líquidos o gases inflamables Conexión de Discos de L...

Page 24: ...slice la bolsa de polvo 3 sobre el puerto de polvo y gire la bolsa de polvo en sentido de las manecillas del reloj para asegurarla en su lugar Para retirar gire la bolsa de polvo 3 en sentido contrario a las manecillas del reloj y deslice la bolsa de polvo hacia afuera Para vaciar la bolsa de polvo retírela de puerto de polvo y retire los desechos de lijado en un receptáculo de basura apropiado 10...

Page 25: ...zas consumibles y ocasionalmente tendrán que ser reemplazadas La almohadilla de lijado debe ser reemplazada cuando sean evidentes las señales de desgaste El reemplazo de la correa es necesario cuando aumenta la velocidad de la almohadilla de forma muy drástica cuando se levanta la unidad de la superficie de trabajo Estas piezas pueden obtenerse por un costo adicional en su distribuidor local o cen...

Page 26: ... en herramienta NOTA Los accesorios Versatrack para uso con su herramienta están disponibles por un costo adicional a partir de su distribuidor local o centro de servicio autorizado Si necesita ayuda para encontrar cualquier accesorio comuníquese con CRAFTSMAN llame al 1 888 331 4569 Fig H 15 16 autorizado CRAFTSMAN Utilice siempre piezas de repuesto idénticas Para reparación y servicio de sus her...

Page 27: ... el motivo podrá devolverlo hasta 90 días de la fecha de compra con su recibo y obtener el reembolso completo de su dinero sin necesidad de responder a ninguna pregunta AMÉRICA LATINA Esta garantía no se aplica a los productos que se venden en América Latina Para los productos que se venden en América Latina debe consultar la información de la garantía específica del país que viene en el empaque l...

Page 28: ...CRAFTSMAN 701 East Joppa Road Towson MD 21286 Copyright 2017 08 18 Part No N637830 ...

Reviews: