background image

00011

Important:

Read and fol low 

all Safety Rules 

and In struc tions 

Be fore Op er at ing 

This Equip ment

MODEL NO.

944.629673

OWNER’S

MANUAL

• Assembly

• Operation

• Maintenance

• Service and Ad just ments

• Repair Parts

900 SERIES

17 INCH TINE WIDTH 

REAR TINE TILLER WITH

DUAL ROTATING TINES

Sears Canada, Inc., Toronto, Ontario M5B 2B8

442831 Rev 1

Gasoline containing up to 10% ethanol (E10) is acceptable for use in this machine.  

The use of any gasoline exceeding 10% ethanol (E10) will void the product warranty.

Summary of Contents for 944.629673

Page 1: ...Operation Maintenance Service and Adjustments Repair Parts 900 SERIES 17 INCH TINE WIDTH REAR TINE TILLER WITH DUAL ROTATING TINES Sears Canada Inc Toronto Ontario M5B 2B8 442831 Rev 1 Gasoline containing up to 10 ethanol E10 is acceptable for use in this machine The use of any gasoline exceeding 10 ethanol E10 will void the product warranty ...

Page 2: ... the controls and the proper use of the equipment Know how to stop the unit and disengage the controls quickly Never allow children to operate the equipment Never allow adults to operate the equipment without proper instruction Keep the area of operation clear of all persons par ticularly small children and pets PREPARATION Thoroughly inspect the area where the equipment is to be used and remove a...

Page 3: ...nd performance Should you experience any problems you cannot easily remedy please contact your nearest authorized service center department They have competent well trained technicians and the proper tools to service or repair this unit Please read and retain this manual The instructions will enable you to assemble and maintain your tiller properly Always observe the SAFETY RULES IMPORTANT THIS UN...

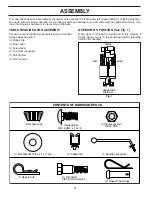
Page 4: ...ch FRONT OPERATOR S POSITION LEFT RIGHT Fig 1 Your new tiller has been assembled at the factory with exception of those parts left unassembled for shipping purposes To ensure safe and proper operation of your tiller all parts and hardware you assemble must be tightened securely Use the correct tools as necessary to insure proper tightness 1 Carriage Bolt 3 8 16 UNC x 1 Gr 5 1 Center Locknut 3 8 16...

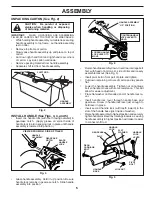
Page 5: ...O HOLD Fig 3 HANDLE ASSEMBLY GEARCASE NOTCH VIEWED FROM R H SIDE OF TILLER BLACK HANDLE LOCK Fig 5 HANDLE LOCK LEVER FLAT WASHER HANDLE LOCK LOCKNUT PIVOT BOLT GEARCASE SLOT REAR CARRIAGE BOLT HANDLE BASE Grasp handle assembly Hold in up position Be sure handle lock remains in gearcase notch Slide handle assembly into position Rotatehandleassemblydown Insertrearcarriagebolt first with head of bolt...

Page 6: ...sition Besurelock lever is tightened securely Make sure shift lever indicator is in N neutral posi tion See Fig 7 Tilt tiller forward by lifting handle Separate cardboard cover from leveling shield Rotate tiller handle to the right and pull tiller out of carton SHIFT ROD HAIRPIN CLIP SHIFT LEVER INDICATOR Fig 7 CHECK TIRE PRESSURE The tires on your unit were overinflated at the factory for shippin...

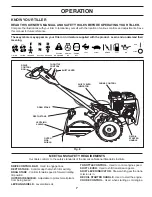
Page 7: ...ANDLE Used to start the engine CHOKE CONTROL Used when starting a cold engine DRIVE CONTROL BAR Used to engage tines DEPTH STAKE Controls depth at which tiller will dig DRAG STAKE Controls forward speed in forward rotating till position OUTER SIDE SHIELD Adjustable to protect small plants from being buried LEVELING SHIELD Levels tilled soil DRIVE CONTROL BAR THROTTLE CONTROL SHIFT LEVER SHIFT LEVE...

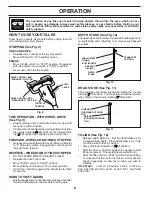
Page 8: ...handle to start tilling movement Tines and wheels will both turn Move throttle control to FAST position for deep tilling To cultivate throttle control can be set at any desired speed depending on how fast or slow you wish to cultivate IMPORTANT ALWAYS RELEASE DRIVE CONTROL BAR BEFORE MOVING SHIFT LEVER INTO ANOTHER POSITION SHALLOWEST TILLING CULTIVATING TINE OPERATION WITH WHEEL DRIVE See Fig 9 A...

Page 9: ...ing to protect small plants from being buried Loosen nut A in slot and nut B Move shield to desired position both sides Retighten nuts TO TRANSPORT CAUTION Beforeliftingortransporting allow tiller engine and muffler to cool Disconnect spark plug wire Drain gasoline from fuel tank AROUND THE YARD Release the depth stake pin Move the depth stake down to the top hole for transporting the tiller Place...

Page 10: ...N Alcohol blended fuels called gasohol or using ethanol or methanol can at tract moisture which leads to separation and formation of acids during storage Acidic gas can damage the fuel system of an engine while in storage To avoid engine problems the fuel system should be emptied before storage of 30 days or longer Drain the gas tank start the engine and let it run until the fuel lines and carbure...

Page 11: ...forward rotating tine drive TINE SHEAR PINS The tine assemblies on your tiller are secured to the tine shaft with shear pins See TINE REPLACEMENT in the Service and Adjustments section of this manual If the tiller is unusually overloaded or jammed the shear pins are designed to break before internal damage occurs to the transmission If shear pin s break replace only with those shown in the Repair ...

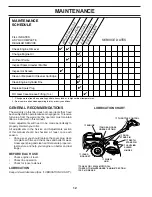
Page 12: ...eck tine operation Check for loose fasteners LUBRICATION Keep unit well lubricated See LUBRICATION CHART MAINTENANCE SCHEDULE FILL IN DATES AS YOU COMPLETE REGULAR SERVICE Check Engine Oil Level Change Engine Oil Oil Pivot Points Inspect Air Screen Inspect Spark Arrester Muffler Clean or Replace Air Cleaner Cartridge Clean Engine Cylinder Fins Replace Spark Plug B E F O R E E A C H U S E E V E R Y...

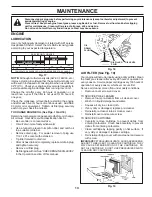
Page 13: ...ng in cold weather these multi viscosity oils will result in increased oil consumption when used above 32 F 0 C Check your engine oil level more frequently to avoid possible engine damage from running low on oil Change the oil after every 50 hours of operation or at least once a year if the tiller is not used for 50 hours in one year Check the crankcase oil level before starting the engine and aft...

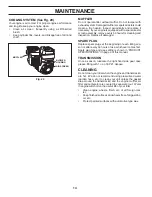
Page 14: ...ase fitting with 1 oz of EP 1 Grease CLEANING Do not clean your tiller when the engine and transmission are hot We do not recommend using pressurized water garden hose etc to clean your unit unless the gasket area around the transmission and the engine muffler air filter and carburetor are covered to keep water out Water in engine will shorten the useful life of your tiller Clean engine wheels fin...

Page 15: ... lessbeadsareseated overinflationcan cause an explosion Maintain 20 pounds of tire pressure If tire pressures are not equal tiller will pull to one side Keep tires free of gasoline or oil which can damage rubber TO REMOVE WHEEL See Fig 22 Place blocks under transmission to keep tiller from tipping Remove hairpin clip and clevis pin from wheel Remove wheel and tire Repair tire and reassemble CLEVIS...

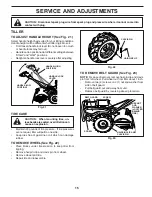
Page 16: ...N GROOVE ON TOP OF IDLER PULLEY NOTE POSITION OF BELT TO GUIDES Check belt adjustment as described below Replace belt guard Reposition wheel and replace clevis pin and hairpin clip GROUND DRIVE BELT ADJUSTMENT See Fig 24 For proper belt tension the extension spring should have about 5 8 inch 16 mm stretch when drive control bar is in ENGAGED position This tension can be attained as follows Loosen ...

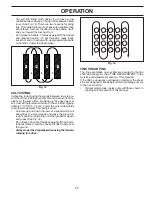
Page 17: ... for sharpness wear and bending particularly the tines which are next to the transmission If the gap between the tines exceeds 3 1 2 inches 9 cm they should be replaced or straightened as necessary For tines that are slightly worn the bolted tine and hub assemblies can be switched between sides to continue tilling in the same tilling mode If tilling in different mode is desired then the bolted tin...

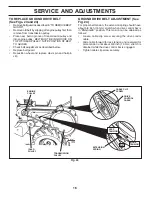
Page 18: ...nt procedure Loosen cable clamp screw Move throttle lever up until it touches high speed stop and hold in this position Tighten cable clamp screw securely TO ADJUST CARBURETOR The carburetor has a high speed jet and has been preset at the factory and adjustment should not be necessary However minoradjustmentsmayberequiredtocompensate for differences in fuel temperature altitude or load If the carb...

Page 19: ...nual Inspect and replace belts if necessary See belt re placement instructions in the Service and Adjustments section of this manual Lubricate as shown in the Maintenance section of this manual Be sure that all nuts bolts and screws are securely fastened Inspect moving parts for damage breakage and wear Replace if necessary Touch up all rusted or chipped paint surfaces sand lightly before painting...

Page 20: ...k 8 Remove fuel tank and clean 9 Spark plug wire loose 9 Connect and tighten spark plug wire 10 Dirty engine air screen 10 Clean engine air screen 11 Dirty clogged muffler 11 Clean replace muffler 12 Carburetor out of adjustment 12 Make necessary adjustments 13 Poor compression 13 Contact an authorized service center department Engine overheats 1 Low oil level dirty oil 1 Check oil level change oi...

Page 21: ...Bolt Pivot 1 189482 Throttle Control 2 141406 Grip Handle 3 110673X Grommet Handle 4 127254X Bar Assembly Control 5 6712J Cap Vinyl 6 188403 Panel Control 7 110641X Bushing Split 8 17720408 Screw 1 4 20 x 1 2 9 72010520 Bolt 5 16 18 x 2 50 10 110646X Handle Grip 11 STD624003 Retainer Spring 12 81328 Bolt Shoulder 13 187497 Handle Shift 14 109313X Grommet Rubber 15 110702X Rod Shift 16 STD533710 Bo...

Page 22: ... 13 32 x 13 16 x 12 Ga 67 74760524 Bolt Hex 5 16 18 x 18 x 1 3 4 68 STD541437 Nut Keps 3 8 16 unc 69 164173 Keeper Belt Engine NOTE All component dimensions given in U S inches 1 inch 25 4 mm KEY PART NO NO DESCRIPTION 3 73930600 Nut Centerlock 3 8 16 unc 4 432420 Shield Inner Belt Guard 5 164329 Pin Shift Lever 6 162756 Lever Shift 7 STD532505 Bolt Carriage 1 4 20 x 1 2 Gr 5 8 161530 Plate Shift ...

Page 23: ...x 5 16 18 x 3 4 5 102332X Bracket Reinforcement 6 74760528 Bolt Fin Hex 5 16 18 Unc x 1 3 4 7 102173X Counter Weight R H 10 74760524 Bolt Hex 5 16 18 x 1 1 2 11 STD624003 Clip Hairpin 12 126875X Rivet Drilled 13 102190X Tire 183122X613 Rim 795R Tire Valve 15 435278 Engine See breakdown Briggs Model 121002 1423 B8 44 STD541437 Nut Keps Hex 3 8 16 unc NOTE All component dimensions given in U S inche...

Page 24: ...431219 Bearing Shaft Ground Drive L H 29 102134X Chain 35 50 Pitch 30 150737 Ground Shaft Assembly 31 143008 Bearing Shaft Ground Drive R H 32 106388X Spacer 0 70 x 1 00 x 1 150 KEY PART NO NO DESCRIPTION NOTE All component dimensions given in U S inches 1 inch 25 4 mm 33 102121X Sprocket and Gear Assembly 34 102112X Shaft Reduction 2nd 35 102101X Screw Whiz Lock 5 16 18 x 3 1 2 36 161524 Sprocket...

Page 25: ...4 14 124343X Bracket Shield Tine 15 161414X428 Shield Side Outer R H 16 73900400 Nut Hex Flange 17 162175 Nut Wing Forged 5 16 18 18 STD532512 Bolt Carriage 1 4 20 x 1 1 4 Gr 5 19 102701X Grip 20 STD541037 Nut Hex 3 8 16 KEY PART NO NO DESCRIPTION 21 102156X Stake Depth 22 74930632 Bolt Hex 3 8 16 x 2 23 4440J Hinge 24 72140404 Bolt Carriage 1 4 20 x 1 2 Gr 5 25 6712J Cap Vinyl 26 109227X Pad Idle...

Page 26: ... PART NO NO DESCRIPTION 2 132673 Pin Shear 4 3146R Retainer Spring 5 188845 Assembly Hub and Plate 6 73610600 Nut Hex 3 8 24 7 STD551137 Washer Lock 3 8 NOTE All component dimensions given in U S inches 1 inch 25 4 mm 8 74610616 Bolt Hex 3 8 24 x 1 16 163499 Tine Spade 17 163500 Tine Cleaning ...

Page 27: ... 110614X Decal Hand Placement 7 166202 Decal Shift Indicator 8 166188 Decal Tine Shield CRT 9 176782 Decal DRT WARN 10 435286 Decal Warning Spark 11 419779 Decal Tine Shield REV 12 435125 Decal Oper Engine 13 419780 Decal Tine Shield FWD 15 409143 Decal Engine 16 423798 Decal Console 17 419742 Decal SER Fast Slow 442831 Manual Owner s English 442832 Manual Owner s French 2 1 7 6 4 9 5 3 8 15 12 11...

Page 28: ...28 REPAIR PARTS TILLER MODEL NUMBER 944 629673 ENGINE BRIGGS STRATTON MODEL NUMBER 121002 TYPE NO 1423 B8 2 0 2 5 3 24 2 0 4 0 2 4 2 3 5 6 6 3 4 3 4 2 52 4 2 6 2 5 4 3 4 3 4 33 3 ...

Page 29: ...29 REPAIR PARTS TILLER MODEL NUMBER 944 629673 ENGINE BRIGGS STRATTON MODEL NUMBER 121002 TYPE NO 1423 B8 ...

Page 30: ...ate Cylinder Head 161 790631 Base Air Cleaner 163 696024 Gasket Air Cleaner KEY PART NO NO DESCRIPTION KEY PART NO NO DESCRIPTION 186 692317 Hose Connector 187 791766 Line Fuel Cut to Required Length 187A 791867 Line Fuel Formed 188 699479 Screw Control Bracket 190 699220 Screw Fuel Tank 192 797440 Adjuster Rocker Arm 209 691278 Spring Governor Platinum 209 692571 Spring Governor 5 Hole 219 693578...

Page 31: ... 791082 Cover Air Cleaner 972 697779 Tank Fuel 975 790559 Bowl Fuel 993 694088 Gasket Cylinder Head Plate 1005 692592 Fan Flywheel 1022 691890 Gasket Rocker Cover 1023 499924 Cover Rocker 1026 790287 Rod Push 1029 797443 Arm Rocker 1034 691343 Guide Push Rod 1036 Label Emissions Available from a Briggs Stratton Authorized Dealer 1058 277040 Operator s Manual 1070 699201 Screw Flywheel Fan 1095 791...

Page 32: ...32 SERVICE NOTES ...

Page 33: ...33 SERVICE NOTES ...

Page 34: ...34 SERVICE NOTES ...

Page 35: ...n SUCH REMEDY SHALL BE YOUR SOLE AND EXCLUSIVE REMEDY FOR ANY BREACH OF WARRANTY CUSTOMER RESPONSIBILITIES In additional to complying with all suggested maintenance guidelines and instructions customers obligations shall include but shall not be limited to operating the product in accordance with the owner s manual or any additional instructions or information provided at the time of purchase or i...

Page 36: ...ª ª ªªªª ª ª ª ª ª ª ª ª ª ª ª ª ª ª ª PRINTED IN U S A 02 02 12 TH ...

Reviews: