28
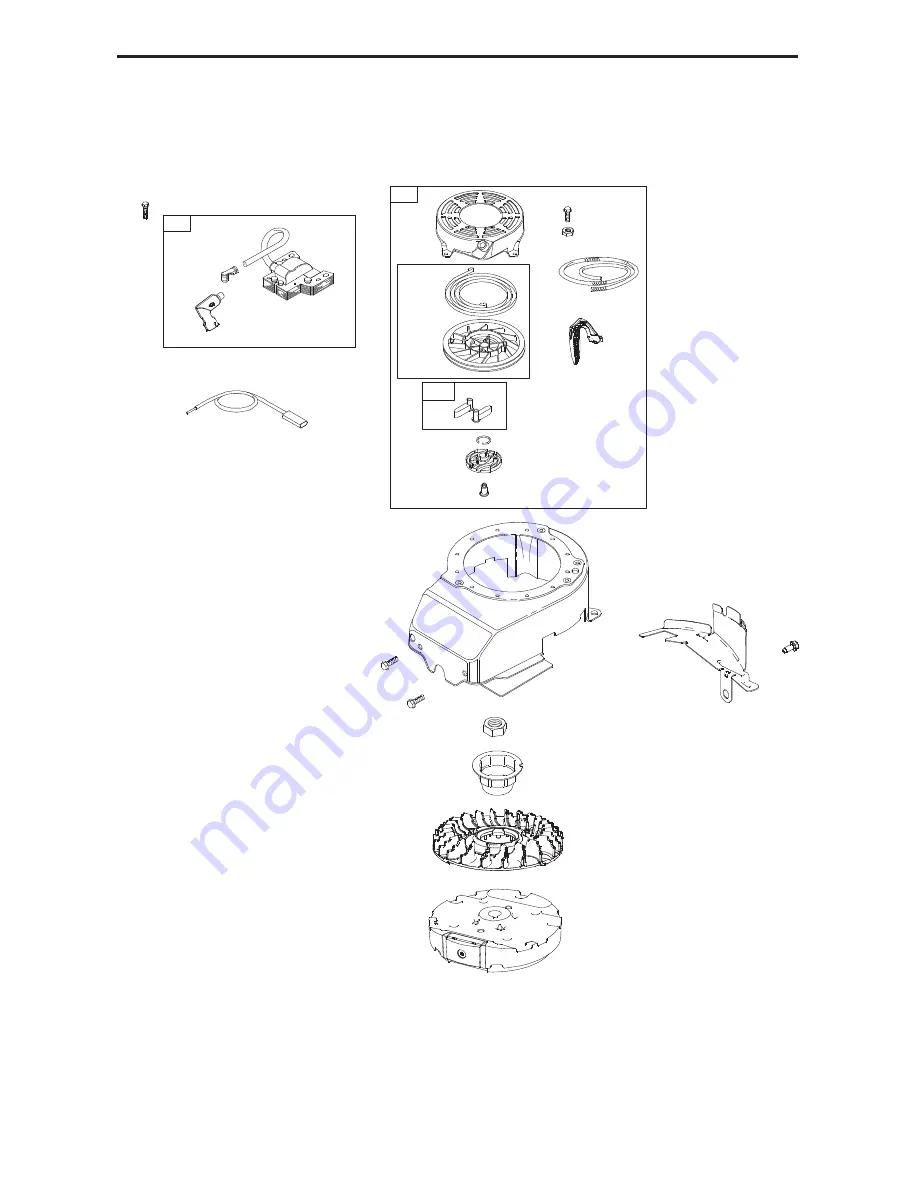
MODEL NUMBER 126M02-0017-F1
BRIGGS & STRATTON 4-CYCLE ENGINE
60
58
592
65
597
456
689
459
1210
1211
55
608
23
455
332
305
304
851
334
333
37
78
1005
362
305A
356
Page 1: ...UTION Read and follow all Safety Rules and Instructions before operating this equipment Owner s Manual ROTARY LAWN MOWER 675 Series Briggs Stratton Engine Power Propelled 22 Multi Cut Sears Canada Inc Toronto Ontario M5B 2B8 ...
Page 2: ...ator Be alert and turn machine off if children enter the area Before and while walking backwards look behind and down for small chil dren Never allow children to operate the machine II GENERAL OPERATION Read understand and follow all instructions on the machine and in the manual s before starting Be thoroughly familiar with the controls and the proper use of the machine before starting Do not put ...
Page 3: ...nning Allow engine to cool before refueling Never refuel the machine indoors Never store the machine or fuel contain er where there is an open flame spark or pilot light such as a water heater or on other appliances Never fill containers inside a vehicle on a truck or trailer bed with a plastic liner Always place containers on the ground away from your vehicle before filling Remove gas powered equ...
Page 4: ...ght Any product missing the model and or serial number identification label will be disqualified from coverage under this warranty REPAIRS Repairs have a 90 day warranty If the defective product is still within the Warranty Period then the new warranty is 90 days from the date of repair or to the end of the original Warranty Period whichever period is longer DISCLAIMERS THE WARRANTIES AND REMEDIES...
Page 5: ...ing purposes Wear items include but are not limited to belts blades tires spark plugs air filters chains shear bolts skid plates scraper bars drift cutters ropes tines collection bags and pulleys As the Warranty Period runs from the date of purchase and NOT from the date that a product is delivered opened assembled or first used plea se ensure during this time period that your product or component...
Page 6: ...se the correct tools as necessary to ensure proper tightness All parts such as nuts washers bolts etc necessary to complete the assembly have been placed in the parts bag TO REMOVE MOWER FROM CARTON 1 Remove loose parts included with mower 2 Cut down two end corners of carton and lay end panel down flat 3 Remove all packing materials except padding between upper and lower handle and padding holdin...
Page 7: ...start the blade Release to stop the blade Throttle engine control used for start ing stopping the engine and allows you to select either FAST or SLOW engine speed Starter handle used for starting engine Blade brake control used to engage the blade after the engine is started Drive control levers used to engage power propelled forward motion of mower Single point height adjuster used to adjust cutt...
Page 8: ...attempt to defeat the function of this control START FAST SLOW STOP DRIVE CONTROL Self propelling is controlled by holding the operator presence control bar down to the handle and pulling either drive control lever rearward to the handle The further toward the handle a lever is pulled the faster the unit will travel Forward motion will stop when either the operator presence control bar or a drive ...
Page 9: ...ed 3 Operate mower to test drive speed Readjust as required 4 If condition fails to improve after the above steps forward speed remains the same your drive belt is worn and should be replaced Adjustment turnbuckle TO ADJUST CUTTING HEIGHT All four wheels are adjusted by a single lever Pull adjuster lever toward wheel To raise mower move lever forward to desired position To lower mower move the lev...
Page 10: ...NOW READY FOR SIDE DISCHARGING OPERATION SIMPLE STEPS TO REMEMBER WHEN CONVERTING YOUR LAWN MOWER FOR MULCHING 1 Rear door closed 2 Mulcher door closed and locked FOR REAR BAGGING 1 Grass catcher installed 2 Mulcher door closed and locked FOR SIDE DISCHARGING 1 Rear door closed 2 Discharge deflector installed CAUTION Do not run your lawn mow er without rear door closed or approved grass catcher in...
Page 11: ...the fuel lines and carburetor are empty Use fresh fuel next season See Storage Instructions for additional information Never use engine or carburetor cleaner products in the fuel tank or permanent damage may occur Engine oil cap Gasoline filler cap TO STOP ENGINE To stop engine place throttle engine control in STOP position TO START ENGINE NOTE Due to protective coatings on the engine a small amou...
Page 12: ...the blades Avoid cutting your lawn when it is wet Wet grass tends to form clumps and interferes with the mulching action The best time to mow your lawn is the early afternoon At this time the grass has dried yet the newly cut area will not be exposed to direct sunlight For best results adjust the lawn mower cutting height so that the lawn mower cuts off only the top one third of the grass blades I...
Page 13: ...r abuse or negligence To receive full value from the warranty operator must maintain unit as instructed in this manual Some adjustments will need to be made periodically to properly maintain your unit At least once a season check to see if you should make any of the adjustments described in the Service and Adjustments section of this manual At least once a year replace the spark plug clean or repl...
Page 14: ...Brake Clutch 4 Use block of wood between blade and lawn mower housing and tighten the blade bolts turning clockwise The recommended tightening torque is 36 44 ft lbs 49 60 Nm IMPORTANT Blade bolts are heat treated If bolts need replacing replace only with approved bolts shown in the Repair Parts section of this manual TO SHARPEN BLADE NOTE We do not recommend sharp ening blade but if you do be sur...
Page 15: ...ide of engine 5 Slowly pour oil down the oil fill spout stopping every few ounces to check the oil level with the dipstick 6 Stop adding oil when you reach the FULL mark on the dipstick Wait a minute to allow oil to settle 7 Continue adding small amounts of oil rechecking the dipstick until oil level settles at FULL DO NOT overfill or engine will smoke heavily from the muffler on startup 8 Always ...
Page 16: ...a fitting that allows quick and easy cleaning of the underside of the housing To use this feature proceed as follows 1 Move lawn mower to an area of cut grass or another hard surface NOTE Water grass and other debris will drain from beneath the mower housing during the washout process 2 Remove grass catcher and discharge chute assembly from lawn mower 3 Close mulcher door if equipped 4 Connect a g...
Page 17: ...ELT If your mower does not operate properly due to suspected drive belt problems take your mower to a Sears or other qualified service center for repair and or adjustment ENGINE ENGINE SPEED Your engine speed has been factory set CARBURETOR Your carburetor is not adjustable IMPORTANT Never tamper with the engine governor which is factory set for proper engine speed Overspeed ing the engine above t...
Page 18: ...ming in essential fuel system parts such as carburetor fuel filter fuel hose or tank during storage Alcohol blended fuels called gasohol or using ethanol or methanol can attract moisture which leads to separation and formation of acids during storage Acidic gas can damage the fuel system of an engine while in storage Empty the fuel tank by starting the en gine and letting it run until the fuel lin...
Page 19: ...rt Cover your unit with a suitable protec tive cover that does not retain moisture Do not use plastic Plastic cannot breathe which allows condensation to form and will cause your unit to rust IMPORTANT Never cover mower while engine and exhaust areas are still warm CAUTION Never store the lawn mower with gasoline in the tank inside a building where fumes may reach an open flame or spark Allow the ...
Page 20: ...ed in OFF position to the ON position 11 Weak battery if equipped 11 Charge battery 12 Disconnected battery 12 Connect battery to engine connector if equipped 13 Blown fuse if equipped 13 Replace fuse 14 Engine control lever is 14 Place engine control lever in STOP position in FAST position Loss of power 1 Rear of lawn mower 1 Raise cutting height housing or cutting blade dragging in heavy grass 2...
Page 21: ... mower to cut grass or to hard surface 5 Defective blade brake clutch 5 Replace blade brake clutch Grass catcher 1 Cutting height too low 1 Raise cutting height not filling 2 Lift on blade worn off 2 Replace blade If so equipped 3 Catcher not venting air 3 Clean grass catcher Hard to push 1 Grass is too high or wheel 1 Raise cutting height height is too low 2 Rear of lawn mower 2 Raise rear of law...
Page 22: ... 56 84 96 11 26 21 9 122 123 125 39 53 57 124 121 28 19 30 31 28 130 129 2 128 18 84 96 11 118 119 120 17 56 126 58 8 1 64 32 52 106 112 113 20 83 85 109 48 49 108 47 46 50 41 38 33 57 53 40 45 36 24 26 127 42 43 53 53 97 60 107 61 103 111 84 56 110 44 51 59 6 6 100 101 16 ...
Page 23: ...Hex Head Grade 8 51 430599 Front Baffle 52 404763 Decal Danger 53 17000510 Screw 56 17411312 Screw Hex Washer Head 13 x 3 4 57 155377 Nut Hex 58 585250703 Lower Handle 59 191574 Handle Bolt 60 579482801 E Ring 61 581424501 Bolt Pivot Tension Arm 64 Engine B S Model 126M02 0017 F1 See Breakdown 83 750097 Screw Hex Washer Head 84 428124 Fastener Push 85 429801X004 Mounting Bracket Rear Skirt 96 1979...
Page 24: ...N MOWER MODEL NUMBER 944 364780 12 12 16 23 62 63 24 29 57 35 38 38 38 39 44 28 29 31 41 32 32 57 14 26 13 37 55 22 22 59 59 19 21 58 1 9 10 61 17 15 15 34 34 11 11 85 36 33 33 40 48 49 50 51 28 31 41 27 20 25 22 86 87 18 40 ...
Page 25: ...or 22 17000510 Screw Hex Head 23 585281901 Wheel Axle Assembly LH 24 433511 Bracket Height Adjustment 25 581313802 Mounting Bracket Debris Shield 26 421516X004 Belt Keeper 27 19171216 Washer Flat 28 12000058 E Ring 7 16 29 585270701 Cover Dust Wheel 31 404845 Pawl Drive 32 585437301 Wheel Tire Assembly Rear 33 409148 Nut Hex 34 197480 O Ring 35 430598 Axle Rear 36 441833X004 Axle Front 37 163409 S...
Page 26: ... ENGINE 10 3 1 8 9 718 307 362 337 13 5 7 11 33 36 40 22 20 15 12 4 847 523 287 525 842 45 34 35 40 45 32 32A 27 26 27 25 29 28 24 741 16 43 46 306 684 585 584 868 51 50 54 868 616 404 615 505 562 227 89 524 332 48 1330 1329 1058 1036 598 869 870 871 1311 ...
Page 27: ...S STRATTON 4 CYCLE ENGINE 97 975 133 134 617 130 633 163 276 137 104 276 108 633A 125 141 127 601 187 190 972 1059 957 443 445 968 425 163 11A 966 1387 1388 1386 883 291 613 81 883 300 188 222 202 209 365 621 976 276 118 117 883A 832 836 ...
Page 28: ...28 MODEL NUMBER 126M02 0017 F1 BRIGGS STRATTON 4 CYCLE ENGINE 60 58 592 65 597 456 689 459 1210 1211 55 608 23 455 332 305 304 851 334 333 37 78 1005 362 305A 356 ...
Page 29: ...ne variability Given both the wide array of products on which engines are placed and the variety of environmental issues applicable to operating the equipment the gas engine will not develop the rated gross power when used in a given piece of power equip ment actual on site or net power This difference is due to a variety of factors including but not limited to accessories air cleaner exhaust char...
Page 30: ...l 45 690548 Tappet Valve 46 691449 Camshaft 48 N A Short Block Not Available at this Printing KEY PART NO NO DESCRIPTION 50 794305 Manifold Intake 51 794306 Gasket Intake 54 691650 Screw Intake Manifold 55 691421 Housing Rewind Starter 58 697316 Rope Starter 60 799716 Grip Starter Rope 65 690837 Screw Rewind Starter 78 691108 Screw Flywheel Guard 81 691740 Lock Muffler Screw 89 692348 Plug Oil Cyl...
Page 31: ...ottle Shaft 633A 693867 Seal Choke Throttle Shaft Choke Shaft 684 690345 Screw Breather Passage Cover 689 691855 Spring Friction 718 690959 Pin Locating 741 795755 Gear Timing KEY PART NO NO DESCRIPTION 832 590486 Guard Muffler 836 690664 Screw Muffler Guard 842 691031 Seal O Ring Dipstick Tube 847 692047 Dipstick Tube Assembly 851 493880s Terminal Spark Plug 868 697338 Seal Valve 869 691155 Seat ...
Page 32: ...586675227 Rev 3 02 29 16 BY Printed in U S A 02489 ...