


12
KNOW YOUR SWEEPER
CAUTION:
Keep sweeper away from fire.
Excessive heat can damage the brushes and
hopper bag and could cause the bag and its
contents to burn.
CAUTION:
Never attach
the hopper rope
to any part of your body or clothing!
Never
hold onto
the rope while towing the sweeper!
Attach the rope
to the towing vehicle to keep
it away from wheels and rotating parts.
DUMPING OF SWEEPER
• Your sweeper can be dumped easily without getting
off of the rider or tractor. Simply pull the rope forward
to dump the hopper. Always empty hopper after each
use.
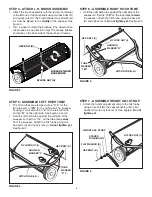
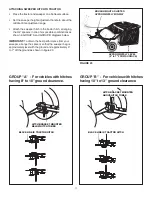
BRUSH HEIGHT ADJUSTMENT
• To adjust your sweeper brushes to the best operating
height, loosen the adjustment knob and push down
on the height adjustment handle to raise the brush, or
push up on the handle to lower the brush. See figure
19. Best adjustment is when the brush setting is 1/2"
down into the grass. Always mow the grass to an even
height before sweeping.
SWEEPING SPEED
• Try a starting speed of approximately 3 m.p.h. (third
gear on most tractors). Depending on the conditions,
it may be necessary to adjust the sweeping speed in
order to achieve best results.
OPERATION
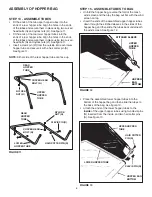
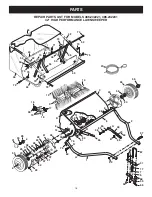
Hopper Bag
Collects grass clippings, leaves and debris.
Hopper Rope
Permits dumping of hopper bag from driver's seat.
Windscreen
Helps prevent collected material from being blown out of hopper bag.
Bag Arm Tubes
Connects the hopper bag to the sweeper housing.
Pivot Rod
Allows hopper bag to tilt forward to dump material.
Height Adjustment Handle
Adjusts the operating height of the sweeper.
Height Adjustment Strap
Holds the height adjustment handle in position when locked.
Hitch Bracket
Connects the sweeper to the towing vehicle. Adjusts for various height tractor hitches.
HOW TO USE YOUR SWEEPER
HOPPER BAG
WINDSCREEN
BAG ARM TUBE
PIVOT ROD
HEIGHT
ADJUSTMENT
HANDLE
HITCH
BRACKETS
HEIGHT
ADJUSTMENT
STRAP
HOPPER
ROPE