background image

WHAT IS COVERED--

REPAIR OR REPLACEMENT OF PARTS--
Repair or replacement ofany warranted part will be performed at no charge to the owner

at an approved Sears servicing center.

If you have any questions regarding your warranty rights and responsibilities, you

should contact your nearest authorized service center or

call

Sears at 1-800-473-7247.

WARRANTYPERIOD--

Any warranted part which is not scheduled for replacement as required maintenance,

or which is scheduled only for regular inspection to the effect of "repair or replace as nec-

essary" shall be warranted for

2

years. Any warranted part which

is

scheduled for re-

placement as required maintenance shall

be

warranted for the period of time up to the

first scheduled replacement point for that

part.

DIAGNOSIS- -

The owner shall not be charged for diagnostic labor which leads to the determination

that a warranted

part

is

defective

if

the diagnostic work

is

performed at an approved

Sears servicing center.
CONSEQUENTIAL DAMAGES--
Sears may be liable for damages to other engine components caused by the failure of a

warranted part still under warranty.

WHAT IS NOT COVERED--

All

failures caused by abuse, neglect, or improper maintenance are not covered.

ADD-ON OR MODIFIED PARTS--

The use of add-on or modified parts can be grounds for disallowing a warranty claim.

Sears

is

not liable to cover failures of warranted parts caused by the use of add -on or

modified parts.

HOW TO FILE A CLAIM--
If you have any questions regarding your warranty rights and responsibilities, you should con-

tact your nearest authorized service center or

call

Sears at 1-800-473-7247.

~TOGETW~SER~CE--
Warranty services or repairs shall be provided at

all

Sears authorized service centers.

MAINTENANCE, REPLACEMENT AND REPAIR OF

EMISSION RELATED PARTS--

Any Sears approved replacement part used

in

the performance of any warranty maintenance

or repair on emission related parts

will

be provided without charge to the owner

if

the part is

under warranty.
EMISSION CONTROL WARRANTY PARTS LIST--

1. Carburetor

2.

Ignition System
a. Spark Plug, covered up to maintenance schedule.

b. Ignition Module

MAINTENANCE STATEMENT--
The owner

is

responsible for the performance of all required maintenance as defined

in

the own-

ersmanual.

530-083104-1-07/13/94

Summary of Contents for 358.798960

Page 1: ...7 a m 7 p m Sun 10a m 7p m 32cc 2 CYCLE ENGINE 170 mph Air Velocity GASOLINE BLOWERNAC Ii WARNING as Read the operator s manual and follow all warnings and safety instructions Failure to do so can result in seri ous injury Assembly Operation Customer Responsibilities Service and Adjustments Repair Parts Sears Roebuck and Co Hoffman Estates IL 60179 U S A 530 084009 8 11 95 ...

Page 2: ... may contain toxic substances Do not set the unit on any surface except a clean hard area to start the engine or while the engine is running Debris such as gravel sand dust grass etc could be picked up by the air intake and thrown out through the discharge opening dam aging the unit property or causing serious injury to bystanders or the operator Avoid dangerous environments Do not use in unventil...

Page 3: ... in this manual and on the unit Read the entire operator s manual before assembling and using this unit Hestrict the use of the power unit to persons who read understand and follow the warnings and instructions in this manual and on the unit Never allow children to use this tool Read Operator s Manual Follow all warnings and instructions Failure to do so can result in serious injury liD A WARNING ...

Page 4: ...combustion engines operated on forest brush and or grass covered lands in the above areas are required to be equipped with a spark arrestor maintained in effective working order or the engine must be constructed equipped and maintained for the prevention of fire Check with your state or local authorities for regulations pertaining to these requirements Failure to follow these requirements is a vio...

Page 5: ... 13 H How To Use Your BlowerNac 10 K Know Your Blower 9 M Maintenance Schedule 15 Model Number 4 o Operation 9 p Product Specifications 4 R Repair Parts 23 Ordering Back Cover S Service and Adjustments 18 Starter Rope 18 Starting 14 Storage 21 T Trouble Shooting Points 22 V Vacuum Bag 18 Vacuum Tube 7 W Warranty 4 ACCESSORIES These accessories and attachments were available when the unit was origi...

Page 6: ...UIRED FOR ASSEMBLY Standard Screwdriver TO REMOVE BLOWER FROM CARTON Remove carton contents included with Blower Remove your Blower from the packing material You may use the opened packing material as a work sur face After removing the contents from the carton check parts against the Carton Contents list Examine the parts for damage Do not use damaged parts Notify Customer Assistance at 1 800 235 ...

Page 7: ... nozzle and blower tube counterclockwise for removal Locking Tabs Blower Outlet Grooves Blower Tube Flare Nozzle h U Glves Locking Tabs Figure 1 VACUUM TUBE ASSEMBLY Fig 2 3 Remove the blower tube from the engine Set the unit blower outlet up on a flat surface Open the vacuum inlet cover as follows Insert a screwdriver into latch area Gently tilt the tip of the screwdriver forward towards the blow...

Page 8: ... outlet twist elbow tube counterclockwise until parts snap together Assure bent end of elbow points downward toward vacuum tube Adjust the vacuum bag at the elbow tube to remove any twists Slide the looped strap over the end of vacuum tube as shown in Figure 6 Elbow Curved tothe Right Figure 6 Vacuum Bag Shoulder Strap Seam Strap Retainer Figure 7 SHOULDER STRAP ADJUSTMENT Fig 7 Place vacuum bag s...

Page 9: ...e on Some Models See Hardware Chart j Flare Nozzle Blower Tube Starter Rope Handle Figure 8 The CHOKE LEVER is used for starting a cold engine The STARTER ROPE HANDLE is used for starting the engine The THROTILE TRIGGER controls engine speed The IGNITION SWITCH is used to stop start the engine The FLARE NOZZLE is used to disperse the air flow over a wider area The THROTTLE LOCK is used to hold the...

Page 10: ...ock is engaged by the following steps Grasp the top handle and squeeze the throttle trigger fully and hold Depress the throttle lock with your thumb and hold Release your grip on the throttle trigger while continu ing to hold the throttle lock NOTE Verify the throttle trigger stays in the advanced position Figure 9 PRIMER BULB The primer bulb is used to circulate fuel to the carburetor The primer ...

Page 11: ...ube frequently always with engine stopped and spark plug disconnected Keep vents and discharge tubes free of debris which can accumulate and restrict proper air flow Never place objects inside blower tubes always direct blowing debris away from people animals glass and solid objects such as trees automobiles walls etc The force of air can cause rocks dirt or sticks to be thrown or to ricochet whic...

Page 12: ...grass clippings from driveways sidewalks patios parks parking lots barns stadiums etc Blowing grass clippings straw or leaves into piles Fast drying wet outdoor areas such as a patio Removing debris from corners around oints and between bricks Blowing light snow from driveways sidewalks or patios VACUUM TIPS When using your unit as a vacuum best results are achieved when the unit is operated at fu...

Page 13: ...ing storage Add sta bilizer to gasoline in fuel tank or storage container Always follow the fuel mix ratio found on the stabilizer container Run engine at least 5 minutes after adding stabilizer to allow the stabilizer to reach the carburetor You do not have to drain the fuel tank for storage if you are using fuel stabi lizer CRAFTSMAN 40 1 2 cycle engine oil AIR COOLED is specially blended with f...

Page 14: ...f Choke position Pull the starter rope sharply until the engine runs but no more than six pulls If the engine still has not started it is probably flooded Flooded engines can be cleared of excess fuel with the following procedure Move the choke lever to the Off position Press primer bulb 6 times Squeeze and hold the throttle trigger Pull starter rope to clear the engine of excess fuel Starting cou...

Page 15: ...east once each season Once a year replace the spark plug replace air filter A new spark plug and clean or new air filter element assures proper air fuel mixture and helps your engine run better last longer and reduces harmful emissions Follow maintenance schedule in this manual A WARNING Disconnect the spark plug before performing maintenance except for carburetor adjustments Inspect the entire un...

Page 16: ...hoke lever to the Full position Remove the air filter cover on top of the unit under the handle by depressing the air filter cover latch Wash the air filter in soap and water Squeeze the air filter dry Add 4 or 5 drops of oil to the air filter Avoid soaking the air filter with oil Squeeze the air filter to distribute oil Reassemble the air filter onto the cover Reassemble air filter cover assembly...

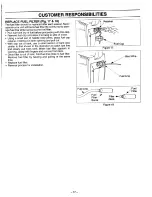
Page 17: ...mall pair of needle nose pliers grasp fuel cap retainer holding it in tank opening and pull out With cap out of tank use a small section of bent wire similar to that shown in the illustration to catch fuel line and slowly pull from tank When fuel filter appears in opening grasp with fingers and remove from tank Once filter is out of tank hold fuel line close to fuel filter Remove fuel filter by tw...

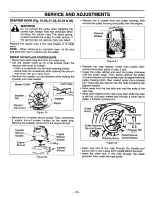
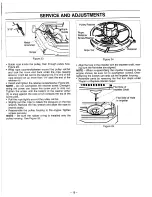
Page 18: ...gine shroud screws located by the spark plug Remove the impeller shroud from the engine shroud Impeller Shroud Engine Screws r Shroud Q I Screws Engine O Ring Shroud c Impeller Shroud Figure 20 Remove the 5 screws from the pulley housing then remove the pulley housing and pulley from the engine Remove Screws Figure 21 Remove the rope retainer screw from pulley then remove the broken piece of rope ...

Page 19: ...IES As the lawn and garden equipment engine owner you are responsible for the performance ofthe required maintenance listed in your Owner s Manual Sears recommends that you retain all receipts covering maintenance on your lawn and garden equipment engine but Sears cannot deny warranty solely for the lack of receipts or for your failure to ensure the performance of all scheduled maintenance As the ...

Page 20: ...ine components caused by the failure of a warranted part still under warranty WHAT IS NOT COVERED All failures caused by abuse neglect or improper maintenance are not covered ADD ON OR MODIFIED PARTS The use of add on or modified parts can be grounds for disallowing a warranty claim Sears is not liable to cover failures of warranted parts caused by the use of add on or modified parts HOW TO FILE A...

Page 21: ...ts the top of the screw post Pull the rope tightly around the pulley ratchet Slightly pull the rope to relieve the pressure on the hex wrench Remove the hex wrench and allow the rope to rewind slowly Reassemble the pulley housing to the engine Tighten screws securely NOTE Be sure the rubber o ring is installed onto the pulley housing See Figure 20 Rope Tai Figure 24 Align the hole in the impeller ...

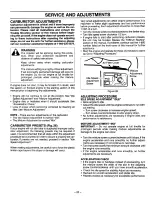
Page 22: ...Speed Adjustment When making adjustments be careful not to force the plastic limiter caps beyond the stops or damage will occur Very small aqjustments can affect engine performance It is important to make slight ajustments and test performance before proceeding Each adjustment should be no more than 1 16th of a turn Turn the mixture screw counterclockwise to the limiter stop Turn idle speed screw ...

Page 23: ...d formation of acids during storage which will damage your engine To avoid engine problems the fuel system should be emptied before stor age of 30 days or longer Fuel stabilizer is an acceptable alternative in minimizing the formation of fuel gum deposits during storage Add stabilizer to the gasoline in the fuel tank or fuel storage container Always follow the mix instructions found on stabilizer ...

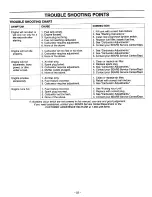
Page 24: ...filter dirty 1 Clean or replace air filter I accelerate lacks 2 Spark plug fouled 2 Replace spark plug power or dies 3 Carburetor requires adjustment 3 See Carburetor Adjustments under a load 4 Muffler outlets plugged 4 Contact your SEARS Service Center Dept 5 None of the above 5 Contact your SEARS Service Center Dept Engine smokes 1 Air filter dirty 1 Clean or replace air filter excessively 2 Fue...

Page 25: ...REPAIR PARTS Sears Blower Models 358 798960 358 798980 2 3 6 23 41 42 1 46 47 48 4 94 78 81 87 J la f f _ 8889 92 I Spark Arrestor al t 107 108 104 23 ...

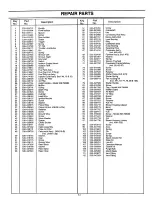
Page 26: ...l 358 798980 79 530 027569 Starter Handle 27 530 069293 Muffler 81 530 015769 Screw 28 530 029116 Spring 82 530 047782 Cap Model 358 798960 29 530 030075 Spark Plug 83 530 069303 Muffler Guard 30 530 001624 Screw 84 530 029404 Air Saffle 31 530 069626 Cylinder 85 530 019167 O Ring 32 530 039194 Lead Wire 86 530 029182 Eyelet 33 530 039137 Ignition Module 87 530 015805 Screw 34 530 015816 Screw 88 ...

Page 27: ...scription No No 1 530 069729 Carburetor Repair Kit 2 530 038403 Limiter Cap Single Needle Vacuum Tube Blower Tube Ass y 4 i i KEY NO PART NO DESCRIPTION 1 530 095358 Collection Bag 2 530 037250 Shoulder Strap 3 530 069750 Vacuum Tube 4 530 038555 Tube Nozzle Ass y 5 530 095359 Vac Tube Stand 25 ...

Page 28: ... the unit All parts listed herein may be ordered from any Sears Roebuck and Co Service Center and most Retail Stores WHEN ORDERING REPAIR PARTS ALWAYS GIVE THE FOL LOWING INFORMATION AS SHOWN IN THIS LIST PRODUCT GASOLINE BLOWER MODEL NUMBER 358 798460 358 798980 PART NUMBER PART DESCRIPTION Your Sears Merchandise has added value when you consider that Sears has service units nationwide staffed wi...

Reviews: