background image

Summary of Contents for 351.217350

Page 1: ...UST COLLECTION Model No 351 217350 CAUTION Read and follow all Safety Rules and Operating Instructions before First Use of this Product Sears Roebuck and Co Hoffman Estates IL 60179 U S A www sears com craftsman 24204 00 Draft 11 28 05 ...

Page 2: ... out of workplace Make workshop childproof Use padlocks master switches or remove switch keys to prevent any unintentional use of power tools TOOL SHOULD BE MAINTAINED Always unplug tool prior to inspection Consult manual for specific maintaining and adjusting procedures Keep tool lubricated and clean for safest operation Remove adjusting tools Form habit of checking to see that adjusting tools ar...

Page 3: ...protective film on the LCD see Figure 4 Place a cover on each LCD Insert the buttons firmly in position NOTE The square button is placed in position A Cover Button INSTALL BATTERIES Loosen and remove four socket head pan screws and then remove the display panel cover see Figure 2 Film on LCD Figure 4 Install Covers and Buttons on Digital Display Figure 2 Remove Display Panel Insert four 4 C batter...

Page 4: ...gure 8 shows the base dimensions and mounting hole dimensions of the planer 3 e Dia 113 8 15 25W Figure 8 Base and Mounting Dimensions 7 15 INSTALL THE HALF BAG DUST COLLECTION SET Refer to Figure 9 The Craftsman Half Bag Dust Collection Set is designed to provide dust collection for woodworking tools with a 2W diameter dust exhaust port The filter bag attaches to a 30 gallon trash can or a 30 gal...

Page 5: ...operly grounded 3 prong receptacle installed in accordance with National Electric Code and local codes and ordinances WARNING Any receptacle replacement should be per formed by a qualified electrician A temporary 3 prong to 2 prong grounding adapter see Figure 11 is available for connecting plugs to a two pole outlet if it is properly grounded Grounding Lug _ IF _ Adapter _II 3 Prong P_ _ Figure 1...

Page 6: ...in OFF position After turning switch on allow planer to come to full speed before operating Keep hands clear of all moving parts Do not force cut Slowing or stalling will overheat motor Allow automatic feed to function properly Use quality lumber Blades last longer and cuts are smoother with good quality wood Do not plane material shorter than 15 narrower than 3 4 wider than 13 or thinner than W N...

Page 7: ... raising or lowering the rollercase To raise or lower the rollercase rotate handle with knob One complete rotation of handle will raise or lower rollercase by Yl_ see Figure 14 A rotational direction label with depth indicator is located under the handle Figure 14 Raising or Lowering the Rollercase Counterclockwise Down Clockwise Up FEED RATE ADJUSTMENT Refer to Figure 15 The planer has a 2 speed ...

Page 8: ...isplay B Feed workpiece and repeat Figure 18 Calibrating the LCD Display PREPARE WORK Thickness planer works best when lumber has at least one flat surface Use surface planer or jointer to create a flat surface Twisted or severely warped boards can jam planer Rip lumber in half to reduce magnitude of warp Work should be fed into planer in same direction as the grain of the wood Sometimes grain wil...

Page 9: ...hardwood take light cuts or plane the wood in thin widths Make a test cut with a test piece and verify the thickness produced Check accuracy of test cut prior to working on finished product AVOID DAMAGE TO BLADES Thickness planer is a precision woodworking machine and should be used on quality lumber only Do not plane dirty boards dirt and small stones are abrasive and wear out blade Remove nails ...

Page 10: ...igure 22 Carefully lift old blades from the cutterhead using the two magnets Do not make contact with the blade using fingers Use magnets only NOTE Magnets can be easily disengaged from blade by tilting them to left or right CAUTION Blade edges are extremely sharp Keep fingers away from blades at all times Figure 22 Loosen All Gib Bolts Reverse blade or replace with new blade and carefully positio...

Page 11: ...Check and Lube Chain BRUSH INSPECTION AND REPLACEMENT WARNING Turn planer off and disconnect from power source Brush life depends on amount of load on motor Regularly inspect brushes after 100 hours of use To inspect brushes Remove the return rollers Remove three 3 screws and lift the rollercase cover up from the rollercase see Figure 25 i i Figure 25 Remove Rollercase Cover Return rollers have be...

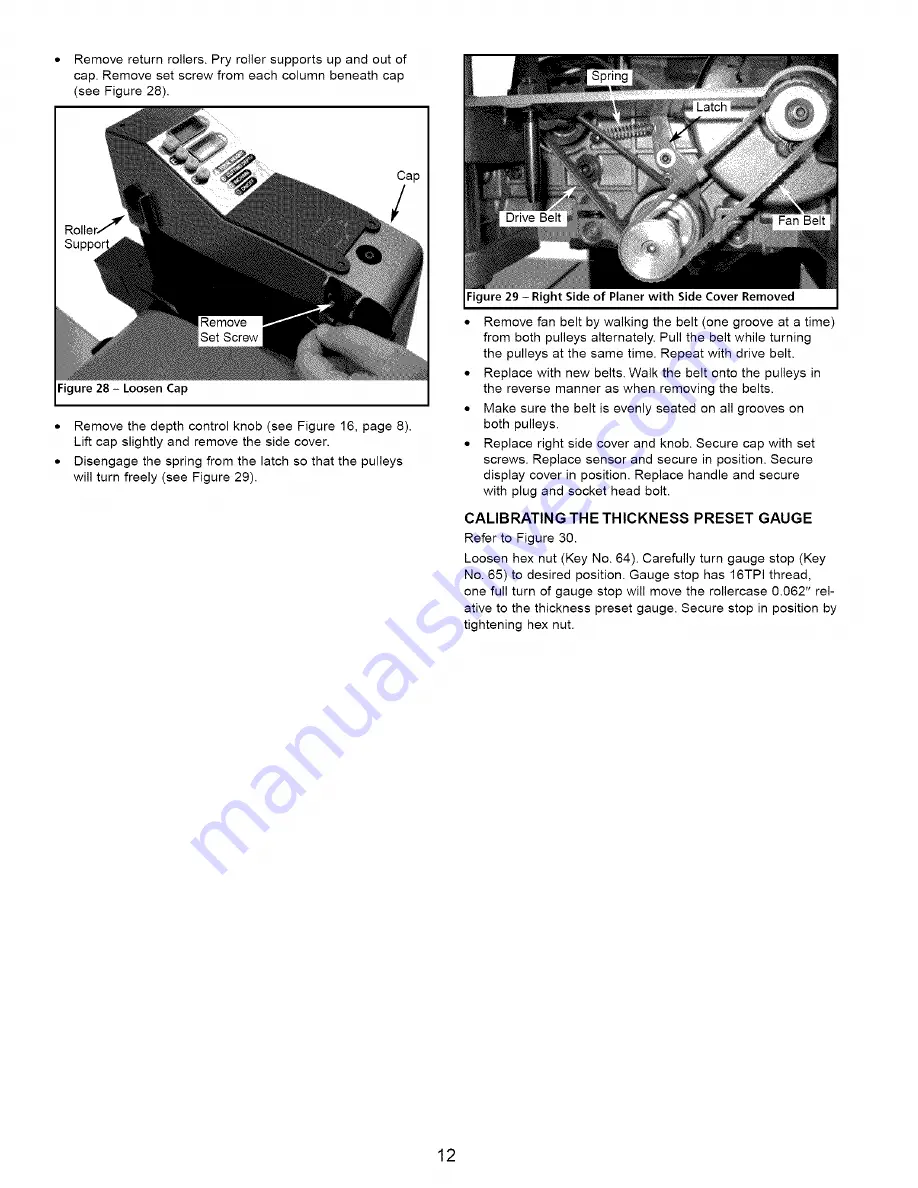
Page 12: ... the pulleys at the same time Repeat with drive belt Replace with new belts Walk the belt onto the pulleys in the reverse manner as when removing the belts Make sure the belt is evenly seated on all grooves on both pulleys Replace right side cover and knob Secure cap with set screws Replace sensor and secure in position Secure display cover in position Replace handle and secure with plug and socke...

Page 13: ...e Level 1 Clean and lubricate sprockets and chain 2 Clean and lubricate elevation screws columns 3 Replace elevation screws 4 Clean and lubricate 5 Adjust rollercase See Adjusting Table Level 1 Clear the clogging clean dust collection system See Clean Planer 2 Use support stands to support workpiece longer than 24 See Recommended Accessories 1 Adjust scale pointer and tighten securely 2 Calibrate ...

Page 14: ...Model 351 217350 Figure 30 Repair Parts Illustration for Motor and Rollercase 76 79 1 7 _82 81 80 3 2 75 I4 72 77 23 23 25 38 66 47 36 84 _ 48 53 52 54 48 1 _ 56 57 60 2 61 62 t 63 14 ...

Page 15: ...r 4 0 7 x 8ram Pan Head Screw Pointer Assembly Rollercase Magnet Standard hardware item available locally N A Not available as repair part QTY 1 6 1 3 1 3 7 1 1 2 2 2 1 13 1 1 1 3 1 1 2 2 14 2 1 1 2 12 2 1 1 1 1 2 1 1 1 1 2 1 1 4 KEY NO 43 44 45 46 47 48 49 5O 51 52 53 54 55 56 57 58 59 6O 61 62 63 64 65 66 67 68 69 70 71 72 73 74 75 76 77 78 79 80 81 82 83 84 85 PART NO 18571 00 06252 00 22441 00...

Page 16: ...Model 351 21 7350 Figure 31 Repair Parts Illustration for Base 31 30 42 5 4 20 42 6 32 43 26 15 45 34 38 39 16 ...

Page 17: ...m Wavy Washer 4 Bushing 4 6 1 0 x 14mm Socket Head Bolt 4 Guide 2 Standard hardware item available locally N A Not available as repair part A Not shown KEY NO PART NO 33 22411 00 34 STD870516 35 22412 00 36 07339 00 37 20421 00 38 22413 00 39 20424 00 40 16115 00 41 N A 42 22415 00 43 22416 00 44 22417 00 45 20417 00 46 20408 00 47 16099 00 48 20410 00 49 18333 00 50 STD851006 51 22418 00 52 01465...

Page 18: ... DE TRABAJO PARA LA TAREA A REALIZAR Mantenga el area de trabajo limpia Las areas de trabajo desordenadas atraen accidentes No use herramientas mecanicas en ambientes peligrosos No use herramientas mecanicas en lugares hOmedos o mojados No exponga las herramientas mecanicas a la Iluvia El area de trabajo debe estar iluminada adecuadamente Debe haber disponible un receptaculo adecuado para la herra...

Page 19: ...lte la Figura 1 Verifique que no hayan ocurrido daSos durante el envio Si hay daSos se debera presentar un reclamo a la compa_ia de transporte Verifique que esta completa Avise inmediatamente al distribuidor si faltan partes La cepilladora viene armada como una unidad Es necesario Iocalizar y tomar en cuenta las piezas adicionales que deben asegurarse a la herramienta antes de armada A Conjunto de...

Page 20: ...n una plataforma de soporte o banco de trabajo para Iograr mayor estabilidad Cercidrese de situar la plataforma sobre una superficie firme y nivelada en un lugar que cuente con suficiente iluminacion y una fuente de alimentaci6n adecuada AsegOrese que haya suficiente espacio para mover la pieza de trabajo a traves de todo el corte Debera haber suficiente espacio de manera que ni los operadores ni ...

Page 21: ...n a tierra o duda que la herramienta haya quedado efectivamente puesta a tierra consulte con un electricista calificado Esta herramienta viene equipada con un cable aprobado y especificado para 150 V y un enchufe de 3 puntas para conexi6n a tierra vea la Figura 10 que Io protegen a usted contra el riesgo de un electrochoque El enchufe de conexi6n a tierra debera conectarse directa mente a un recep...

Page 22: ...ra impedir un arranque accidental La unidad incluye indicador digital sistema de alimentaci6n de dos velocidades calibrador de profundidad del corte para una configuraci6n mas sencilla calibrador preajus tado del grosor de la pieza de trabajo con 6 valores de ajuste para obtener siempre una misma configuraci6n cuchillas faciles de reemplazar sin intervenci6n manual para mayor seguridad y menor tie...

Page 23: ...ruptor Figura 12 Interruptor de Encendido Apagado y Cortacircuito NOTA La cubierta del interruptor fue removida para propositos de ilustradon CORTACIRCUITO Consulte la Figura 12 La cepilladora esta equipada con un cortacircuito que sirve de protecci6n al motor El cortacircuito apaga automaticamente la cepilladora si se consume demasiada corriente Si el interruptor se dispara apague la cepilladora ...

Page 24: ...e rodillos hasta que quede justo encima de la pieza de trabajo Coloque la pieza de trabajo en la mesa de la cepiHadora por debajo de la caja de rodillos Gire la perilla hasta que indique 1_ 4 Ahora a cepilladora esta ajustada para detener a caja de rodiHos cuando el grosor de la pieza de trabajo sea 1V4 NOTA Para hacer que la caja de rodillos se detenga en otra profundidad e evela 2 vueltas aproxi...

Page 25: ...yor apoyo mediante pedestales de material independientes 25 Coloque la pieza de trabajo con la cara que se va a cepillar en la parte superior Encienda la cepilladora Haga descansar el extremo de la tabla en la mesa de alimentaci6n y dirijala hacia el interior de la cepilladora Suavemente deslice la pieza de trabajo hacia el interior del lado de alimentacidn de la cepilladora hasta que el rodillo d...

Page 26: ... se topen entre si para evitar el redondeo El redondeo es mas evidente cuando se hacen cortes mas profundos Introduzca el trabajo en la direcci6n de la veta La madera que se alimenta en contra de la veta tendra bordes picados y astillados ADVERTENClA Asegurese que la cepilladora haya sido desconectada de cualquier fuente de alimentaci6n y apagada antes de intentar realizar el mantenimiento LIMPIE ...

Page 27: ...desecho para sujetar la cuchilla en su lugar de manera que no se levante Apriete los pernos de forma pareja a fin de Iograr una fuerza de sujeci6n uniforme a traves de la cuchilla Oprima el pestillo para soltar el portacuchillas Suelte el pestillo cuando pueda girar manualmente el portacuchillas Gire con la mano el portacuchillas hasta que Io detenga el pestillo automatico Repita este procedimient...

Page 28: ...or del motor de la cepilladora Reemplace las escobillas siesta dar_ado el resorte Reemplace las escobillas si el carb6n se ha desgastado a W de su Iongitud Luego de realizar la inspecci6n vuelva a colocar la escobilla y la tapa Figura 26 Inspeccion de las Escobillas del Motor COMO REEMPLAZAR LAS CORREAS TRANSMISORAS ADVERTENCIA Apague la cepilladora y desconectela de la fuente de alimentaci6n La t...

Page 29: ...a tapa con los tornillos de fijacidn Vuelva a colocar el sensor y asegQrelo en su posici6n Asegure la cubierta del indicador en su posici6n Vuelva a colocar la manivela y asegt_rela con el tapdn y el tornillo de cabeza de hueca GRADUACION DEL CALIBRADOR PREAJUSTADO DE GROSOR Consulte la Figura 30 Afloje la tuerca hexagonal Clave No 64 Con cuidado gire el tope del calibrador Clave No 65 hacia la po...

Page 30: ...mpuje la tabla cuando este en contacto con solo un rodillo alimentador Consulte Como Evitar el Redondeo 4 Ajuste la caja de rodillos Vea Ajuste del Nivel de la Mesa 5 Haga que los extremos de las piezas de material se topen entre si a medida que las tablas pasan por la cepilladora Sequela madera para eliminar su alto contenido de humedad 1 Revise Profundidad del Corte 2 Revise Como Pasar la Pieza ...

Page 31: ...rapado debajo de la abrazadera de la bolsa o la bolsa del recolector no esta sellada en la brida Ruido excesivo del 1 Residuos o pedazo de madera de gran 1 Apague la cepilladora y deje que los residuos ventilador tama_o en el alojamiento del ventilador se asienten en la bolsa del colector Extraiga el protector de las cuchilias y limpie la camara 2 Ventilador flojo 2 Abra la cubierta de la cuchilla...

Page 32: ... and electronics call or go on line for the location of your nearest Sears Parts Repair Center 1 800 488 1222 Call anytime day or night U S A only www sears com To purchase a protection agreement U S A or maintenance agreement Canada on a product serviced by Sears 1 800 827 6655 U S A 1 800 361 6665 Canada Para pedir servicio de reparaci6n a domicilio y para ordenar piezas 1 888 SU HOGAR sM 1 888 ...

Reviews: