background image

38

                                                                          (This page applicable in the U.S.A. and Canada only.)

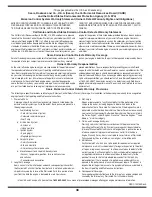
Sears, roebuck and co., U.S.a. (Sears), the california air resources board (carb)

and the United States environmental Protection agency (U.S. ePa)

emission control System Warranty Statement (owner’s Defect Warranty rights and obligations)

EMISSION CONTROL WARRANTY COVERAGE IS APPLICABLE TO CERTI-
FIED ENGINES PURCHASED IN CALIFORNIA IN 1995 AND THEREAF-
TER, WHICH ARE USED IN CALIFORNIA, AND TO CERTIFIED MODEL 

YEAR 1997 AND LATER ENGINES WHICH ARE PURCHASED AND USED 
ELSEWHERE IN THE UNITED STATES (AND AFTER JANUARY 1, 2001 IN 
CANADA).

california and United States emission control Defects Warranty Statement

The California Air Resources Board (CARB), U.S. EPA and Sears are pleased 

to explain the Emission Control System Warranty on your model year 2000 and 

later small off-road engine (SORE). In California, new small off-road engines 
must be designed, built and equipped to meet the State’s stringent anti-smog 
standards. Elsewhere in the United States, new non-road, spark-ignition 
engines certified for model year 1997 and later must meet similar standards set 
forth by the U.S. EPA. Sears must warrant the emission control system on your 

engine for the periods of time listed below, provided there has been no abuse, 
neglect or improper maintenance of your small off-road engine. Your emis-
sion control system includes parts such as the carburetor, air cleaner, ignition 
system, muffler and catalytic converter. Also included may be connectors and 

other emission related assemblies. Where a warrantable condition exists, Sears 

will repair your small off-road engine at no cost to you including diagnosis, parts 
and labor.

Sears emission control Defects Warranty coverage

Small off-road engines are warranted relative to emission control parts defects 

for a period of one year, subject to provisions set forth below. If any covered 

part on your engine is defective, the part will be repaired or replaced by Sears.

owner’s Warranty responsibilities

As the small off-road engine owner, you are responsible for the performance of 
the required maintenance listed in your Operating and Maintenance Instruc-
tions. Sears recommends that you retain all your receipts covering maintenance 
on your small off-road engine, but Sears cannot deny warranty solely for the 
lack of receipts or for your failure to ensure the performance of all scheduled 
maintenance. As the small off-road engine owner, you should however be 
aware that Sears may deny you warranty coverage if your small off-road engine 
or a part has failed due to abuse, neglect, improper maintenance or unap-

proved modifications. You are responsible for presenting your small off-road 

engine to an Authorized Sears Service Dealer as soon as a problem exists. The 

undisputed warranty repairs should be completed in a reasonable amount of 

time, not to exceed 30 days. If you have any questions regarding your warranty 

rights and responsibilities, you should contact a Sears Service Representative 
at 1-800-469-4663. The emission warranty is a defects warranty. Defects are 

judged on normal engine performance. The warranty is not related to an in-use 

emission test.

Sears emission control Defects Warranty Provisions

The following are specific provisions relative to your Emission Control Defects Warranty Coverage. It is in addition to the Sears engine warranty for non-regulated 
engines found in the Operating and Maintenance Instructions.
1.  Warranted Parts

  Coverage under this warranty extends only to the parts listed below (the 

emission control systems parts) to the extent these parts were present on 

the engine purchased.

    a.  Fuel Metering System


• Cold start enrichment system


• Carburetor and internal parts


• Fuel Pump

    b.  Air Induction System


• Air cleaner


• Intake manifold

    c.  Ignition System


• Spark plug(s)


• Magneto ignition system

    d.  Catalyst System


• Catalytic converter


• Exhaust manifold


• Air injection system or pulse valve

    e.  Miscellaneous Items Used in Above Systems


• Vacuum, temperature, position, time sensitive valves  


and switches


• Connectors and assemblies

2.  Length of Coverage
  Sears warrants to the initial owner and each subsequent purchaser that 

the Warranted Parts shall be free from defects in materials and workman-
ship which caused the failure of the Warranted Parts for a period of one 
year from the date the engine is delivered to a retail purchaser.

3.  No Charge
  Repair or replacement of any Warranted Part will be performed at no 

charge to the owner, including diagnostic labor which leads to the 
determination that a Warranted Part is defective, if the diagnostic work is 
performed at an Authorized Sears Service Dealer. For emissions warranty 
service contact your nearest Authorized Sears Service Dealer as listed in 
the “Yellow Pages” under “Engines, Gasoline,” “Gasoline Engines,” “Lawn 
Mowers,” or similar category.

4.  Claims and Coverage Exclusions

  Warranty claims shall be filed in accordance with the provisions of the 

Sears Engine Warranty Policy. Warranty coverage shall be excluded for 

failures of Warranted Parts which are not original Sears parts or because 
of abuse, neglect or improper maintenance as set forth in the Sears 
Engine Warranty Policy. Sears is not liable to cover failures of Warranted 
Parts caused by the use of add-on, non-original, or modified parts.

5.  Maintenance
  Any Warranted Part which is not scheduled for replacement as required 

maintenance or which is scheduled only for regular inspection to the effect 
of “repair or replace as necessary” shall be warranted as to defects for the 
warranty period. Any Warranted Part which is scheduled for replacement 
as required maintenance shall be warranted as to defects only for the 
period of time up to the first scheduled replacement for that part. Any 
replacement part that is equivalent in performance and durability may 
be used in the performance of any maintenance or repairs. The owner is 
responsible for the performance of all required maintenance, as defined in 
the Sears Operating and Maintenance Instructions.

6.  Consequential Coverage

  Coverage hereunder shall extend to the failure of any engine components 

caused by the failure of any Warranted Part still under warranty.

            In the USA and Canada, a 24 hour hot line, 

1-800-469-4663

, has a menu of pre-recorded messages offering you engine maintenance information.

GDOC-100188 Rev. A

Summary of Contents for 21AB40M1099

Page 1: ... site www craftsman com CAUTION Before using this product read this manual and follow all safety rules and operating instructions Operator s Manual 208cc Engine Rear Tine Tiller Model No 247 29930 SAFETY ASSEMBLY OPERATION MAINTENANCE PARTS LIST ESPAÑOL 11 18 2009 FORM NO 769 05423 ...

Page 2: ... for only 90 days from the date of purchase if this product is ever used for commercial or rental purposes This warranty covers ONLY defects in material and workmanship Sears will NOT pay for Expendable items that become worn during normal use including but not limited to blades tines or belts Tire or wheel replacement or repair resulting from normal wear accident or improper operation or maintena...

Page 3: ...eet or sandals Before starting check all bolts and screws for proper tightness to be sure the machine is in safe working condition Also visually inspect machine for any damage at frequent intervals Disengage clutch levers and shift if provided into neutral N before starting the engine Never leave this machine unattended with the engine running Never attempt to make any adjustments while the engine...

Page 4: ...r traffic Do not carry passengers Never operate the machine at high transport speeds on hard or slippery surfaces Exercise caution to avoid slipping or falling Look down and behind and use care when in reverse or pulling machine towards you Start the engine according to the instructions found in this manual and keep feet well away from the tines at all times After striking a foreign object or if y...

Page 5: ... or death do not modify engine in any way Tampering with the governor setting can lead to a runaway engine and cause it to operate at unsafe speeds Never tamper with factory setting of engine governor Notice Regarding Emissions Engines which are certified to comply with California and federal EPA emission regulations for SORE Small Off Road Equipment are certified to operate on regular unleaded ga...

Page 6: ... ROTATING TINES Do not put hands or feet near rotating parts Contact with the rotating parts can amputate hands and feet WARNING GASOLINE IS FLAMMABLE Allow the engine to cool at least two minutes before refueling WARNING CARBON MONOXIDE Never run an engine indoors or in a poorly ventilated area Engine exhaust contains carbon monoxide an odorless and deadly gas WARNING HOT SURFACE Engine parts esp...

Page 7: ...7 SAFETY LABELS ...

Page 8: ...nut removed earlier Refer to Figure 1 inset NOTE The bell washer should be positioned with the top of the bell shape towards the hex nut which will create tension and further secure the flange lock nut once tightened Do not tighten this hardware at this time Install the handle crank adjustment rod into the top hole of the 3 mounting bracket from the left hand side of the handle assembly secure wit...

Page 9: ... raise one wheel 1 about 1 off the ground Remove the click pin from the wheel hub and wheel shaft See Figure 5 Slide the wheel fully inward on the wheel shaft Reinstall the click 2 pin through the wheel shaft only not through the wheel hub See Figure 4 The wheel should now spin freely freewheel on the wheel shaft Repeat with the other wheel Use the handlebar to roll the tiller to a flat area 3 NOT...

Page 10: ...ing the engine See Figure 5 WARNING The operation of any tiller can result in foreign objects being thrown into the eyes which can damage your eyes severely Always wear the safety glasses provided with this unit or eye shields before tilling and while performing any adjustments or repairs Now that you have set up your tiller for operation get aquainted with its controls and features These are desc...

Page 11: ...rward drive of the wheels and tines See Figure 5 Depth regulator lever This lever controls the tilling depth of the tines Pull the lever back and slide it up or down to engage the notched height See Figure 5 Handlebar height adjustment The handlebar height is adjustable to three different settings In general adjust the handlebars so they are at waist level when the tines are 3 4 in the ground See ...

Page 12: ...ngine with too little oil can 3 result in permanent engine damage Transmission Gear Oil First Time Use With the tiller on level ground pull the Depth Regulator Lever 1 back and then all the way up until the lowest notch in the lever is engaged See Figure 6 Remove the oil fill plug from the transmission housing cover and 2 locate the main drive shaft situated inside the housing See Figure 7 The gea...

Page 13: ...nsttheenginetoprevent accidental starting while the equipment is unattended TO engage drive Tines For forward motion of the wheels and power to the tines pull the 1 Forward Clutch Bail up against the handlebar NOTE In forward mode the tines will rotate in reverse Walk slowly behind the tiller allowing it to move at its own pace 2 while keeping a secure grip on the handlebar with your elbows flexed...

Page 14: ... use the setting which gives 1 of tilling depth second hole from the top Place the side shields in their lowest position For further depth raise the depth stake and side shields and also make one or two more passes over the area When tilling loose soil the depth stake may be raised to its highest position use bottom adjustment hole to give the deepest tilling depth Raise the side shields to their ...

Page 15: ...dirt Help them along by lifting up slightly on the handlebar one hand palm up works most easily Avoid the temptation to push down on the handlebars in an attempt to force the tiller to dig deeper Doing so takes the weight off the powered wheels causing them to lose traction Without the wheels to hold the tiller back the tines will attempt to propel the tiller backward towards the operator When cul...

Page 16: ...uarter width See Figure 15 Tilling on a Slope Tillonlyonmoderateslopes neveronsteepgroundwherethefooting 1 is difficult Tilling up and down slopes is recommended over terracing Tilling 2 vertically on a slope allows maximum planting area and also leaves room for cultivating NOTE When tilling on slopes be sure the correct oil level is main tained in the engine check every one half hour of operation...

Page 17: ...tion to prevent slipping they should also have side rails to guide the tiller along the ramps and they should have a locking device to secure them to the vehicle The handlers should wear sturdy footwear that will help to prevent slipping Position the loading vehicle so that the ramp angle is as flat as possible the less incline to the ramp the better Turn the vehicle s engine off and apply the par...

Page 18: ...k 3 Every 50 hours Engine oil 1 Change 1 Every 100 hours Air cleaner 1 Spark Plug 2 Change 1 Change 2 Before Storage Fuel system 1 Run engine until it stops from lack of 1 fuel or add a gasoline additive to the gas in the tank Change oil every twenty five hours when operating engine under heavy load or in high temperatures WARNING Before performing any type of maintenance service disengage all con...

Page 19: ...n air cleaner completely assembled Check the air cleaner before each use Paper filters cannot be cleaned and must be replaced once a year or every 100 operating hours more often if used in extremely dusty conditions Press the tab on the air filter cover lift the cover and remove the 1 air filter See Figure 19 Discard old air filter 2 Install new air filter 3 Close the cover 4 NOTE If the filter is...

Page 20: ...e manufacturer s requirements for service classification SG SF Motor oils classified SG SF will show this designation on the container Change engine oil after the first five to eight hours of operation and every fifty hours or every season thereafter Change oil every twenty five hours when operating engine under heavy load or in high temperatures To Drain Oil Drainthefuelfromthetankbyrunningtheeng...

Page 21: ... fill plug 8 Change Transmission Gear Oil The transmission gear oil does not need to be changed unless it has been contaminated with dirt sand or metal particles See an autho rized Sears Service Center to have the transmission gear oil changed or to schedule service simply contact Sears at 1 800 4 MY HOME LUBRICATION After every 10 operating hours oil or grease the lubrication points Use clean lub...

Page 22: ...t aside in a safe location until reinstallation See Figure 24 Remove the idler bracket extension spring See Figure 25 It is 4 recommended to use a pair of needle nosed pliers and grab the spring by the end that hooks over the frame Simply grab it and pull it away from the frame then up wards and carefully relieve the tension of the spring Remove the idler pulley bracket by removing the 5 16 24 hex...

Page 23: ...ted Badly worn tines will result in a loss of tilling depth and reduced effective ness when chopping up and turning under organic matter Removing Installing a Tine Assembly Remove the tine shield end covers and side shields by removing 1 the three wing nuts on each side that secure them A tine assembly consists of a left hand tine and a right hand tine 2 NOTE The tine assembly moves in a counter r...

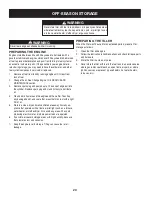
Page 24: ... away from any ap 5 pliance that operates with a flame or pilot light such as a furnace water heater or clothes dryer Also avoid any area with a spark producing electric motor or where power tools are operated If possible also avoid storage areas with high humidity because 6 that promotes rust and corrosion Keep the engine level in storage Tilting can cause fuel or oil 7 leakage Preparing THE Till...

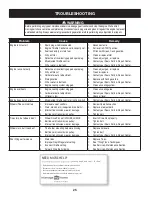
Page 25: ...sadjusted drive belt s 2 Internal transmission wear or damage 3 Bolt loose in transmission pulley 4 Review Operation section 1 Replace or adjust belts 2 Contact your Sears Parts Repair Center 3 Tighten bolt 4 Tines turn but wheels don t Wheel Drive Pins not in WHEEL DRIVE 1 Bolt loose in transmission pulley 2 Internal transmission wear or damage 3 Inserts Drive Pins properly 1 Tighten bolt 2 Conta...

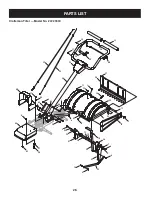
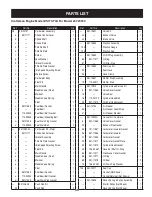
Page 26: ...ST Craftsman Tiller Model No 247 29930 50 51 6 11 6 3 20 28 38 39 35 31 29 16 12 24 11 17 33 32 34 7 6 8 10 13 36 40 22 18 10 14 21 25 26 27 15 30 41 42 44 43 45 48 46 37 4 23 9 47 49 31 19 6 6 1 2 5 4 52 6 6 3 6 ...

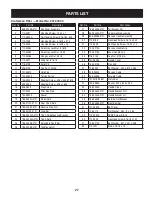
Page 27: ... 0721 Tine Shield 25 786 04356 0721 Adjustable Depth Bar 26 786 04363 0721 Tail Bracket LH Ref No Part No Description 27 786 04364 0721 Tail Bracket RH 28 649 04054 0721 Upper Handle Assembly 29 686 04098 0721 Reverse Handle Assembly 30 710 0189 Hex Head Screw 5 16 18 x 3 00 31 710 0599 Self Tapping Screw 1 4 20 x 1 2 32 720 0270A Reverse Handle Grip 33 720 0278A Foam Handle Grip 34 726 0135 Cap N...

Page 28: ...28 PARTS LIST Craftsman Tiller Model No 247 29930 39 37 12 15 25 24 3 7 2 1 4 5 3 6 6 7 8 10 11 11 13 9 14 16 17 19 20 21 21 22 22 23 24 26 27 28 29 30 31 32 33 34 35 36 18 38 40 41 ...

Page 29: ...43 Internal Cotter Pin 19 736 0343 Flat Washer 330 X 1 25 X 120 20 936 0452 Bell Washer 396 x 1 140 x 095 21 736 3092 Flat Washer 265 x 1 0 x 030 Ref No Part No Description 22 738 04425 Shoulder Screw 342 x 335 1 4 28 23 748 04087A Pivot Idler Spacer 24 750 04571 Shoulder Spacer 260 x 785 x 538 25 750 04907 Pivot Idler Spacer 26 1916657 V Belt 4L x 25 375 Long 27 1916658 V Belt 3L x 29 125 Long 28...

Page 30: ...30 PARTS LIST Craftsman Tiller Model No 247 29930 1 2 2 2 2 2 3 4 5 6 6 7 7 7 7 8 9 10 11 12 13 13 14 14 14 14 15 16 17 18 18 18 18 19 19 20 20 21 21 21 21 22 23 ...

Page 31: ...r 12 921 04030 Seal Oil 750 Shaft x 1 783 Bore 13 921 04229 Gasket Gear Housing 14 721 04232 Seal Oil 1 00 Shaft x 2 00 Bore 15 721 04271 Rubber Plug Oil 16 732 0614 Wire Ring 17 736 04305 Washer Flat 1 50 x 1 75 x 062 736 04306 Washer Flat 1 50 x 1 75 x 005 736 04307 Washer Flat 1 50 x 1 75 x 03 736 04308 Washer Flat 1 50 x 1 75 x 010 18 736 0745 Washer Flat 1 010 x 1 56 x 060 19 941 04298 Cone B...

Page 32: ... 17 42 39 44 43 46 50 68 70 73 74 69 74 71 45 16 18 16 19 14 11 19 16 15 10 9 8 7 6 2 4 5 1 1 20 12 13 3 24 25 27 26 28 32 31 30 35 75 76 77 33 29 36 37 38 33 78 49 49 81 82 83 84 83 82 83 82 91 98 98 49 97 49 90 103 102 101 100 105 107 106 23 23 21 22 Craftsman Engine Model ZS170 T0A For Model 247 29930 PARTS LIST 32 ...

Page 33: ...y 57 951 11369 Radial Ball Bearing 59 951 10307 Flywheel Key 60 951 11576 Governor Assembly 61 715 04092 Dowel Pin 7 x 14 62 715 04089 Dowel Pin 9 x 14 63 951 11371 Crankcase Cover Gasket Ref Part No Description 65 710 04932 Bolt 66 951 11577 O Ring 68 951 11578 Oil Seal 70 736 04440 Oil Drain Plug Washer 71 710 04906 Oil Drain Plug 73 951 10792 Ignition Coil 74 710 04919 Bolt 75 951 10805 Flywhee...

Page 34: ...371 Crankcase Cover Gasket 1 68 951 11578 Oil Seal 2 951 11063A Valve Cover Gasket Kit 2 951 11054A Valve Cover 1 5 951 11565 Valve Cover Gasket 1 Ref Part No Description Qty 951 10799 Cylinder Head Assembly 5 951 11565 Valve Cover Gasket 1 7 751 11123 Valve Adjusting Nut 2 8 Rocker Arm 2 9 710 04902 Rocker Arm Stud 2 10 Push Rod Guide 1 11 Valve Spring Retainer Intake 1 12 Exhaust Valve Adjustor ...

Page 35: ... 1 951 10648 Push Rod Kit 40 Push Rod 2 Ref Part No Description Qty 951 10647 Valve Kit 43 Exhaust Valve 1 44 Intake Valve 1 951 10655 Dipstick Assembly 102 Dipstick Gauge 1 103 Dipstick Cap 1 951 10669 Oil Fill Plug Assembly 66 951 11577 O Ring 1 67 Oil Filler Plug 1 951 10650 Fuel Line Kit 94 Fuel Hose 1 95 Hose Clamp 2 951 10657 Muffler Stud Assembly 19 710 04911 Muffler Stud 2 951 10819 Cylind...

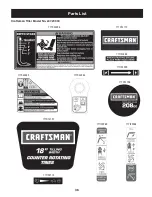
Page 36: ...Parts List 36 777D14196 777I23174 777I23259 777D13770 777I20358 777S33382 777X43953 777S33496 777D14197 777I22968 777I22969 Craftsman Tiller Model No 247 29930 ...

Page 37: ...NOTES 37 ...

Page 38: ...cts are judged on normal engine performance The warranty is not related to an in use emission test Sears Emission Control Defects Warranty Provisions The following are specific provisions relative to your Emission Control Defects Warranty Coverage It is in addition to the Sears engine warranty for non regulated engines found in the Operating and Maintenance Instructions 1 Warranted Parts Coverage ...

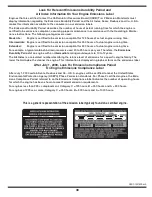
Page 39: ...typical walk behind lawn mower is used 20 to 25 hours per year Therefore the Emissions Durability Period of an engine with an intermediate rating would equate to 10 to 12 years The Air Index is a calculated number describing the relative level of emissions for a specific engine family The lower the Air Index the cleaner the engine This information is displayed in graphical form on the emissions la...

Page 40: ...one we call it Rapid Resolution phone support from a Sears representative Think of us as a talking owner s manual Once you purchase the Agreement a simple phone call is all that it takes for you to schedule service You can call anytime day or night or schedule a service appointment online The Repair Protection Agreement is a risk free purchase If you cancel for any reason during the product warran...

Page 41: ...compra si este producto se usa en cualquier momento para fines comerciales o de alquiler Esta garantía cubre ÚNICAMENTE los defectos en los materiales y la mano de obra Sears NO pagará por Componentes desechables que se desgastan con el uso normal incluyendo sin limitación las cuchillas los dientes y las correas Reemplazo o reparación de neumáticos o ruedas como resultado del desgaste normal un ac...

Page 42: ...ien ajustados para garantizar que la máquina se encuentra en condiciones seguras de operación Además realice una inspección visual de la máquina a intervalos frecuentes para controlar si la misma está dañada Antes de arrancar el motor desenganche las palancas del embrague y desplácelas en caso de haber a la posición neutral N Nunca deje la máquina en funcionamiento sin vigilancia Nunca intente rea...

Page 43: ...máquina hacia usted Arranque el motor de acuerdo con las instrucciones del manual y aleje los pies de los dientes en todo momento Si golpea algún un objeto extraño o si la máquina comienza a emitir un sonido poco común o a vibrar apague el motor de inmediato Desconecte el cable de la bujía póngalo haciendo masa contra el motor y siga los pasos siguientes Inspeccione la máquina para ver si está dañ...

Page 44: ...ados y cumplen con las regulaciones de emisiones federales EPA y de California para SORE Equipos Small Off Road Equipment están certificados para operar con gasolina común sin plomo y pueden incluir los siguientes sistemas de control de emisiones Modificación de motor EM catalizador oxidante OC inyección de aire secundaria SAI y catalizador de tres vías TWC si están equipados de esa manera Amortig...

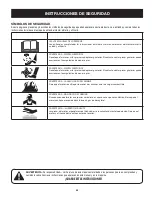
Page 45: ...oloque las manos ni los pies cerca de piezas giratorias El contacto con las piezas giratorias puede ocasionar en la amputación de manos o pies ADVERTENCIA LA GASOLINA ES INFLAMABLE Deje que el motor se enfríe por lo menos dos minutos antes de cargar combustible ADVERTENCIA MONÓXIDO DE CARBONO Nunca encienda el motor en espacios cerrados o en una zona con poca ventilación El escape del motor contie...

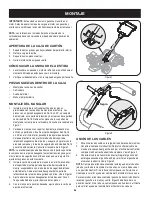
Page 46: ... brida de 5 16 18 que retiró anteriormente Consulte el recuadro de la Figura 1 NOTA La arandela campana debe ubicarse con la parte superior de la campana hacia el perno hexagonal para crear tensión y asegurar más la tuerca de seguridad con brida una vez que se la ajuste No ajuste estas piezas en este momento Instale la varilla de ajuste de la manivela en el orificio superior 3 del soporte de monta...

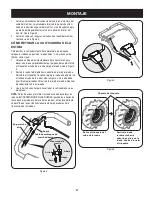
Page 47: ...e de la rueda Vea la Figura 5 Deslice la rueda totalmente hacia adentro en el eje de la rueda 2 Reinstale el trinquete a través del eje de la rueda únicamente no a través del cubo de la rueda Vea la Figura 4 La rueda debe girar libremente ruedas libres sobre el eje de la rueda Repita el procedimiento con la otra rueda Use la barra de control para hacer rodar la cultivadora hasta un 3 área plana NO...

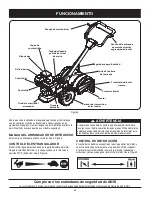
Page 48: ...ra que tiene la cultivadora preparada para funcionar familiarícese con los controles y funciones Encontrará las descripciones en las siguientes dos páginas y las ilustraciones en ésta Este conocimiento le permitirá utilizar su nuevo equipo a su máxima capacidad Manija del arrancador de retroceso Esta manija se utiliza para arrancar el motor Vea la Figura 5 Control del estrangulador El control del ...

Page 49: ... de la marcha directa en las ruedas y dientes Vea la Figura 5 Palanca del regulador de profundidad Esta palanca controla la profundidad de labranza de los dientes Tire la palanca hacia atrás y deslícela hacia arriba o hacia abajo para engranar las muescas de altura Vea la Figura 5 Ajuste de la altura de la barra de control La altura de la barra de control tiene tres ajustes diferentes En general a...

Page 50: ...d Single Viscosidad 1 Multi Viscosidad 2 Aunque los aceites de viscosidad múltiple 5W30 10W30 etc mejoran el encendido cuando el clima está frío los mismos incrementan el consumo de aceite cuando se usan a más de 32ºF Compruebe el nivel de aceite con mayor frecuencia para evitar daños debido a que el motor trabaje con un nivel de aceite bajo Compruebe el nivel de aceite asegurándose que la varilla...

Page 51: ...ara evitar que se encienda accidentalmente el equipo al dejarlo sin vigilancia Para engranar la transmisión y los dientes PRECAUCIÓN Los combustibles con mezcla de alcohol que se llaman gasohol o que utilizan etanol o metanol pueden atraer la humedad lo que conduce a la separación y formación de ácidos durante el almacenamiento El gas acídico puede dañar el sistema de combustible del motor mientra...

Page 52: ...e la cultivadora por primera vez utilice el segundo orificio de ajuste de arriba 1 de profundidad de labranza Para fracturar el césped y para cultivo superficial utilice la posición que ofrece 1 de profundidad de labranza segundo orificio de arriba Coloque los protectores laterales en su posición más baja Para mayor profundidad levante la estaca y los protectores laterales y también haga una o dos...

Page 53: ...ontrol de un lado al otro aproximadamente entre 6 y 12 La acción de coleado a menudo despeja los dientes desprendiendo los desechos SUGERENCIAS Y TÉCNICAS DE LABRANZA la profundidad de la labranza Esta es una cultivadora de dientes que rotan en sentido contrario CRT A medida que las ruedas tiran hacia adelante los dientes rotan hacia atrás Esto crea una acción de gancho de los dientes que cava en ...

Page 54: ... opere la cultivadora en una pendiente demasiado empinada para una operación segura Realice la labranza lentamente y asegúrese de estar firmemente parado Nunca permita que la cultivadora se desplace con las ruedas libres cuesta abajo Si no se observa esta advertencia se pueden producir lesiones personales Labranza en pendiente Realice la labranza únicamente en pendientes moderadas nunca 1 en terre...

Page 55: ... rodar la cultivadora manualmente con el motor apagado para subirla o bajarla del vehículo Para realizar esto se necesitan dos o más personas Las rampas deben ser lo suficientemente fuertes como para soportar el peso combinado de la cultivadora y de los cargadores Las rampas deben proporcionar buena tracción para evitar resbalones deben tener rieles laterales para guiar la cultivadora a lo largo d...

Page 56: ...3 Cada 50 horas Aceite del motor 1 Cambiar 1 Cada 100 horas Purificador de aire 1 Bujía de encendido 2 Cambiar 1 Cambiar 2 Antes de almacenar Sistema de combustible 1 Hacer funcionar el motor hasta que 1 se detenga por falta de combustible o agregar aditivo para gasolina a la que se encuentra en el tanque Cambie el aceite cada veinticinco horas si el motor trabaja con cargas pesadas o a elevada te...

Page 57: ...or con agua para limpiarlo porque el agua podría contaminar el combustible Si se utiliza una manguera de jardín o equipo de lavado a presión también puede entrar agua dentro de la abertura del silenciador El agua que pasa por el silenciador puede ingresar en el cilindro causando daños Bujía de encendido Funda de bujía Filtro de aire Tapa del filtro de aire Elemento de espuma 0 02 0 03 pulg 0 60 0 ...

Page 58: ...Deseche el aceite usado co rrectamente No lo arroje junto con los residuos domésticos Consulte a las autoridades locales o al centro de servicio Sears para averiguar dónde hay instalaciones para la eliminación reciclaje segura o del aceite usado ADVERTENCIA El aceite usado del motor puede causar cáncer de piel si entra en contacto con la piel de manera reiterada y por períodos prolongados Si bien ...

Page 59: ...ceite 8 Cambio de aceite del engranaje de la transmisión El aceite del engranaje de la transmisión no necesita ser cambiado a menos que se contamine con suciedad arena o partículas de metal Vaya a un Centro de Servicio Sears autorizado para que le cambien el aceite del engranaje de la transmisión o para programar un servicio simplemente comuníquese con Sears al teléfono 1 800 4 MY HOME LUBRICACIÓN...

Page 60: ...r retire el protector de la polea y póngalo en un lugar seguro hasta que lo vuelva a colocar Vea la Figura 24 Retire el resorte de extensión del soporte intermedio Vea la 4 Figura 25 Se recomienda usar un par de pinzas de punta de aguja para agarrar el resorte por el extremo que engancha sobre el bastidor Simplemente tómelo y tire alejándolo del bastidor luego hacia arriba aflojando la tensión del...

Page 61: ...ateria orgánica Retiro Instalación de un conjunto de dientes Retire las cubiertas de los extremos y los protectores laterales del 1 protector de los dientes sacando las tres tuercas mariposa que lo sujetan a cada lado Un conjunto de dientes consta de un conjunto de dientes 2 izquierdo y un conjunto de dientes derecho NOTA El conjunto de dientes se mueve rotando en sentido contrario con los bordes ...

Page 62: ...lama o luz piloto como un horno calentador de agua o secador de ropa También evite cualquier sector con una chispa produciendo motor eléctrico o donde se utilizan herramientas eléctricas De ser posible también evita áreas de almacenamiento con 6 mucha humedad para evitar oxidación y corrosión Mantenga el motor nivelado cuando lo almacene La inclinación 7 del motor puede resultar en fugas de combus...

Page 63: ...sión interna desgastada o dañada 3 Perno suelto en la polea de transmisión 4 Revise la sección de Funcionamiento 1 Reemplace o ajuste las correas 2 Contacte con su centro de piezas y reparaciones Sears 3 Ajuste el perno 4 Los dientes giran las ruedas no Los pasadores de transmisión en las ruedas no se 1 encuentran en la posición TRANSMISIÓN EN LAS RUEDAS Perno suelto en la polea de transmisión 2 T...

Page 64: ...NOTAS 64 ...

Page 65: ...n de acuerdo con el funcionamiento normal de un motor La garantía no está relacionada con una prueba de emisiones en uso Disposiciones de la garantía Sears para defectos en el control de emisiones Las siguientes son disposiciones específicas relacionadas con la cobertura de la garantía para defectos en el control de emisiones Es un añadido a la garantía de motor Sears para motores no regulados que...

Page 66: ...o tanto el Período de Duración de Emisiones de un motor con una clasificación intermedia sería equivalente a entre 10 y 12 años Laclasificación de aire es un número calculado para describir el nivel relativo de emisiones para un grupo de motores en particular Cuanto menor sea la clasificación de aire mayor es la limpieza del motor La información se presenta de forma gráfica en la etiqueta de emisi...

Page 67: ...no lo llamamos Resolución Rápida el apoyo telefónico de un Chamusca al representante Piense en nosotros como el manual de un dueño hablador Una vez adquirido el Acuerdo puede programar el servicio con tan sólo realizar una llamada telefónica Puede llamar en cualquier momento del día o de la noche o programar un servicio en línea El Acuerdo de Protección de Reparación es una compra sin riesgo Si us...

Page 68: ... and owner s manuals that you need to do it yourself For Sears professional installation of home appliances and items like garage door openers and water heaters 1 800 4 MY HOME 1 800 469 4663 Call anytime day or night U S A and Canada www sears com www sears ca Our Home For repair of carry in items like vacuums lawn equipment and electronics call anytime for the location of your nearest Sears Part...

Reviews: