background image

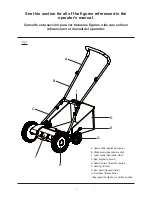
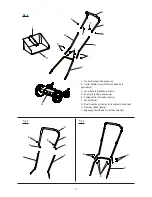
A

B

C

F

H

G

D

E

I

See this section for all of the fi gures referenced in the 

operator’s manual.

Consulte esta sección para ver todas las fi guras a las que se hace 

referencia en el manual del operador.

A - Upper handle (Agarradera superior)

B - Middle handle (Agarradera central)

C - Lower handle (Agarradera inferior)

D - Rear bag (Bolsa trasera)

E - Adjustment lever (Ajuste de la altura)

F - Housing (Carcasa)

G - Rear wheel (Rueda posterior)

H - Front wheel (Rueda frontal)

I - Bag support belt (Bolsa con cinta de sujeción)

Fig. 1

i

Summary of Contents for 151.37664

Page 1: ...craftsman com Visite el sitio web de Craftsman www craftsman com Save this manual for future reference Guarde este manual pare futuras consulta 18 in REEL MOWER WARNING To reduce the risk of injury the user must read and understand the operator s manual before using this product ADVERTENCIA Para reducir el riesgo de lesiones el usuario debe leer y comprender el manual del operador antes de usar es...

Page 2: ...rom the date of sale this product is warranted against defects in material or workmanship WITH PROOF OF SALE a defective product will be replaced free of charge For warranty coverage details to obtain free replacement visit the web page www craftsman com warranty This warranty is void if this product is ever used while providing commercial services or if rented to another person This warranty give...

Page 3: ...lectric shock fire and or serious personal injury SPECIFIC SAFETY RULES FOR REEL MOWER WARNING This symbol points out important safety instructions which if not followed could endanger the personal safety and or property of yourself and others Read and follow all instructions in this manual before attempting to operate this machine Failure to comply with these instructions may result in personal i...

Page 4: ...t allow children under the age of 14 to operate this reel mower Children who are 14 years of age and older must read and understand the operating instructions and safety rules in this manual and must be trained and supervised by a parent Stay alert and stop the reel mower if a child or any other person enters the mowing area Look behind and down for small children before and while moving backwards...

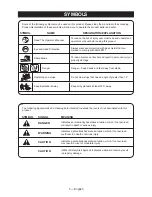
Page 5: ...h this product SYMBOL NAME DESIGNATION EXPLANATION Read The Operator s Manual To reduce the risk of injury user must read and understand operator s manual before using this product Eye and Head Protection Always wear eye protection with side shields that are marked to comply with ANSI Z87 1 Sharp Blade Thrown objects can ricochet and result in personal injury or property damage Danger Danger Keep ...

Page 6: ...e information on the product and in this operator s manual as well as a knowledge of the project you are attempting Before use of this product familiarize yourself with all operating features and safety rules REAR BAG The rear bag prevents grass clippings from being scattered across your lawn as you mow HEIGHT ADJUSTMENT LEVER The height adjustment lever provides cutting height adjustments There i...

Page 7: ...nd knobs 6 provided Fig 3 Attach the top handle subassembly previously assembled to the lower handle subassembly 3 using four carriage bolts 5 and knobs 6 provided Fig 4 Tighten all the knobs on the joints of the handle assembly ATTACHING THE HANDLE TO THE MOWER BASE See Figure 5 Align holes 1 at the lower end of each handle arm with posts 2 extending from the mower base side plates Slide lower en...

Page 8: ...el by hand Each blade should cut across the paper in a continuous line If there are missed spots in the cut it is necessary to make further adjustments See Mower Blade Adjustments NOTE Blades are factory adjusted Misalignment can occur often caused by blades being too loose or too tight This can cause an uneven cut or difficulty pushing the mower Each end of the cutting bar is adjusted separately ...

Page 9: ...inding compound or debris from the cutting bar blade reel blade pinions and pawls NOTE Use industrial or valve lapping compound between 100 and 240 grit Lubricate the axle and pinion with a light film of wheel bearing grease CLEANING AND STORAGE Clean the exterior of the machine thoroughly using a soft brush and cloth before storing Do not use water solvents or polishes Turn the mower on its side ...

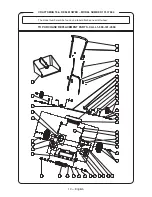
Page 10: ...10 English CRAFTSMAN 18in REEL MOWER MODEL NUMBER 151 37664 TO PURCHASE REPLACEMENT PARTS CALL 1 888 331 4569 The model number will be found on a label attached near left wheel ...

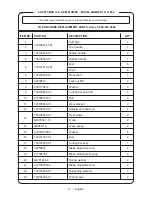
Page 11: ... Rear shaft 1 7 22030812 Lock nut M8 2 8 2301170812 Washer 6 9 100104832 01 Cutting bar pivot rod 1 10 21030810162 Bolt 2 11 100105950 01 Rear bracket 2 12 100106530 01 Adjustment handle L 1 13 100105940 01 Rear wheel 2 GB T894 1 10 C clip 2 14 GB955 12 Wave spring 2 15 23012013082 Washer 6 16 100101557 01 Bolt 2 17 100103550 01 Cutting bar assy 1 18 22050822 Blade adjustment nut 2 19 271704392 Bl...

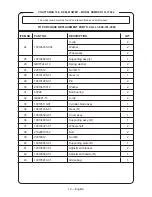
Page 12: ...244 10 Spring washer 2 27 22011012 Nut M10 2 28 100101205 01 Gear L 1 29 100101208 01 Pin 2 30 23013415012 Washer 2 31 6002Z Ball bearing 2 32 GB8941 15 C clip 2 33 100105110 01 Cylinder blade assy 1 34 100101206 01 Gear R 1 35 100106520 01 Cover assy 1 36 100104830 01 Supporting assy R 1 37 100104321 01 Wheel shaft 2 38 21020810162 Bolt 2 39 22010812 Nut M8 2 40 100103055 01 Supporting plate R 1 ...

Page 13: ...s que se hace referencia en el manual del operador A Upper handle Agarradera superior B Middle handle Agarradera central C Lower handle Agarradera inferior D Rear bag Bolsa trasera E Adjustment lever Ajuste de la altura F Housing Carcasa G Rear wheel Rueda posterior H Front wheel Rueda frontal I Bag support belt Bolsa con cinta de sujeción Fig 1 i ...

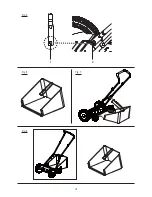
Page 14: ...ndle pieces Piezas centrales de la agarradera C Lower handle Agarradera inferior D Foam grip Asidero de espuma E Carriage bolts Pernos de soporte F Knobs Perilla G Reel mower body Cuerpo de la podadora de carrete H Rear bag Bolsa trasera I Bag support belt Bolsa con cinta de sujeción Fig 4 Fig 3 Fig 2 ii ...

Page 15: ...1 2 Fig 6 Fig 8 Fig 7 Fig 5 iii ...

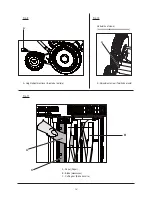
Page 16: ...ustment lever Ajuste de la altura A Adjustment screw Tornillo de ajuste Fig 9 Fig 11 Fig 10 A A Paper Papel B Blade xxxxxxxxxx C Cutting bar Barra de corte B A C iv Underside of mower xxxxxxxxxxxxxxxxxxxxxxxxxxxxxxxx ...

Page 17: ...stas a preguntas o problemas y ordenar piezas o pedir servicio para la reparación de su equipo To help us help you register your product at www craftsman com registration Para poderte ayudar mejor registra tu producto en www craftsman com registration Receive exclusive member benefits including special pricing and offers project sharing expert advice and SHOP YOUR WAY REWARDS Como miembro exclusiv...

Reviews: