


17
DOOR CONTROL BUTTON
Antenna
Back Panel
of Opener
Opener
Terminal Screws
KG
KG
1
3
9
7
5
1
3
9
7
5
2
3
1
2-Conductor
Bell Wire
Terminal
Screws
Bell
Wire
(BACK VIEW)
WHT
2
1
RED
Drywall Anchors
Insulated
Staples
6AB x 1-1/4" Screw
(drywall installation)
HARDWARE SHOWN ACTUAL SIZE
To prevent possible SERIOUS INJURY or DEATH from
electrocution:
• Be sure power is not connected BEFORE installing door
control.
• Connect ONLY to 24 VOLT low voltage wires.
To prevent possible SERIOUS INJURY or DEATH from a
closing garage door:
• Install door control within sight of garage door, out of
reach of children at a minimum height of 5 feet (1.5 m),
and away from all moving parts of door.
• NEVER permit children to operate or play with door
control push buttons or remote control transmitters.
• Activate door ONLY when it can be seen clearly, is
properly adjusted, and there are no obstructions to
door travel.
• ALWAYS keep garage door in sight until completely
closed. NEVER permit anyone to cross path of closing
garage door.
WARNING
CAUTION
WARNING
WARNING
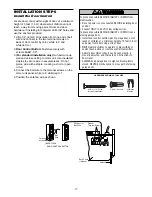
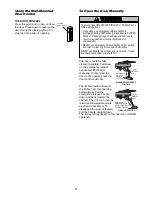
INSTALLATION STEP 6
Install the Door Control
Locate door control within sight of door, at a minimum
height of 5 feet (1.5 m) where small children cannot
reach, away from moving parts of door and door
hardware. If installing into drywall, drill 5/32" holes and
use the anchors provided.
1. Strip 1/4" (6 mm) of insulation from one end of bell
wire and connect to the two terminal screws on
back of door control by color: white to 2 and
white/red to 1.
2.
Door Control Button:
Fasten securely with
screws 6ABx1-1/2".
3.
(For standard installation only)
Run bell wire up
wall and across ceiling to motor unit. Use insulated
staples to secure wire in several places. Do not
pierce wire with a staple, creating a short or open
circuit.
4. Connect the bell wire to the terminal screws on the
motor unit panel: white to 2; white/red to 1.
5. Position the antenna wire as shown.


