background image

30

31

30

31

INTERIOR CUTTING (FIG. Y)

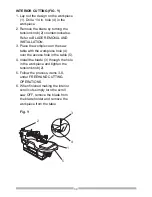
1. Lay out the design on the workpiece 

(1). Drill a 1/4 in. hole (4) in the 

workpiece .

2. Remove the blade by turning the 

tension knob (2) counterclockwise. 

Refer to BLADE REMOVAL AND 

INSTALLATION.

3. Place the workpiece on the saw 

table with the workpiece hole (4) 

over the access hole in the table (5).

4. Install the blade (3) through the hole 

in the workpiece and tighten the 

tension knob (2).

5. Follow the process, items 3-8, 

under FREEHAND CUTTING 

OPERATIONS.

6. When finished making the interior 

scroll cuts simply turn the scroll 

saw OFF, remove the blade from 

the blade holder and remove the 

workpiece from the table.

Fig. Y

3

4

5

1

2

Summary of Contents for 137.21602

Page 1: ...s Safety Rules and Operating Instructions Safety Instructions Installation Operation Maintenance Parts List Customer Help Line For Technical Support 1 800 843 1682 Sears Parts Repair Center 1 800 488 1222 Sears Roebuck and Co Hoffman Estates lL 60179 USA Visit our Craftsman website www sears com craftsman Part No 137216020001 Printed in China ...

Page 2: ...ety 5 Scroll Saw Safety 8 Electrical Requirements and Safety 10 Accessories and Attachments 12 Tools Needed for Assembly 12 Carton Contents 13 Know Your Scroll Saw 14 Glossary of Terms 15 Assembly and Adjustments 17 Operation 26 Maintenance 31 Troubleshooting Guide 32 Parts List 34 WARRANTY WARNING Some dust created by using power tools contains chemicals known to the state of California to cause ...

Page 3: ...f it is worn cut or damaged in any way Before using your tool it is critical that you read and understand these safety rules Failure to follow these rules could result in serious injury to you or damage to the tool PRODUCT SPECIFICATIONS MOTOR Power Source 1 6 A 120 V AC 60 Hz Speed Control Electric TABLE Tilt 450 Left SAWDUST BLOWER Yes BLADE Speed 400 1600 SPM Type Pin end or Plain end Length 5 ...

Page 4: ... user and all bystanders must read and understand operator s manual before using this product SUPPORT AND CLAMP WORK KEEP HANDS AWAY FROM BLADE Failure to keep your hands away from the blade will result in serious personal injury DANGER WARNING CAUTION CAUTION DANGER indicates an imminently hazardous situation which if not avoided will result in death or serious injury WARNING indicates a potentia...

Page 5: ... locations or expose them to rain or snow Keep work area well lit 6 KEEP CHILDREN AWAY All visitors and bystanders should be kept a safe distance from work area 7 MAKE WORKSHOP CHILD PROOF with padlocks master switches or by removing starter keys 8 DO NOT FORCE THE TOOL It will do the job better and safer at the rate for which it was designed 9 USE THE RIGHT TOOL Do not force the tool or an attach...

Page 6: ...your hand and it frees both hands to operate the tool 15 DISCONNECT TOOLS FROM POWER SOURCE before servicing and when changing accessories such as blades bits and cutters 16 REDUCE THE RISK OF UNINTENTIONAL STARTING Make sure switch is in the OFF position before plugging the tool in 17 USE RECOMMENDED ACCESSORIES Consult this Operator s Manual for recommended accessories The use of improper access...

Page 7: ...d clean for best and safest performance Follow instructions for lubricating and changing accessories 23 WARNING Dust generated from certain materials can be hazardous to your health Always operate saw in well ventilated area and provide for proper dust removal 24 People with electronic devices such as pacemakers should consult their physician s before using this product Operation of electrical equ...

Page 8: ... small to be held safely 15 DO NOT USE dull or bent blades SCROLL SAW SAFETY 1 READ AND UNDERSTAND all safety instructions and operating procedures throughout the manual 2 DO NOT OPERATE the Scroll Saw until it is completely assembled and installed according to the instructions 3 SHOULD any part of Scroll Saw be missing damaged or fail in any way or any electrical component fail to perform properl...

Page 9: ...ressing against the blade Slowly feed the workpiece into the moving blade 20 WHEN CUTTING a large workpiece MAKE SURE the material is supported at table height 21 EXERCISE CAUTION when cutting workpieces that are round or irregularly shaped Round items will roll and irregularly shaped workpieces can pinch the blade 22 ALWAYS release blade tension before loosening the blade holder screw 23 MAKE CER...

Page 10: ... stamped on the motor nameplate Running at a lower voltage will damage ELECTRICAL REQUIREMENTS AND SAFETY GROUNDING INSTRUCTIONS IN THE EVENT OF A MALFUNCTION OR BREAKDOWN grounding provides a path of least resistance for electric currents and reduces the risk of electric shock This tool is equipped with an electrical cord that has an equipment grounding conductor and a grounding plug The plug mus...

Page 11: ...ntact grounded receptacle The adapter Fig 2 has a rigid lug extending from it that MUST be connected to a permanent earth ground such as a properly grounded receptacle box CAUTION In all cases make certain the receptacle is properly grounded If you are not sure have a qualified electrician check the receptacle This tool is for indoor use only Do not expose to rain or use in damp locations This tool...

Page 12: ...rds Visit your Sears Hardware Department or see the Sears Power and Hand Tool Catalog for the following accessories ITEM Pin end saw blades Plain end saw blades Sears may recommend other accessories not listed in this manual See your nearest Sears store or Power and Hand Tool Catalog for other accessories Do not use any accessory unless you have completely read the instruction or Operator s Manual...

Page 13: ...htha acetone lacquer thinner or similar highly volatile solvents to clean the scroll saw CARTON CONTENTS 1 Remove the scroll saw from the carton by lifting the saw by the back of the upper frame 2 Place the saw on a secure stationary work surface 3 Separate all parts from the packing material Check each one with the illustration below to make certain all items are accounted for before discarding a...

Page 14: ... Holder Upper Arm Blade Guard Foot Worktable Sawdust Collection Port Mounting Holes Table Lock Knob Bevel Scale Blade Holder Lock Screw Bellows Seat Sawdust Blower Variable Speed Control Knob Mounting Holes ON OFF Switch Tension Knob Blade Storage Motor KNOW YOUR SCROLL SAW ...

Page 15: ...the blower tube is directed toward the blade and workpiece SAWDUST COLLECTION PORT Allows vacuum hose or attachments to be used to remove the sawdust from under the table and base TABLE LOCK KNOB Securely locks the table at the angle desired for bevel cutting VARIABLE SPEED CONTROL KNOB Variable switch dial allows greater versatility when cutting a variety of materials Adjust the speed to the desi...

Page 16: ...workpiece that is guided into the blade SAW BLADE PATH Area or line of sight of the workpiece moving in line toward the saw blade edge SURFACE Top of workpiece being cut TRAILING EDGE The end of the workpiece edge last cut by the saw blade WORKPIECE Material on which the cutting operation is being performed ...

Page 17: ...h the saw The hardware as shown in Fig A should be used Fig A STORING THE T WRENCH FIG B The left rear side of the body 1 has a U Shaped clamp holder 2 designed to store the T wrench 3 Position the shaft of the T wrench handle into the U shaped clamp holder as shown Fig B BLADE STORAGE FIG C The blade storage 1 is located on the right rear side of the scroll saw body The blade storage can convenie...

Page 18: ...anually remove sawdust by first unplugging the saw from the power source then removing the three screws 2 on the left side of saw holding the plate cover After cleaning all sawdust buildup reattach the plate and screws before restarting the saw This will keep your saw cutting efficiently Fig E To prevent fire hazard clean and remove sawdust from under the saw frequently To prevent sawdust build up in...

Page 19: ...r blade holders should not be over or under tightened The slot must be slightly wider than the thickness of the blade After the blade is installed the blade tension mechanism will keep the pin end in place PIN END BLADE REMOVAL FIG G H 1 Loosen the tension on the blade by turning the tension knob counterclockwise Fig G Fig G 2 Remove the blade 2 from the upper 3 and lower 4 blade holder by pulling...

Page 20: ...hinner kerf To avoid injury from accidental starting always turn the switch OFF and remove power cord plug from power source before removing or replacing the blade PIN END BLADE INSTALLATION FIG I J K NOTE Do not tighten the set screw 1 2 when using Pin end blades Fig J In order to avoid uncontrollable lifting of the workpiece the teeth of the blade MUST ALWAYS point downward Fig I Fig I 1 Install...

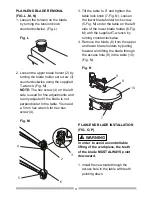
Page 21: ...3 Tilt the table to 0 and tighten the table lock knob 7 Fig N Loosen the lower blade holder lock screw 5 Fig M under the table on the left side of the lower blade holder 6 Fig M with the supplied T wrench by turning counterclockwise 4 Remove the blade 8 from the upper and lower blade holders by pulling forward and lifting the blade through the access hole 9 in the table 10 Fig N Fig N PLAIN END BL...

Page 22: ...o avoid injury from accidental starting always turn the switch OFF and unplug the scroll saw before moving replacing the blade or making adjustments 900 00 Bevel Adjustment Fig Q R 1 Remove the blade guard foot 1 by using the supplied T wrench to turn the hex screw 2 counterclockwise Fig Q 2 Loosen the table lock knob 3 and move the table 4 until it is approximately at a right angle to the blade 5...

Page 23: ...ust keep constant downward pressure on workpiece when cutting The blade guard foot is not designed to hold down the workpiece but is rather to help prevent the workpiece from lifting up excessively When cutting at angles the table guard foot 1 should be adjusted so it is parallel to the table and rests flat above the workpiece 1 To adjust loosen the screw 2 tilt the foot so it is parallel to table ...

Page 24: ...ct the narrowest blades for intricate curve cutting and the widest blades for straight and large curve cutting operations The following table represents suggestions for various materials When purchasing blades refer to the back of the package for the best use of blades and speeds on various materials 10 37 9 5 48 9 5 33 Use this table as an example but practice and your own personal preference wil...

Page 25: ...interless finish Double 10 37 Efficient chip removal Clean edges Reverse 9 5 28 21 Eliminates underside tearout Smooth splinterless finish Spiral 36 46 All direction cutting 1 Hard thicker wood Coarse TPI slower speed 2 Soft thinner wood Fine TPI faster speed 3 Plastic materials Slower speed 4 Please use the blades for the applications recommended by the blade suppliers ...

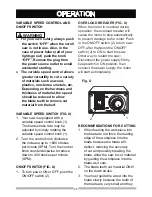
Page 26: ...ly because the teeth of the blade are very small and they VARIABLE SPEED CONTROL AND ON OFF SWITCH For your own safety always push the switch OFF when the scroll saw is not in use Also in the case of power failure all of your lights go out push the knob OFF Remove the plug from the power source outlet to avoid accidental starting The variable speed control allows greater versatility to cut a varie...

Page 27: ...ly remove wood when they are on the down stroke 4 There is a learning curve for each person who wants to use this saw During that period of time it is expected that some blades will break until you learn how to use the saw and receive the greatest benefit from the blades 5 Best results are achieved when cutting wood less than one inch thick 6 When cutting wood thicker than one inch the user must gu...

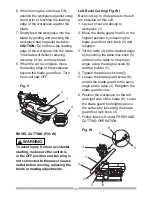
Page 28: ...the surface by loosening the blade guard foot lock knob 3 7 Follow items 4 8 under FREEHAND CUTTING OPERATION Fig W 6 1 2 3 4 5 7 8 9 6 When turning the scroll saw ON position the workpiece against scrap wood prior to touching the leading edge of the workpiece against the blade 7 Slowly feed the workpiece into the blade by guiding and pressing the workpiece down against the table CAUTION Do not fo...

Page 29: ...IP OR STRAIGHT LINE CUTTING FIG X To avoid injury from an accidental starting make sure the switch is in the OFF position and the plug is not connected to the power source outlet before moving replacing the blade or making adjustments Tools Needed Not Included 1 Raise the blade guard foot 1 by loosening the blade guard foot lock knob 2 on the right side of the upper arm Measure from the tip of the...

Page 30: ...ce the workpiece on the saw table with the workpiece hole 4 over the access hole in the table 5 4 Install the blade 3 through the hole in the workpiece and tighten the tension knob 2 5 Follow the process items 3 8 under FREEHAND CUTTING OPERATIONS 6 When finished making the interior scroll cuts simply turn the scroll saw OFF remove the blade from the blade holder and remove the workpiece from the t...

Page 31: ... brushes when either has less than 1 4 in length of carbon remaining or if the spring or wire is damaged or burned To inspect or replace brushes first unplug the saw Then remove the black plastic cap 1 on the side of the motor 2 Carefully remove the spring loaded cap Then pull out the brush and replace Replace for the other side To reassemble reverse the procedure The ears on the metal end of the a...

Page 32: ...attempt to repair this motor may create a HAZARD unless the repair is done by a qualified technician 3 Restart the saw See OVERLOAD BREAKER section Excessive vibration NOTE There will always be some vibration present when the saw is running because of motor operation 1 Improper mounting of saw 2 Unsuitable mounting surface 3 Loose table or table resting against motor 4 Loose motor mounting 1 See mo...

Page 33: ...33 33 NOTE ...

Page 34: ...SS Y 1 0FPN EXTENSION SPRING 1 2B6Z HOLD DOWN ROD 1 0FR0 SPACER 1 2CHZ BOTTOM ARM ROCKER ASS Y 06 1 0FRK BUSH 1 2CJQ COLLAR STOP 1 0FSK BELLOW 1 2KWJ UPPER ARM ROCKER ASS Y 06 1 0HFX BOLT CLAMP 1 2L8R T WRENCH 3 mm 1 0HGA BELLOWS SEAT 1 2MR7 SWITCH BOX 1 0HJM AIR DUCT ASS Y 1 2MR8 PLATE COVER 1 0J4C FLAT WASHER φ4 8 1 1 2MRA DUST PORT ADAPTER 1 0J4D FLAT WASHER φ5 10 1 2 2MRL MOTOR REAR COVER 1 0J...

Page 35: ...35 35 16 in VARIABLE SPEED SCROLL SAW MODEL NO 137 216020 SCHEMATIC OP ER AT OR S M AN UA L ...

Page 36: ...ry in items like vacuums lawn equipment and electronics call anytime for the location of your nearest Sears Parts Repair Service Center 1 800 488 1222 U S A 1 800 469 4663 Canada www sears com www sears ca To purchase a protection agreement on a product serviced by Sears 1 800 827 6655 U S A 1 800 361 6665 Canada manage my home Get it fixed at your home or ours Para pedir servicio de reparación a d...

Reviews: