7
PUSH-PULL LIQUID RECOVERY
The following is recommended to maximize recovery rates:
A. Use shortest length of 3/8” (inside) diameter refrigeration hose on suction side of unit to vapor
port on tank.
B. Use 3/8” (inside) diameter refrigerant hoses from system liquid service valve to liquid port on
tank.
C. If refrigerant is clean, remove all suction side filters, screens, etc...
D. Remove all Schrader type valve cores and any valve depressors from the hoses and service
valves.
E. Use 90 lb DOT recovery tank or larger to minimize tank change over.
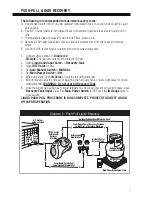
1. Connect unit as shown in
Diagram 2
EU Note
: The recovery tank must be rated for 38 bar
2. Open
Liquid and Vapor Valve
on
Recovery Tank
3. Open
OUT Valve
on unit.
4. Set
Auto-Manual Switch
to
MANUAL
.
5. Set
Main Power Switch
to
ON
.
6. When unit starts, open
IN Valve
on unit to start refrigerant flow.
7. Monitor weigh scale for increase of weight in the Recovery Tank, or view sight glass for liquid
refrigerant flow.
WARNING: Do not over fill Recovery Tank
.
8. Once the weight gain subsides or liquid refrigerant is no longer present in the sight glass, close
Recovery Tank Vapor
Valve. Set
Main Power Switch
to OFF once the
IN Gauge
pulls in
to a vacuum.
LIQUID PUSH-PULL PROCEDURE IS NOW COMPLETE. PROCEED TO DIRECT LIQUID
OR VAPOR OPERATION
LB
KG
TARE
High Capacity Charging Scale
Optional tank
overfill switch
DOT Recovery
Tank
Refrigerant
Manifold Set
A/C System
being serviced
TR700 Series
Refrigerant
Recovery
Machine
Liquid
Service
Port
Vapor
Service
Port
IN
IN
OUT
OUT
Optional Cylinder Overfill Sensor Cord
From Vapor Port of Recovery Cylinder
to Inlet Port of Recovery Machine
To Liquid Port of
Recovery Tank
From Liquid Service Port
to Refrigerant Manifold Set
Diagram 2 - Push-Pull Liquid Recovery


