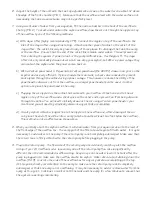
6. Adjust the height of the unit with the two top adjustment screws so the water level is about ¼” above
the edge of the front chamber.(FIG 1) Make sure that the overflow is level with the water surface, not
necessarily the tank, as some tanks may not be perfectly level. .
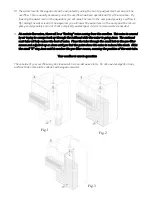
7. Using a container of water from your aquarium, fill the narrow chamber in the back of the overflow to
the top.(FIG 2) To start and maintain the siphon overflow, draw the air out through the nipple on top
of the overflow by one of the following methods:
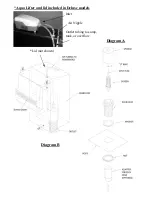
a) With Aqua Lifter (highly recommended by CPR): Connect the nipple on top of the overflow to the
inlet of the Aqua Lifter using airline tubing. Attach another piece of airline to the outlet of the
Aqua Lifter. The outlet line may be placed in any of three places for drainage: the tank, the sump,
or the overflow. Ensure that the end of the outlet line remains under water. This will prevent air
from entering the system if power is lost or the pump malfunctions. See Diagram B. The Aqua
Lifter not only constantly draws out air which can stop your siphon, but after a power outage they
can restart the siphon when the power comes back on.
b) With a Venturi powerhead: A Rejuvenation Venturi powerhead (Rio 600RV) draws in air prior to the
impeller and are very efficient. If placed inside the main tank, a check valve is needed to prevent
back siphon through the airline during a power outage. This, however, reduces the ability of the
powerhead to draw air out from the overflow, so a larger powerhead should be used. Another
option is to place the powerhead in the sump.
c) Plugging the air nipple: Use the airline that came with your overflow. Attach one end to the air
nipple on top of the overflow and a check valve on the other end to prevent air from being drawn in
through the airline. You will need to initially draw out the air using a Venturi powerhead or your
mouth and you will need to periodically draw out any air that accumulates.
d) Gravity siphon: Attach a long air line to the nipple on the overflow and, after drawing all the air
out, place the end of the airline into a sump (which should be at least two feet below the overflow).
This method is not as effective as those above.
8. When you initially start the siphon overflow, it will drain water from your aquarium down to the level of
the front edge of the overflow box. The sump part of the filter should begin to fill with water. It may be
necessary to add water to the sump if the return pump is not completely submerged. Make sure that
the return hose is firmly attached to the return pump before plugging in the pump.
9. Plug in the return pump. The flow rate of the return pump should closely match up with the overflow
rating of your CS Overflow model. Issues may arise if the return pump flow rate is significantly
different then the recommended overflow rating. Keep an eye on the water level in the tank after the
pump is plugged in to make sure the overflow starts its siphon. Water should start draining down the
overflow.(FIG 3) Look into the side of the overflow box for any air pockets accumulating at the top.
At this point, direct your attention to the sump to make sure the return pump is still completely
submerged, or that the sump is not overflowing. It may be necessary to add or remove water from the
sump at this point. Continue to monitor both the tank and the sump for a few minutes to ensure that
the system is working consistently.


