

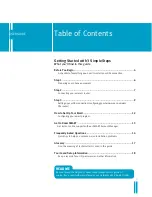


WINDOWS XP HOME/PROFESSIONAL/MEDIA CENTER EDITION
1. Select
Start
and then
Control Panel
OR
Start
and then
Settings > Control Panel
.
2. Select
Network and Internet Connections
and then select
Network Connections
OR double-click on
Network Connections
.
3. Double-click on
Local Area Connection
.
4. Click on
Properties
.
5. Highlight
Internet Protocol (TCP/IP)
by clicking on it (do not uncheck the check box).
6. Click on
Properties
.
7. Select
Obtain an IP address automatically
.
8. Select
Obtain DNS server address automatically
.
9. Click
OK
.
10. Click
OK
to close the
Local Area Connection Properties
window.
11. Close the remaining open windows.
WINDOWS 2000
1. Select
Start
and then select
Settings.
2. Select
Control Panel.
3. Double-click on
Network and Dial-up Connections.
4. Double-click on
Local Area Connection.
5. Click on
Properties.
6. Highlight
Internet Protocol (TCP/IP)
by clicking on it (do not uncheck the check box).
7. Click on
Properties.
8. Select
Obtain an IP address automatically.
9. Select
Obtain DNS server address automatically.
10. Click
OK
and close the remaining open windows.
Macintosh configuration instructions are located on the next page. After you’ve completed these instructions,
please proceed to Configuring Your Wireless DSL Router on the next page.
WINDOWS VISTA
1. Select the
Microsoft Orb
located in the bottom left corner of your screen and then
Control Panel
.
2. Under
Network and Internet
select
View network status and tasks
.
3. Select
Manage network connections
.
4. Double-click on
Local Area Connection
.
5. Click on
Properties
.
6. Highlight
Internet Protocol Version 4 (TCP/IPv4)
by clicking on it (do not uncheck the check box).
7. Click on
Properties
.
8. Select
Obtain an IP address automatically
.
9. Select
Obtain DNS server address automatically
.
10. Click
OK
.
11. Click
OK
to close the
Local Area Connection Properties
window.
12. Close the remaining open windows.
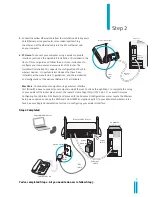
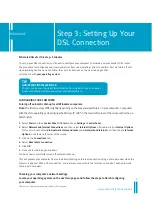
Step 3
10