

120
*240
*240
120
(Top)
1
(Rear)
3
120
120
120
120
(Front)
2
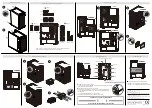
Installing water cooling radiators & cooling fans
* Please choose either of front or top to install a 240mm radiator.
* Max. component height on motherboard is 40mm.
1
1
2
3
2
3
Installing the internal 2.5
"
SSDs
RIGHT
1
2
RIGHT
LEFT
RIGHT
Removing side panels
Installing PCI-E cards
2
1
2
1
2
1
LEFT
1
2
Installing the internal 3.5
"
HDDs
RIGHT
Controlling lighting modes
Support for graphics card up to 300mm-long
RIGHT
RIGHT
2
1
RIGHT
3
4
Compucase Enterprise Co.,Ltd.
No. 225, Lane 54, An Ho Road Sec. 2 Tainan, Taiwan, R.O.C
Tel:+886-6-356-0606
Service E-Mail:[email protected]
COUGAR USA Technical Service
Tel: (833) 256-3778
Mail: [email protected]
https://cougargaming.com/support/contact/upload/
* 300 (mm) / 11.8 (in) (Only fans at the front panel)
* 270 (mm) / 10.6 (in) (Radiator with fans at the front panel)
3
First Mode: 16 Preset Lighting Effects
You can use the front panel’s RGB SW button to switch between the sixteen beautiful
lighting effects we have preset for you.
Second Mode: Motherboard Synchronization
Please use the included adaptor to connect to a compatible motherboard’s
3-pin 5V Addressable RGB header. Then, press and hold the RGB SW button
for 3-5 seconds.
※
If you press the RGB SW button for 1 second again.
It will be returned to the First mode: 16 Preset Lighting Effects
First Mode: 16 Preset Lighting Effects
Second Mode: Motherboard Synchronization
Press the RGB button for one second
Press and hold the RGB button for 3-5 seconds
For more information, please visit
Compucase Enterprise Co.,Ltd.
All rights reserved.
www.cougargaming.com
Made in China
LED Strip 1
5V Addressable Header Adapter
Power Connector
FAN1
FAN2
FAN3
LED Strip 2
FAN6
FAN5
FAN4
RGB SW button
*Please don't remove the SATA connector from the PSU
RIGHT


