background image

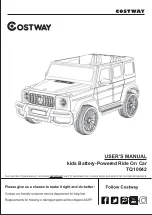
kids Battery-Powered Ride On Car

TQ10042

Summary of Contents for TQ10042

Page 1: ......

Page 2: ...kids Battery Powered Ride On Car TQ10042...

Page 3: ...ts and hardware Please ensure that all parts are correctly installed incorrect installation can lead to a danger We recommend that where possible all items are assembled near to the area in which they...

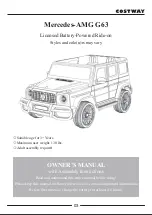
Page 4: ...ears Maximum user weight 130 lbs Adult assembly required OWNER S MANUAL with Assembly Instructions Read and understand this entire manual before using Please keep this manual for future reference as i...

Page 5: ...es Specification BATTERY INFORMATION Non rechargeable batteries are not to be recharged If removable rechargeable batteries are used they are only to be charged under adult suervision Remove rechargea...

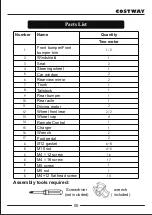
Page 6: ...7 Trunk 1 8 Tailstock 1 9 Rear bumper 1 10 Rear axle 1 11 Driving motor 2 12 Wheel front rear 2 2 13 Wheel cap 4 14 Remote Control 1 15 Charger 1 16 Wrench 2 17 Foot pedal 2 A 12 gasket 6 8 B M10 nut...

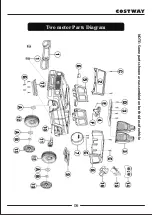
Page 7: ...NOTE Some parts shown are assembled on both sides of vehicle r Two motor Pa ts Diagram 06...

Page 8: ...ons of the vehicle periodically Do not let any child touch the wheels or be near them when the car is moving This vehicle has adjustable play seat belts Please instruct children how to tie the safety...

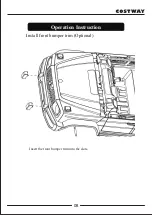
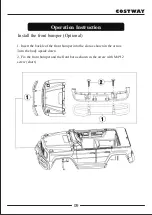
Page 9: ...a Oper tion Instruction Install front bumper trim Optional Insert the front bumper trim into the slots 08...

Page 10: ...r Optional 1 Insert the buckle of the front bumper into the slot as shown in the arrow Turn the body upside down 2 Fix the front bumper and the front bar as shown in the arrow with M4 12 screw short O...

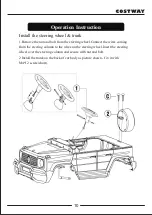
Page 11: ...e wires coming from the steering column to the wires on the steering wheel Insert the steering wheel over the steering column and secure with nut and bolt 2 Install the trunk on the back of car body a...

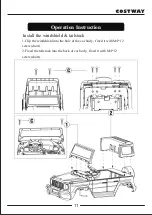
Page 12: ...nstruction 1 Clip the windshield into the hole of the car body fixed it with M4 12 screw short 2 Fixed the tailstock into the back of car body fixed it with M4 12 screw short Install the windshield ta...

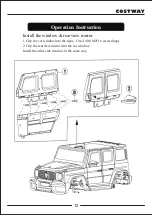
Page 13: ...n Instruction 1 Clip the car window into the door fixed with M4 16 screw long 2 Clip the rearview mirror into the car window Install the other side window in the same way Install the window rearview m...

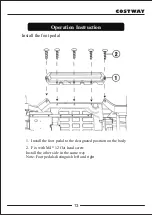
Page 14: ...ruction 1 Install the foot pedal to the designated position on the body 2 Fix with M4 12 flat head screw Install the other side in the same way Note Foot pedals distinguish left and right Install the...

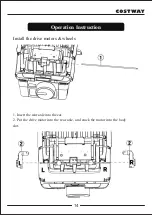
Page 15: ...Operation Instruction 1 Insert the rear axle into the car 2 Put the drive motor into the rear axle and stuck the motor into the body slot Install the drive motors wheels 14...

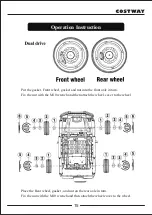
Page 16: ...and nut into the front axle in turn Fix the nut with the M10 wrench and then attach the wheel cover to the wheel Place the Rear wheel gasket and nut on the rear axle in turn Fix the nut with the M10...

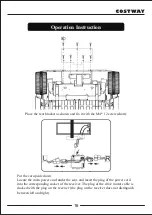
Page 17: ...t the car upside down Locate the main power cord under the seat and insert the plug of the power cord into the corresponding socket of the receiver The plug of the drive motor cable is docked with the...

Page 18: ...ation Instruction 1 Fix the upper cover seat into the corresponding buckle groove 2 Clip the lower cover cushion flat into the upper cover cushion chuck Fixed it with M4 16 screw long Install the seat...

Page 19: ...ss down the pedal the vehicle moves lifting the foot to release the pedal the vehicle will slowly brake 2 Shift switch Change the direction of the car Forward Stop Backward 3 Horn sound button Press i...

Page 20: ...button Play music 11 Next song Switch songs and long press will increase volume 12 Power button Long Press it for 3 seconds turn the vehicle on and off Short press it for 1 second stop the music from...

Page 21: ...requency binding failed Low speed LED light flashing remove the battery and repeat steps 1 3 5 If the remote control is not operated for 10 seconds the indicator light will go out and enter the power...

Page 22: ...Insert the charger jack into the charging hole of the car 2 Plug the charger plug into the stable matching AC power supply as shown in the picture ATTENTION Only an adult can charge and recharge the...

Page 23: ...e charged under adult supervision echargeable batteries are to be removed from the toy before being charged Must confirm before using that following work which is already finished Important Before usi...

Page 24: ...the charger when damage is found until it is repaired After a period of time lubricate the parts of the vehicle with a small amount of lubricating oil to prevent wear and rust This product is equippe...

Page 25: ...e the vehicle with dry soft cloth Non waxy furniture polishing material can also be used instead of soft cloth to wipe plastic parts to achieve surface finish effect Do not use chemical solvents to wi...

Page 26: ...rmal The vehicle should run The car can move but there is no sound or light The vehicle sometimes goes and sometimes stops 2 Is it driving in rough terrain 3 Check if the horizontal wheel can turn its...

Page 27: ...a residential installation This equipment generates uses and can radiate radio frequency energy and if not installed and used in accordance with the instructions may cause harmful interference to radi...

Page 28: ...o assemble this product and giving us valuable feedbacks With your inspiring rating COSTWAY will be more consistent to offer you EASY SHOPPING EXPERIENCE GOOD PRODUCTS and EFFICIENT SERVICE US office...

Reviews: