background image


17


Contera Outdoor Dome  |  Installation Manual  


7.


Use the supplied two Steel Straps to attach the Pole Mount Adapter to the pole and tighten the 
compression screws. 

8.


To attach the camera to the Wall Mount Adapter (AV-WMJB-W), reference the Installation and Wall 
Mount section. 

9.


To configure the camera, reference the camera discovery, set-up and configuration section. 


CAUTION! The captive screws must be used to properly secure the dome cover and camera housing. 
Failure to use the captive fastener may result in serious injury. When mounting the dome cover to the camera 
housing, ensure that the gasket is properly seated and not folded. Failure to do so may result in water and 
dust ingress. Water damage from improper installation is not covered by the warranty! 


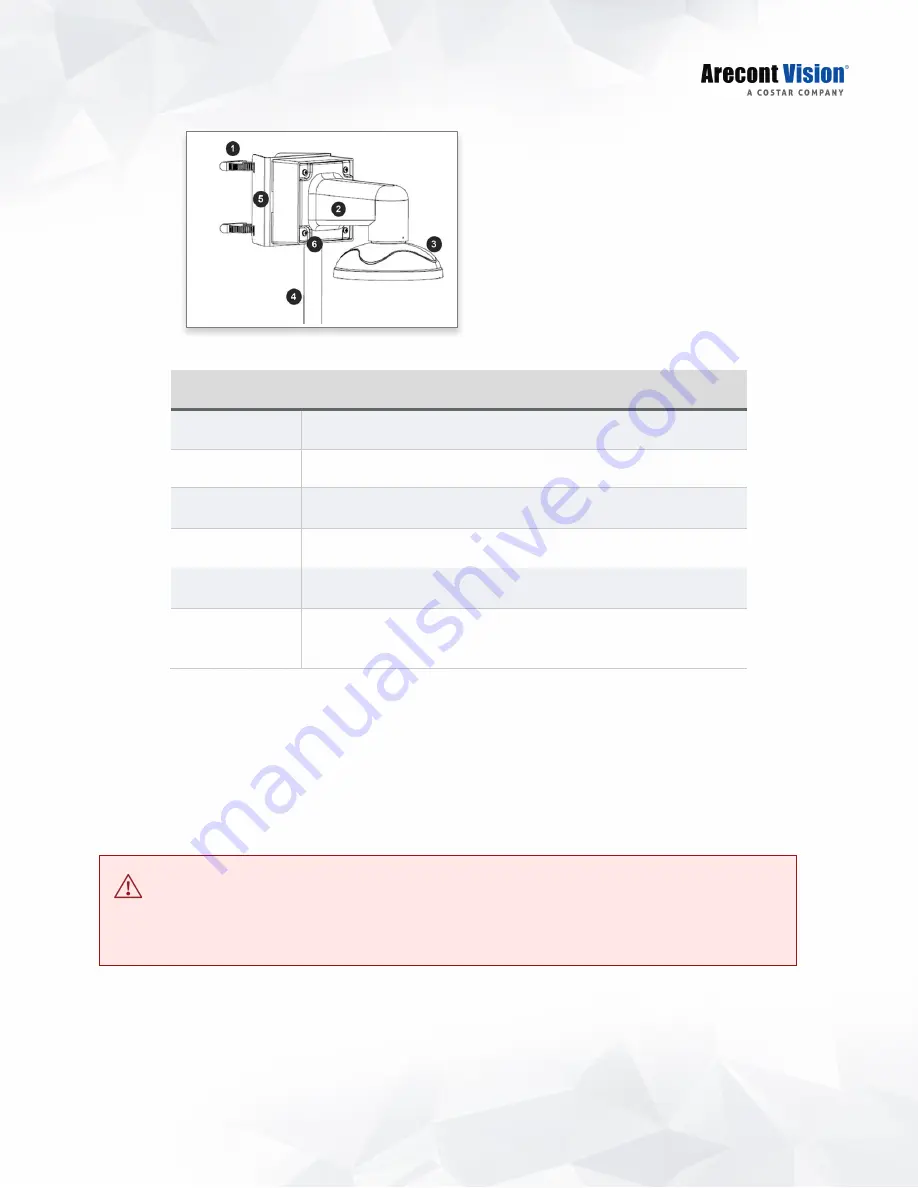
Reference # 

Description 

Steel straps with compression screws 

AV-WMJB-W wall mount 

MD-CAP-W mount cap 

Conduit pipe 

AV-PMA pole mount adapter 

Apply Teflon water seal tape to the thread of ¾” NPT pipe to 
avoid water leakage 

Summary of Contents for ARECONT VISION CONTERA

Page 1: ... 1 818 937 0700 www arecontvision com avsales arecontvision com Contera Outdoor Dome Installation Manual 1080p 5MP AV02CLD 100 AV05CLD 100 ...

Page 2: ...nt 16 Corner Mount 18 Electrical Box Adapter 20 SD Card 20 Adjusting the Pan Tilt and Focus 21 Camera Power Up 23 Alarm I O Functions 24 Audio Kit AV 1AK Installation Instructions 25 Reset to Factory Default 26 Camera Discovery Setup and Configuration 27 Camera Discovery 27 Web Interface Navigation 28 Zoom and Focus 30 Image 31 Video Audio 36 Network 39 Privacy Mask 44 Event 45 System Options 50 A...

Page 3: ...ent the Warranty Period b during the Warranty Period the Products will materially conform with the specification in the applicable documentation c all licensed programs accompanying the Product the Licensed Programs will materially conform with applicable specifications ARECONT VISION warrants to Purchaser and only Purchaser the Limited Warranty that a each Product shall be free from material defe...

Page 4: ...object in view to prevent over exposure when the object is very close to the camera Arecont Vision was the first to bring H 264 to the mainstream market and recently developed SNAPstream Smart Noise Adaptation and Processing technology for reducing bandwidth without impacting image quality Today we are proud to offer our next generation H 265 with SNAPstream smart codec capable of delivering high ...

Page 5: ...and with all local codes and authorities having jurisdiction Wiring should be UL Listed and or Recognized wire suitable for the application 3 Always use hardware e g screws anchors bolts locking nuts etc which are compatible with mounting surface and of sufficient length and construction to insure a secure mount Package Contents AV02CLD 100 AV05CLD 100 Description QTY AV02CLD 100 AV05CLD 100 IP ca...

Page 6: ...oam Do not remove screws from the dome cover The Contera Outdoor Dome camera has been designed to provide installers with flexible mounting options such as ceilings walls poles or corners NOTE When mounting the camera outdoors or in a wet environment use of supplied grommet is recommended Ensure the grommet properly seated flush with the camera housing NOTE The camera is suggested to be covered by...

Page 7: ... have the proper compatible mounting parts prior to starting your installation Pendant mount Wall mount Reference Pendant Mount Components Required 1 Pendant mount AV PMJB with integrated junction box 2 Contera Outdoor Dome camera 3 MD CAP W mounting cap ...

Page 8: ...ents Required 1 Wall mount AV WMJB W with integrated junction box 2 Contera Outdoor Dome camera 3 MD CAP W mounting cap Reference Pole Mount Components Required 1 Wall mount AV WMJB W with integrated junction box 2 MD CAP W mounting cap 3 Contera Outdoor Dome camera 4 AV PMA corner mount adapter ...

Page 9: ...Outdoor Dome Installation Manual Reference Corner Mount Components Required 1 Wall mount AV WMJB W with integrated junction box 2 MD CAP W mounting cap 3 Contera Outdoor Dome camera 4 AV CRMA corner mount adapter ...

Page 10: ...e camera installation 2 Use the supplied security L key to loosen the four 4 tamper resistant screws securing the dome cover Do not remove screws from the dome cover 3 Remove the protective foam and discard 4 Install four supplied dry wall anchors using the supplied mounting template 5 Align four supplied screws 4pcs 8 16 1 tapping screws with the dry wall anchors and screw mounting plate into pla...

Page 11: ...ort always use Teflon tape around the threads to ensure proper sealing The conduit fits NPT standard Ensure NPT port is facing downward 8 Fasten securely four captive screws 9 Attach the Dome Cover to the Contera Outdoor Dome camera and fasten securely four captive screws 10 To configure the camera reference the camera discovery set up and configuration section CAUTION The captive screws must be u...

Page 12: ...dant pole and mount is 1 5 NPT 3 Attach the wall mount to the wall using the four drywall screws provided or any optional hardware suitable for the mounting surface 4 Run the Ethernet Cable and outside power cable if necessary through the supplied rubber gasket and then through the wall mount Ensure the gasket is seated properly 5 Attach the mounting plate to the MD CAP W with the supplied screws ...

Page 13: ...ws 10 To configure the camera reference the camera discovery set up and configuration section CAUTION The captive screws must be used to properly secure the dome cover and camera housing Failure to use the captive fastener may result in serious injury When mounting the dome cover to the camera housing ensure that the gasket is properly seated and not folded Failure to do so may result in water and...

Page 14: ...ield pendant pole and mount is 1 5 NPT 3 Attach the pendant mount to the ceiling using the four wood screws provided or any optional hardware suitable for the mounting surface 4 Run the Ethernet Cable and outside power cable if necessary through the supplied rubber gasket and then through the wall mount Ensure the gasket is seated properly 5 Attach the mounting plate to the MD CAP W with the suppl...

Page 15: ...ws 10 To configure the camera reference the camera discovery set up and configuration section CAUTION The captive screws must be used to properly secure the dome cover and camera housing Failure to use the captive fastener may result in serious injury When mounting the dome cover to the camera housing ensure that the gasket is properly seated and not folded Failure to do so may result in water and...

Page 16: ...t 3 Attach the Junction Box Adapter to the Pole Mount Adapter 4 Remove the conduit plug on the junction box adapter and connect NPT conduit to the junction box adapter NOTE Use silicon or water pipe seal tape to make sure no water leakage between conduit pipe and junction box adapter 5 Run the Ethernet cable and outside power cable if necessary through the Junction Box Adapter Ensure the gasket is...

Page 17: ...st be used to properly secure the dome cover and camera housing Failure to use the captive fastener may result in serious injury When mounting the dome cover to the camera housing ensure that the gasket is properly seated and not folded Failure to do so may result in water and dust ingress Water damage from improper installation is not covered by the warranty Reference Description 1 Steel straps w...

Page 18: ...l mount 3 Attach the Junction Box Adapter to the Corner Mount Adapter 4 Remove the conduit plug on the junction box adapter and connect NPT conduit to the junction box adapter NOTE Use silicon or water pipe seal tape to make sure no water leakage between conduit pipe and junction box adapter 5 Run the Ethernet cable and outside power cable if necessary through the Junction Box Adapter Ensure the g...

Page 19: ...to properly secure the dome cover and camera housing Failure to use the captive fastener may result in serious injury When mounting the dome cover to the camera housing ensure that the gasket is properly seated and not folded Failure to do so may result in water and dust ingress Water damage from improper installation is not covered by the warranty Reference Description 1 Attach corner mount adapt...

Page 20: ...ter with the threaded holes on the electrical box Ensure every threaded hole is matched with a mounting hole 2 Attach the electrical box adapter to the user supplied electrical box SD Card Insert an SD card user supplied into the SD card slot until it locks in place The location of the SD card slot is located on the main board The SD card can only be set up via the Web Interface Note Upon insertio...

Page 21: ...move the dome cover by loosening the captive fasteners with the supplied security L key screwdriver 2 Power on the camera to adjust the pan tilt and focus 3 Remove the shroud from the camera gimbal 4 Adjust the pan and tilt rotate the lens module to obtain the desired field of view ...

Page 22: ...era Outdoor Dome Installation Manual 5 To configure the zoom focus function reference the Zoom and Focus section of the camera discovery set up and configuration 6 Install the shroud back on the camera gimbal ...

Page 23: ...ctions inside a watertight compartment Isolate unused power wires individually After connections are made ensure that the watertight compartment is tightly closed and cables and conduits are properly sealed to prevent ingress of water 1 Connect the camera to a PoE port on 100Mbps network PoE switch using an Ethernet cable 2 If the camera is powered by an outside power supply connect the power wire...

Page 24: ...e Alarm In DI connector to the alarm input sensor and connect Alarm Out DO connector to the alarm output signal To avoid any damaged please follow the specification of the part as below Alarm In Wet Contact Alarm Out Wet Contact V sense V sense I sense 4 2V 30 0 80V 50mA max ...

Page 25: ...dio cable connection jack cables through the hole on the bottom of the camera and connect them to the connectors on the circuit board 2 Connect the line in signal to LINEIN Line In and connect an active speaker with a built in amplifier to LOUT Line Out via the in line jack 3 Enable Audio function on the camera web interface ...

Page 26: ...nd release the reset button The camera has been reset to the factory default except the network settings 5 Press and hold the reset button for more than 5 seconds and release the reset button The camera has been reset to the factory 6 Or user can reset the camera to factory default via camera web interface or AV IP Utility ...

Page 27: ...r used for large installations that require an update to multiple settings or smaller installations where only one camera needs changed the AV IP Utility tool is efficient and convenient for mass or single camera uploads The AV IP Utility tool is compatible with all Contera cameras The user manual for the software is included on the CD that came with your camera or available on our website Camera ...

Page 28: ...mage Basic Image Settings WDR Wide Dynamic Range Settings IR Control OSD On Screen Display ROI Regions of Interest Zoom and Focus Zoom Focus Control Video Audio Main Stream Configuration Sub Stream Configuration Third Stream Configuration Audio Network IP Assignment QoS Quality of Service UPnP Universal Plug and Play RTSP Real Time Streaming Protocol DDNS Dynamic DNS SNMP Simple Network Management...

Page 29: ...29 Contera Outdoor Dome Installation Manual System Options Firmware Upgrade Reboot Restore Settings Date Time Administration Administrator settings Viewer Management About Support ...

Page 30: ...us after changing zoom lens group position Full range Focus Best for scenes that are completely out of focus The camera automatically scans the full focus range of the scene to find the best focus position Short range Focus Best for scenes that are slightly of out of focus The camera quickly fine tunes for a precise focus position Stop Stops any command in progress Reset Zoom and Focus Position Re...

Page 31: ...ast Manually controls Gamma level affects the overall luminance of the image Hue Configures the overall hue of the image the range is 0 100 Increasing the value will adjust the image hue towards red Decreasing the value will adjust the image hue towards blue Rotate Image 0 90 180 270 Digitally rotates image 0 90 180 or 270 Mirror Image Flip Vertically Flip Horizontally Flips the image horizontally...

Page 32: ...a is in night mode for better nighttime image quality DWDR Digital WDR DWDR is to enhance dark areas by adjusting the gamma value This will not impact FPS of 5MP camera LDR Will not combine long and short exposures into one frame resulting in better low light performance Auto Exposure Automatically adjusts illumination and exposure values Stream Profiles Balance Mode Slow Shutter Quality Mode Bala...

Page 33: ...tom Prevents flicker caused by the power line frequency of lighting Chooses 50Hz for Europe and China and 60Hz for US and Japan This parameter will have no effect when the dominate light is sunlight Or user can select frequency between 5Hz and 255Hz It will be enabled when user select Custom Day Night Mode Automatic Day Night Schedule Day Mode Automatic Enables the camera to automatically switch f...

Page 34: ...o display the text overlay Date Time Displays the current date time It will force the camera to synchronize the date time information Camera Name Displays the camera name you set Camera Name Date Time Displays both camera name and date time information Custom Text Displays a customized text ROI Regions of Interest ROI Regions of Interest is used to select which areas will be monitored and recorded...

Page 35: ...35 Contera Outdoor Dome Installation Manual ...

Page 36: ...ression Fit Video to Window Scales the full field of view image to fit the browser window When in default unselected images will be displayed in the browser at VGA resolution Control Video with Mouse No Control PTZ ROI Exposure Reference Radio buttons control various functions using the mouse to select them on screen Whichever function is selected can be controlled by left clicking in the image wi...

Page 37: ...d resolution Options vary based on the sensor resolution being used Enable SNAPstream TM Enables the SNAPstream feature on camera This feature utilizes both Smart GOP and Smart ROI to reduce bitrate without impacting the image quality Smart GOP sets GOP to automatically increase when no moving objects are detected Smart ROI will increase the bitrate of moving objects and make them clearer Variable...

Page 38: ...e main stream is up to 15 FPS GOP Length Specifies how many frames between two consecutive I Frames Video Compression MPJEG The third stream is designed for the live view on web interface and the only option of Video Compression is MPJEG Resolution The third stream is designed for the live view on web interface and the only option of Resolution is VGA Frames Per Seconds Frame rate adjustment for t...

Page 39: ...ay if the destination is on a different network Port HTTP Second HTTP Port HTTPs HTTP The port default is 80 It is used to access the camera via the web browser Second HTTP port Sets an alternative HTTP port This port can be useful when the standard HTTP port 80 is not appropriate for this camera HTTPs The port default is 443 It can be used when you use HTTPs Port Primary DNS Secondary DNS Configu...

Page 40: ...ub Stream and stream 3 Third Stream Enable RTSP Stream metadata Enables RTSP stream metadata for stream 1 Main stream stream 2 Sub Stream and stream 3 Third Stream Path Configures the pathname for each stream Link for external media players Copies the link from here for external media players Enable RTSP Multicast Stream Enables RTSP Multicast stream for stream 1 Main stream stream 2 Sub Stream an...

Page 41: ...time to live threshold of the multicast datagram before it is discarded by the router Enable DDNS Enables DDNS service Host Name Specifies the Host name registered with the DDNS server DDNS Sever Selects one of the pubic DDNS severs from the dropdown menu Options are DynDNS NO IP and Twi DNS User Name Specifies the user name of the DDNS account Password Specifies the password of the DDNS account P...

Page 42: ...assword for the Authentication Privacy Password Selects one of the encryption methods for SNMP v3 from the dropdown menu Options are DES and AES Specifies the Password for the encryption Trap Configuration Address Specifies the destination IP address to send SNMP trap messages Download MIB Clicks to download MIB file for SNMP Mode Disable Optional Disable Support for HTTP only Optional Support for...

Page 43: ...and confirms the password to access the FTP Max Connection Specifies the maximum number of FTP connections to the IP camera Protocol The default is None to disable 802 1 x functions You can select one of the protocol options from the dropdown menu The supported protocols are EAP MD5 EAP TLS EAP TTLS or EAP PEAP After the protocol has been selected manually configures the username password and othe...

Page 44: ...44 Contera Outdoor Dome Installation Manual Privacy Mask Menu Feature Description Enable Privacy Mask Creates a privacy mask on the image so the selected areas will not be visible ...

Page 45: ...lues will trigger motion only for larger objects moving through the zone lower values will cause detection of smaller objects in the zone increasing sensitivity to smaller size objects moving through the image Level Threshold Sets the sensitivity to brightness changes between dark and light objects within each grid zone As an example Detail will set the size of the object detected within the zone ...

Page 46: ...be triggered Trigger Motion Detection When a motion detection event is detected the Alarm out will be triggered Trigger Tamper Detection When a tamper detection event is detected the Alarm out will be triggered Type Selects the type N O Normal Open or N C Normal Close Off Time Specifies the alarm duration Enable Tampering Detection Enables Tampering Detection function Tampering Schedule Configures...

Page 47: ...on is supported depends on models SMTP Notification Handler From Specifies the email address of the sender Selects a desired trigger source The options are Trigger Alarm Detection Trigger Motion Detection and Trigger Tampering Alarm SMTP Server Host Address Port Username Password Authentication Host Address Specifies the host name or IP address of the SMTP server Port Specifies the port number of ...

Page 48: ...deo Mount Sets up a network connection with the network storage server All the video recordings or snapshots from event triggers will be uploaded to the network storage server After the setting is complete the Network Storage Status field will display ok Remove Deletes the previous setting After the setting is removed the Network Storage Status field will display not_mounted Network Storage Handle...

Page 49: ...e SD card if it is installed Format SD Card Erases all the data stored on the SD Card Usage Displays the total storage that has been used now Status Displays the status whether the SD card is installed or not not_mounted or ok Overwrite when storage full Enables overwriting the SD card if the storage is full Recoding Type Specifies the desired action to record a stream The options are Snapshot and...

Page 50: ... camera Restore Factory Default Settings Except Network Settings Restores all settings to factory default except the network settings Restore to Factory Default Settings Restores all settings to factory default Get Time from NTP Server Computer System NTP Server Synchronizes the date time information with defined NTP server After setting up the desired Time zone and NTP Server clicks Apply NTP Ser...

Page 51: ...e changed Admin full access to all camera settings and live video Admin Password Specifies the password for the administrator Confirmation Re enters the password for the password validation Set Erase Saves or removes the password Note If admin password was set but has been lost it can be erased by AV IP Utility using the key file Please contact Arecont Vision technical support to obtain the key fi...

Page 52: ...e camera Clicks New User Delete User to create or remove a user account User Name Specifies the user name It must be at least five and up to sixteen characters Viewer Password Specifies the password for the viewer Confirmation Re enters the password for the password validation Access Level Defines the authorization level for the user Admin or Viewer Set Erase Save or removes the password ...

Page 53: ...port Menu Feature Description About Displays the information of the camera Model Name Firmware Serial Number and MAC Address Menu Feature Description Support Provides several useful hyperlinks for users who would like to get more information of the camera ...

Page 54: ...ut written permission from Arecont Vision The information in this publication is believed to be accurate in all respects However Arecont Vision cannot assume responsibility for any consequences resulting from the use thereof The information contained herein is subject to change without notice Revisions or new editions to this publication may be issued to incorporate such changes ...

Page 55: ...165mm 165mm Mounting Template E E E E ...

Reviews: