Costar Video Systems CDIH226V Quick Installation Manual Download Page 4


                 Quick Installation Guide 


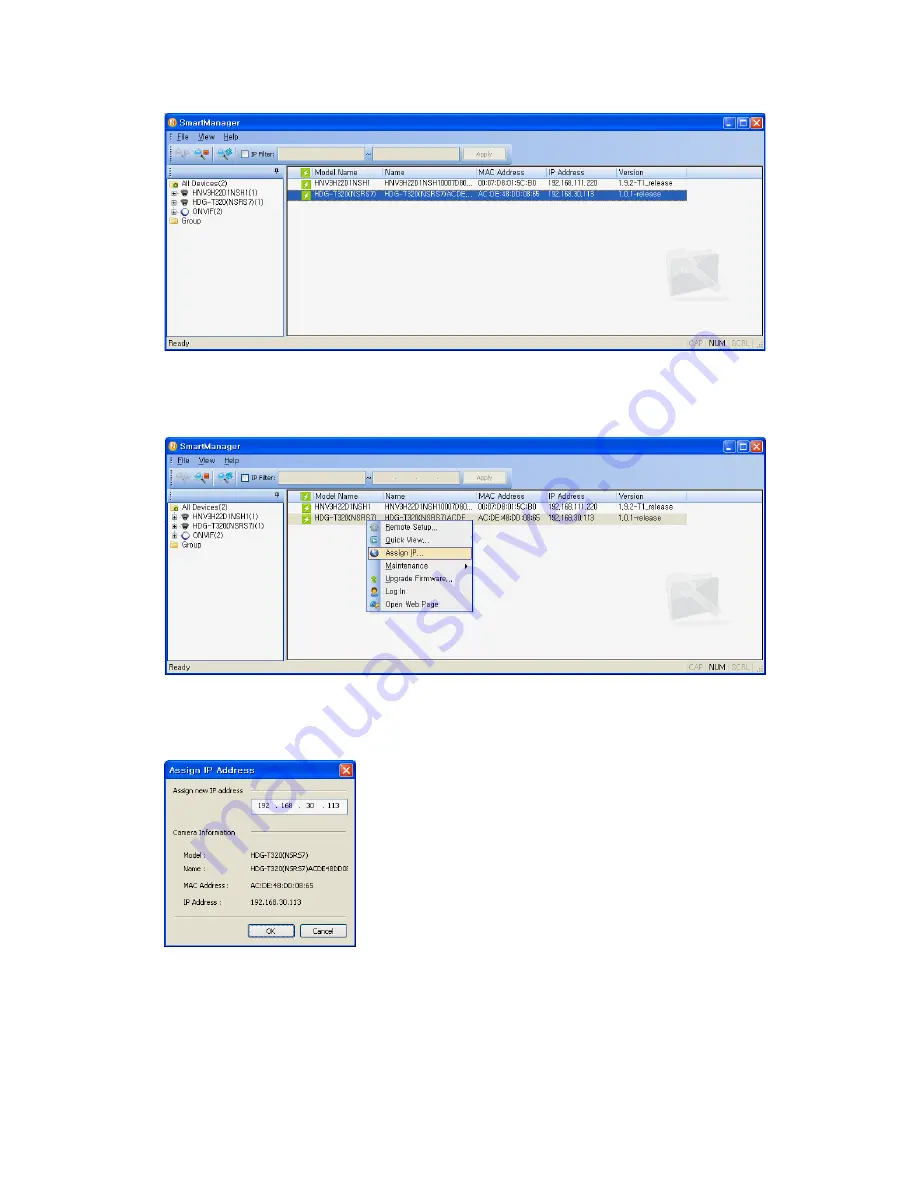
3.  Select the camera on the list and click right button of the mouse. You can see the pop-up menu 

as below. 


4.  Select Assign IP. You cam see a Assign IP window. 
    Enter the required IP address. 


Note

: For more information, refer to the Smart Manger User’s   


Manual. 


Summary of Contents for CDIH226V

Page 1: ... it available on the network as real time full frame rate Motion JPEG and H 264 or MPEG 4 video streams The alarm input and alarm output can be used to connect various third party devices such as door sensors and alarm bells Installation Steps Follow these steps to install the Network Transmitter on your local network LAN 1 Check the package contents against the list below 2 Connect the Network Ca...

Page 2: ...rea to be monitored 2 Extension Cable 26pin camera extension cable Extension Cable NO Wire Color Description 1 Red AC24V DC12V White AC24V GND Main Power 2pin terminal DC12V AC24V 330mA 4 0W 2 Green AC24V DC12V Black AC24V GND Heater Power 2pin terminal max 10Watt DC12V max 20Watt AC24V 3 Pink Alarm In Yellowish Green GND Yellow AD Key Brown GND Light Blue Alarm Out Gray GND Alarm Input AD Key Inp...

Page 3: ...talling lens Set Video Switch SW2 on the board to On position to output the video signal Video Output is restricted to VGA 640x480 resolution Caution After lens installation you must set Video Switch to Off position to provide the best performance of the Network Camera Connecting the Power Connect the power of DC12V or AC24V 330mA for the network camera Connect the positive pole to the position an...

Page 4: ...e camera on the list and click right button of the mouse You can see the pop up menu as below 4 Select Assign IP You cam see a Assign IP window Enter the required IP address Note For more information refer to the Smart Manger User s Manual ...

Page 5: ...Live View or Setup to enter web page 4 The encoder s Live View page appears in your browser 3 2 Access from the internet Access from the internet once connected the Network Camera is accessible on your local network LAN To access the video encoder from the Internet you must configure your broadband router to allow incoming data traffic to the video encoder To do this enable the NAT traversal featu...

Page 6: ...720 720x480 576 640x480 352x240 288 and 320x240 Users are allowed to select the most suitable one out of those modes Please adjust the mode in accordance with your PC specifications and monitoring purposes 1 General controls Live View Page Search Playback Page Setup Page Help Page The video drop down list allows you to select a customized or pre programmed video stream on the live view page Stream...

Page 7: ...ll the entire screen area No other windows will be visible Press the Esc button on the computer keyboard to cancel full screen view The Manual Trigger button activates a pop up window to manually start or stop the event Use this scale to control the volume of the speakers Use this scale to control the volume of the microphone Use this scale to control the volume of the speakers and microphones 3 V...

Page 8: ...Network Camera to the original factory settings go to the Setup System Maintenance web page described in 3 5 5 System Maintenance of the User s Manual or use the control button on the network camera as described below Follow the instructions below to reset the Network Camera to the factory default settings using the Reset Button 1 Switch off the Network Camera by disconnecting the power adapter 2 ...

Reviews: