Parts Identification /
Identifikasi Peralatan
Specification /
Spesifikasi
Petunjuk Pemasangan /
Installation Guide
Important Safeguards /
Petunjuk Keselamatan
1
1
2
3
4
5
6
7
8
9
10
11
12
16 - COD
16 - COCN
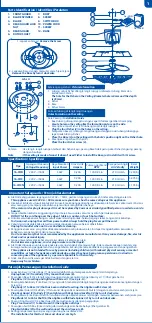
1.
FRONT GUARD
2.
BLADE SPINNER
3.
BLADE
4.
REAR GUARD LOCK
NUT
5.
REAR GUARD
6.
ROTOR SHAFT
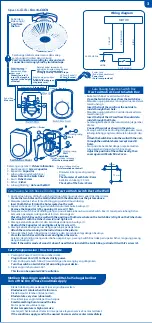
1. Lepaskan Screw /
Remove the Screw
2. Lepaskan Base dengan memutar searah jarum jam
Remove the Base by turn it clockwise
1. Lubang untuk Fisher dilangit-langit ruangan (diameter lubang 8mm dan
kedalaman 35mm)
The hole for the Fisher on the Ceiling (diameter hole is 8mm and the depth
is 35mm)
2. Fisher
3. Base
4. Fisher Screw
7.
BODY
8.
SCREW
9.
SWITCH BOX
10. POWER CORD
11. SCREW
12. BASE
Formasi lubang di langit-langit ruangan
Holes Formation on the ceiling
Cara Pasang /
Installation Guide
1. Buat lubang dilangit-langit ruangan seperti formasi gambar di samping.
Create holes on the ceiling like the formation picture on the side.
2. Pasang ke empat Fisher (2) di lubang langit-langit ruangan.
Plug the four Fisher (2) in the holes on the ceiling.
3. Tempatkan Base (3) dilangit- langit ruangan dengan posisi lubang-lubangnya
tepat pada lubang Fisher.
Place the Base (3) on the ceiling with the hole’s position right on the Fisher hole.
4. Pasang ke empat baut Fisher (4).
Place the four Fisher screw (4).
Catatan
: Jika langit- langit ruangan terbuat dari bahan kayu, pasang Base tidak perlu pakai Fisher, langsung pasang
dengan bautnya.
Note
: If the ceiling is made of wood, it doesn’t need Fisher to install the Base, just install it with it’s screw.
Gbr. A
2
1
3
4
40
40
ø8
ø8
ø8
ø8
Keterangan gambar /
Picture Information
l
Alat ini menggunakan tegangan AC 220 V~ / 50Hz, pastikan tegangan di rumah Anda sama dengan alat ini.
This appliance uses AC 220 V~ / 50Hz, make sure your home has the same voltage as this appliance.
l
Jika kabel listrik atau tusuk kontak alat ini rusak, maka penggantian harus dilakukan oleh service center resmi Cosmos
atau orang yang mempunyai keahlian sejenis untuk menghindari bahaya.
If the main cord or plug is damaged, it must be replaced by Cosmos or similarly qualified person in order to avoid a
hazard.
l
Jangan biarkan kabel menggantung di tepi meja atau counter, atau menyentuh permukaan panas.
DO NOT let the cord hang over the edge of table or counter, or touch hot surface.
l
Untuk memutuskan sambungan, cabut steker dari stopkontak. Selalu pegang steker. Jangan tarik kabelnya.
To disconnect, unplug the cord from power outlet. Always hold the plug. Never pull the cord.
l
Cabut dari stopkontak bila alat sedang tidak digunakan atau sebelum dibersihkan.
Unplug from outlet when not in use and before cleaning.
l
Penggunaan aksesori yang tidak direkomendasikan oleh produsen alat. Ini dapat mengakibatkan kerusakan,
kebakaran, sengatan listrik dan/ atau cedera.
Don't use accessory that is not recommended by the appliances manufacturer. It may cause damage, fire, electric
shock and/or personal injury.
l
Jangan merendam alat, kabel atau steker dalam air atau cairan lain.
Do not immerse appliance, cord or plug in water or other liquid.
l
Alat tidak digunakan untuk anak-anak atau orang dengan kemampuan fisik, indera atau kecakapan mental yang
kurang atau kurang pengalaman dan pengetahuan, kecuali jika mereka diberikan pengawasan dan pengarahan.
This appliance is not intended for use by persons (including children) with reduced physical sensory or mental
capabilities, or lack of experience and knowledge, unless they have been given supervision or instruction
concerning use of the appliance by a person responsible for their safety.
l
Anak-anak harus diawasi agar tidak bermain dengan alat ini.
Keep away from children.
1. Lepaskan Base (12) dari Body (7) dengan terlebih dahulu melepaskan Screw (8) dari tempatnya.
Unplug base (12) from Body (7) by loosen the Screw (8).
2. Pasangkan Base (12) ke langit-langit ruangan dan kencangkan dengan Bautnya (11) (lihat gambar A).
Plug Base (12) to ceiling and tighten with Screw (11) (see. pic . A).
3. Pasang kembali Body (7) ke Base (12) yang sudah menempel dilangit-langit ruangan,kemudian kencangkan dengan
Screw (8).
Plug body (7) to Base (12) that has been installed to ceiling, then tighten with Screw (8).
4. Pasang Rear Guard (5) ke Body (7) lalu kunci dengan Rear Guard Lock Nut (4) dengan memutar searah jarum jam.
Plug Rear Guard (5) to Body (7) then tighten with Rear Guard Lock Nut (4) by turn it clockwise.
5. Pasang Blade (3) ke Rotor Shaft (6) lalu kunci dengan Blade Spinner (2) dengan memutar berlawanan arah jarum jam.
Plug Blade (3) to Rotor Shaft (6) then tighten with Blade Spinner (2) by turn it anticlockwise.
6. Pasang Front Guard (1) ke Rear Guard (5) kemudian kunci dengan penjepitnya.
Plug Front Guard (1) to Rear Guard (5) then tighten all clips.
7. Pasangkan Switch Box (9) ke dinding dan sambungkan kabel-kabelnya (lihat gambar B).
Plug Switch Box (9) to the wall and connect the cord (see.pic. B).
8. Ketinggian pemasangan kipas angin gantung harus diatas 2,3m.
The installation for this Duct Fan must above 2.3m high.
16-COD
220 V~ /50Hz
46W
0,20A
1200 r/min
210 m/min
3,230 Kg
3,135 Kg
3,475 Kg
210 m/min
210 m/min
220 V~ /50Hz
16-COC
16-COCN
220 V~ /50Hz
46W
46W
0,20A
0,20A
1200 r/min
1200 r/min
Tegangan/Frekuensi
Voltage/Frequency
Tipe
Daya Masukan
Input Power
Putaran per Menit
RPM
Arus Listrik
Ampere
Kecepatan Angin
Air Velocity
Berat
Weight


