8
B345887218PCOM
0
14 /24
?? www.ameriwood.com ??
finished edgeborde acabadobord fini
UNLOCK
LOCK
APRETAR
DESAPRETAR
OUVRIR
SERRER
C
B
F
E
K
N
I
H
Page 1: ...individuels ne gardent pas de pi ces If a part is missing or damaged please visit our website or call our toll free customer service line We will gladly ship your replacement parts FREE of charge Si...
Page 2: ......
Page 3: ...r stamped on a raw edge Nota algunas partes est n marcados con una etiqueta y algunas partes tienen una letra impresa en un borde Veuillez noter que certaines parties sont tiquet s avec un autocollant...
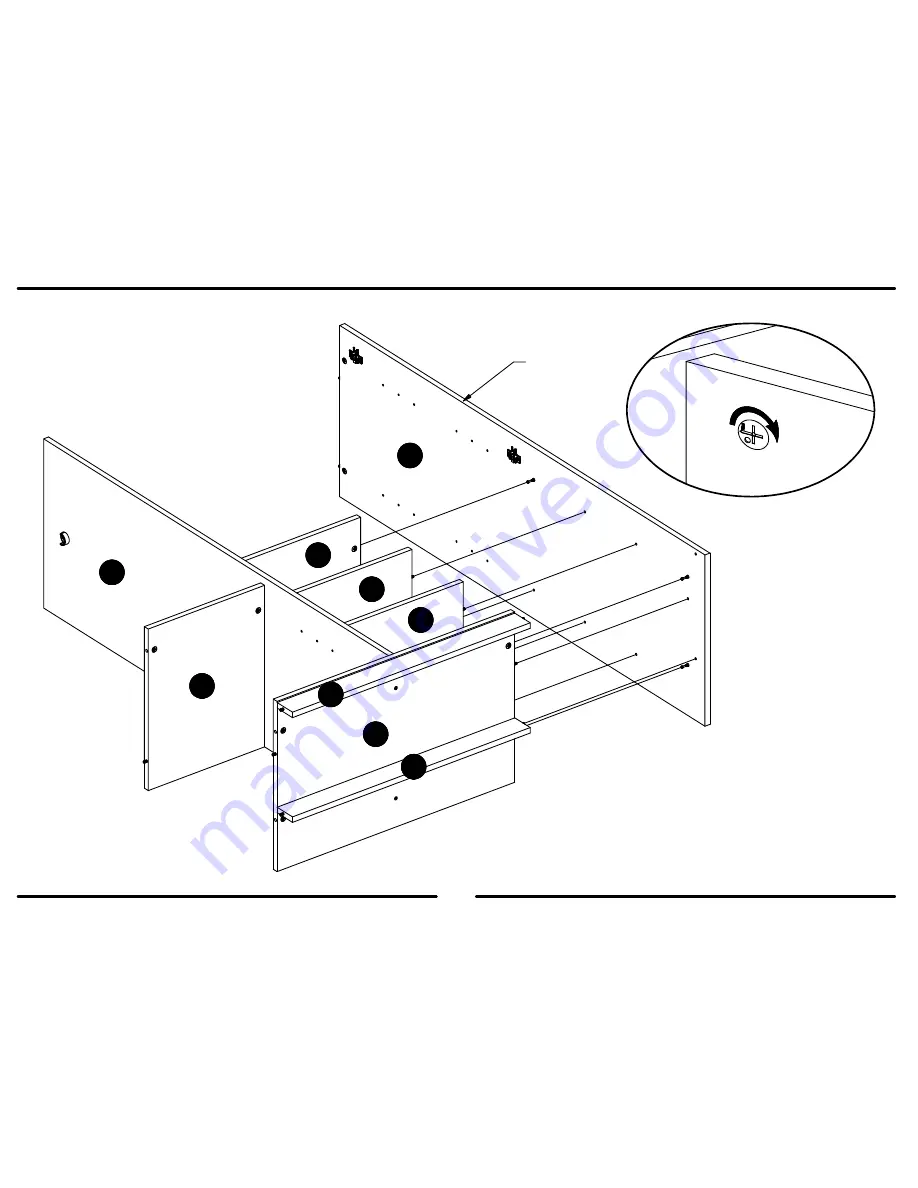
Page 4: ...ANTE FIJO IZQUIERDO TABLETTE FIXE GAUCHE 35887218060 1 F ESTANTE REGULABLE IZQUIERDO GAUCHE TAG RE R GLABLE 35887218070 1 G ESTANTE SUPERIOR DERECHO PLATEAU DROIT SUP RUEUR 35887218080 1 H ESTANTE FIJ...
Page 5: ...14 x A21660 wood dowel clavija de madera goujon de bois 3 21 x 4 2 A12930 1 1 8 pan head 1 1 8 cabeza redondo 1 1 8 vis x A53600 angle bracket support de l angle anaquel del ngulo 5 6 x 6 12 A12210 1...
Page 6: ...i tese Serrez pour mettre le si ge bien en place Ne pas trop serrer Proper orientation of cam La orientaci n apropiada de leva Bonne orientation de la came 1 This illustration shows how the CAM fasten...
Page 7: ...trique ou un tournevis lectrique pour le vissage sachez pour ralentir et arr ter lorsque la vis est serr e Faute de quoi vous risquez dans la vis se d shabillant x 1 2 x 2 3 xx 1 9 x 13 1 x 3 1 x 15 3...
Page 8: ...tion to face out Secci n larga a hacer frente hacia fuera La section longue orient e vers l ext rieur 3 1 2 15 finished edge borde acabado bord fini Approx 7 16 3 Proper orientation of CAM LOCK Posici...
Page 9: ...x 1 2 x 3 1 Approx 7 16 3 x 2 3 xx 1 9 TURN OVER VUELTA A RETOURNEZ C C 1 3 13 9 2 finished edge borde acabado bord fini x 13 1 Proper orientation of CAM LOCK Posici n correcta de la cerradura de leva...
Page 10: ...eriwood com x 3 6 x 1 4 Approx 7 16 3 x 5 6 x 6 12 finished edge borde acabado bord fini 3 3 3 3 1 E K 5 6 6 K 1 N N Proper orientation of CAM LOCK Posici n correcta de la cerradura de leva Bonne orie...
Page 11: ...om H F I X2 x 1 4 x 3 12 x 7 6 x 10 6 Approx 7 16 3 1 1 3 3 3 7 10 7 7 K E finished surface superficie acabado surface fini N Proper orientation of CAM LOCK Posici n correcta de la cerradura de leva B...
Page 12: ...www ameriwood com finished edge borde acabado bord fini unfinished surface superficie inacabado surface non fini unfinished surface superficie inacabado surface non fini F H I I C UNLOCK LOCK APRETAR...
Page 13: ...7 B345887218PCOM0 13 24 www ameriwood com F H I I E K x 8 2 8 C N...
Page 14: ...8 B345887218PCOM0 14 24 www ameriwood com finished edge borde acabado bord fini UNLOCK LOCK APRETAR DESAPRETAR OUVRIR SERRER C B F E K N I I H...
Page 15: ...9 B345887218PCOM0 15 24 www ameriwood com UNLOCK LOCK APRETAR DESAPRETAR OUVRIR SERRER F K E I I H B A finished edge borde acabado bord fini N...
Page 16: ...10 B345887218PCOM0 16 24 www ameriwood com x 14 1 14a 14b 14c 14d x 2 6 x 7 2 x 10 2 7 10 D 2 2 14a 14b finished edge borde acabado bord fini...
Page 17: ...11 B345887218PCOM0 17 24 www ameriwood com UNLOCK LOCK APRETAR DESAPRETAR OUVRIR SERRER finished edge borde acabado bord fini D A E K F I I H B N...
Page 18: ...ebe ser igual como se muestra por favor Assurez vous que le meuble est galit La distance de coin en coin doit tre gale comme montr Attach the back panel so that the bottom edge is even with the bottom...
Page 19: ...13 B345887218PCOM0 19 24 www ameriwood com x 15 5 15 15 L M...
Page 20: ...n la pared Golpea la ancla de pared 14d en el agujero hasta que sea parejo Abroche la escuadra de pared 14a al la ancla de la pared 14d con el tornillo 14c Option 2 Percez un trou de 3 16 de diam tre...
Page 21: ...ety bracket attachment DO NOT remove the top of the unit Observe por favor La unidad de encima no demuestra la visibilidad del accesorio del soporte de seguridad No quite la parte de encima de la unid...
Page 22: ...le c t envisagent Loosen screw C Turn screw B to move door Tighten screw C Suelte el tornillo C D vuelta el tornillo B para mover la puerta Ajuste el tornillo C D faites le vis C Le vis du tour B d p...
Page 23: ...tela inatale fondos y adjunter perillas como se muestra D plier les bacs de tissu installez fonds et fixer les boutons comme indiqu Install the fabric bins as shown Instale los contenedores de tela c...
Page 24: ...u causer des blessures graves wardrobe rod barra del armario tringle a cintres 25 lbs 11 3 kg 20 lbs 9 07 kg assembled weight peso montado poids assembl 153 lbs 69 4kg Certificate of Conformity 1 This...